Warning: This Japanese translation is incomplete.
For information on how to help with translating content, see Translating articles
Important:
LoopBackがどのように動くかを理解するには**まずこのページをお読みください。次に、LoopBackアプリケーションを作成するための基本的な紹介として Getting started with LoopBack を参照してください。
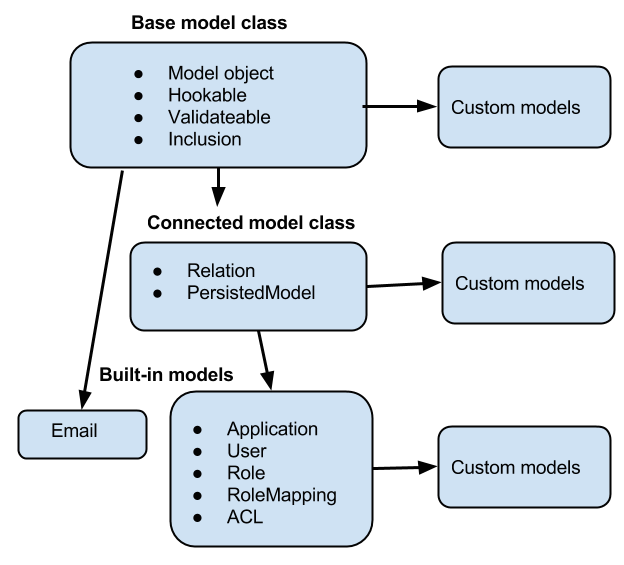
Model inheritance
 </figure>
Models
_モデル_はLoopBackの中心部にあり、データベースやその他のサービス(RESTやSOAP等)のようなバックエンドデータソースを代表します。LoopBackのモデルは、NodeとRESTの両方のAPIを備えたJavaScriptオブジェクトです。
モデルはLoopBackの強力な主要機能です。モデルを定義すると、CRUD(create, read, update, delete)のすべての操作が可能な、事前定義されたREST APIが自動的に提供されます。
基本的なモデルオブジェクトにはフックを追加するためのメソッドと、 データバリデーションのためのメソッドが備わっています。その他のモデルはすべて基本的なモデルオブジェクトから「継承」されています。モデルには、右図に示すような継承ヒエラルキーがあります。モデルに永続データソースをアタッチすると、接続されたモデル(Connected model)となり、CRUD操作が提供されます。LoopBackの組み込みモデルはそれらから継承しています。
ビルトインモデル
すべてのLoopBackアプリケーションは、User、Role、Applicationのような事前定義されたビルトインモデルを備えています。こういったありふれたモデルを一から作る必要はありません。
カスタムモデル
あなたのアプリケーションに特化したカスタムモデルを定義することができます。User、Applicationなどのビルトインモデルの既存機能をもとに、ビルトインモデルを継承してモデルを作成することもできます。
You can create LoopBack models in various ways, depending on what kind of data source the model is based on. You can create models:
- With the model generator,
slc loopback:model. - From an existing relational database using model discovery. Then you can keep your model synchronized with the database using LoopBack’s schema / model synchronization API.
- By instance introspection for free-form data in NoSQL databases or REST APIs.
All three of these methods create a Model definition JSON file that defines your model in LoopBack, by convention in a LoopBack project’s common/models directory; for example, common/models/Account.json.
You can also create and customize models programmatically using the LoopBack API, or by manually editing the Model definition JSON file. In most cases, you shouldn’t need to use those techniques to create models, but generally will to customize models for your use.
Note:
モデル定義JSONファイルは、LoopBackがモデルにユニークな id プロパティを自動的に付加するかどうかを示す idInjection プロパティを含みます。モデルをデータベースに接続する場合、id プロパティはプライマリキーに相当します。詳しくは ID properties を参照して下さい。
モデルの関連
BelongsTo、HasManyやHasAndBelongsToManyといったような、モデル間の関連 を記述することができます。
モデルのCRUD操作
データベースのような永続化データソースとモデルを接続すると、PersistedModel クラスから継承したCRUD操作(create, read, update, delete)を備える connected model になります。
| 操作 | REST | LoopBack model メソッド (Node API)* |
対応する SQL 操作 |
|---|---|---|---|
| Create | create()* |
INSERT | |
| Read (取得) | GET /modelName?filter=... | find()* |
SELECT |
| Update (編集) | updateAll()* |
UPDATE | |
| Delete (破棄) | DELETE /modelName/modelID | destroyById()* |
DELETE |
*主要なメソッドのみ例示しましたが、他のメソッドも同様の機能を提供しています。他には findById(), findOne(), and findOrCreate() などがあります。詳しくは PersistedModel API documentation を参照してください。
アプリケーションロジック
いくつかの方法で、カスタムアプリケーションロジックを追加することができます。下記のことが可能です:
- リモートメソッド(カスタムRESTエンドポイント)経由でアプリケーションロシックをモデルに追加します。リモートフックはリモートメソッドによりトリガされ、オペレーションフックはモデルのCRUDメソッド経由でトリガされます。
- アプリケーション起動時に実行される「ブートスクリプト」を追加します。
- カスタムミドルウェアを定義します。カスタムミドルウェアは、Expressのミドルウェアと似たものです。
モデルとバックエンドデータストアにデータを保存する前に、データバリデーションを実行するため、コードを追加することもできます。
ミドルウェアフェーズ
RESTエンドポイントに対してHTTPリクエストが発行されたとき、_ミドルウェア_は実行されるファンクションを参照します。LoopBackはExpressをベースにしているため、LoopBackのミドルウェアはExpressのミドルウェアと同じです。しかしLoopBackでは、ミドルウェアの実行順序を明確にするために、Expressミドルウェアにフェーズのコンセプトを追加しています。Expressミドルウェアでは実行順序に起因する問題が発生することがありますが、フェーズを使うことでこの問題を回避しやすくなります。
詳しくはDefining middlewareを参照してください。
データソースとコネクタ
 </figure>
LoopBackはデータベースやREST API、SOAP Webサービス、ストレージサービスなどのバックエンドサービスを一般化します。
データソースはデータベースやその他のバックエンドサービスと直接通信する「コネクタ」によって支援されます。アプリケーションはコネクタを直接使うことはなく、DataSourceとPersistedModel APIを使ったデータソース経由で利用します。
LoopBack コンポーネント
LoopBack コンポーネントは、追加の「プラグイン」機能を提供します:
- Push notifications - モバイルアプリに対して、「バッジ」やアラート、ポップアップメッセージのような形で端末上に即座に表示される情報の送信を可能にします。
- Storage service - サーバのファイルシステムと同様に、クラウドストレージプロバイダ(Amazon、Rackspace、Openstack、Azure)へのアップロード及びダウンロードを可能にします。
- Third-party login - Facebook、Google、Twitter、GithubまたはOAuth、OAuth 2、OpenIDをサポートしているシステムのサードパーティ証明書を利用して、Passportと連携したユーザログイン(及びアカウントのリンク)を可能にします。
- Synchronization - モバイルアプリケーションでのオフライン操作と、再接続時のサーバアプリケーションとのデータ同期を可能にします。
- OAuth 2.0 - アクセス制限されたAPIエンドポイントへの認証とオーソライズを行う OAuth 2.0プロバイダ機能をLoopBackアプリケーションに追加します。
開発ツール
LoopBackは2つの主要な開発ツールを提供してします:
slc loopback… LoopBackアプリケーションの生成と編集のためのコマンドラインツールです。
slc loopback コマンドラインツールは対話的なプロンプトで開発手順をガイドします:
- Start with the application generator to initially create and scaffold the basic structure of the application:
slc loopback. - Add models (and model properties) using the model generator:
slc loopback:model. If you need to add properties to existing models, use the property generator,slc loopback:property. - Add data sources using the data source generator,
slc loopback:datasource. - Add relationships between models with the relation generator,
slc loopback:relation.
Examples
StrongLoop provides numerous LoopBack example applications. The table below lists some of the key examples. Refer to https://github.com/strongloop/loopback-example for a complete list.
| Name | Description |
|---|---|
| loopback-getting-started | The basics of LoopBack. Follow along in Getting started with LoopBack to build the example. |
| loopback-getting-started-intermediate | Full-stack example that builds on loopback-getting-started to demonstrate intermediate level features of LoopBack. Follow instructions in Getting started part II to build the example. |
| loopback-example-mongodb | LoopBack with MongoDB. |
| loopback-example-mssql | LoopBack with Microsoft SQL Server. |
| loopback-example-mysql | LoopBack with MySQL. |
| loopback-example-oracle | LoopBack with Oracle. |
| loopback-example-postgresql | LoopBack with PostgreSQL. |
| loopback-example-relations | Model relations and filtering via REST |
| loopback-example-app-logic | How to add your own logic to a LoopBack app |
| loopback-example-access-control | Controlling access to your API endpoints |