Building an Online Game With LoopBack 4 - User Authentication and Role-Based Access Control (Part 4)

Originally published on strongloop.com
Part 4: User Authentication and Role-Based Access Control
In This Episode
We already have some APIs that allow users to customize their characters. However, a user should not get access to characters that belong to other users. With that in mind, we will add user authentication and role-based access control to this project.
You can check here for this episode's code.
Introduction
In this series, I’m going to help you learn LoopBack 4 and how to use it to easily build your own API and web project. We’ll create a new project I’ve been working on: an online web text-based adventure game. In this game, you can create your own account to build characters, fight monsters and find treasures. You will be able to control your character to take a variety of actions: attacking enemies, casting spells, and getting loot. This game also allows multiple players to log in and play with their friends.
Previously on Building an Online Game With LoopBack 4
In the last episode, we created customized APIs to manage weapon, armor, and skill for character.
Here are the previous episodes:
- Part 1: Building a Simple LoopBack Project With MongoDB
- Part 2: Generating Universally Unique ID and Managing Models Relationships
- Part 3: Customizing APIs in Controller
Basic Structure
LoopBack 4 provides us a built-in authentication package. This package includes an authentication system as the skeleton to verify the identity of a request. It invokes an authentication strategy provided by the developer to process the authentication information in the request and to then return the corresponding user profile.
In this episode, I will combine LoopBack authentication package with my self-defined authorization. This diagram shows the basic structure:
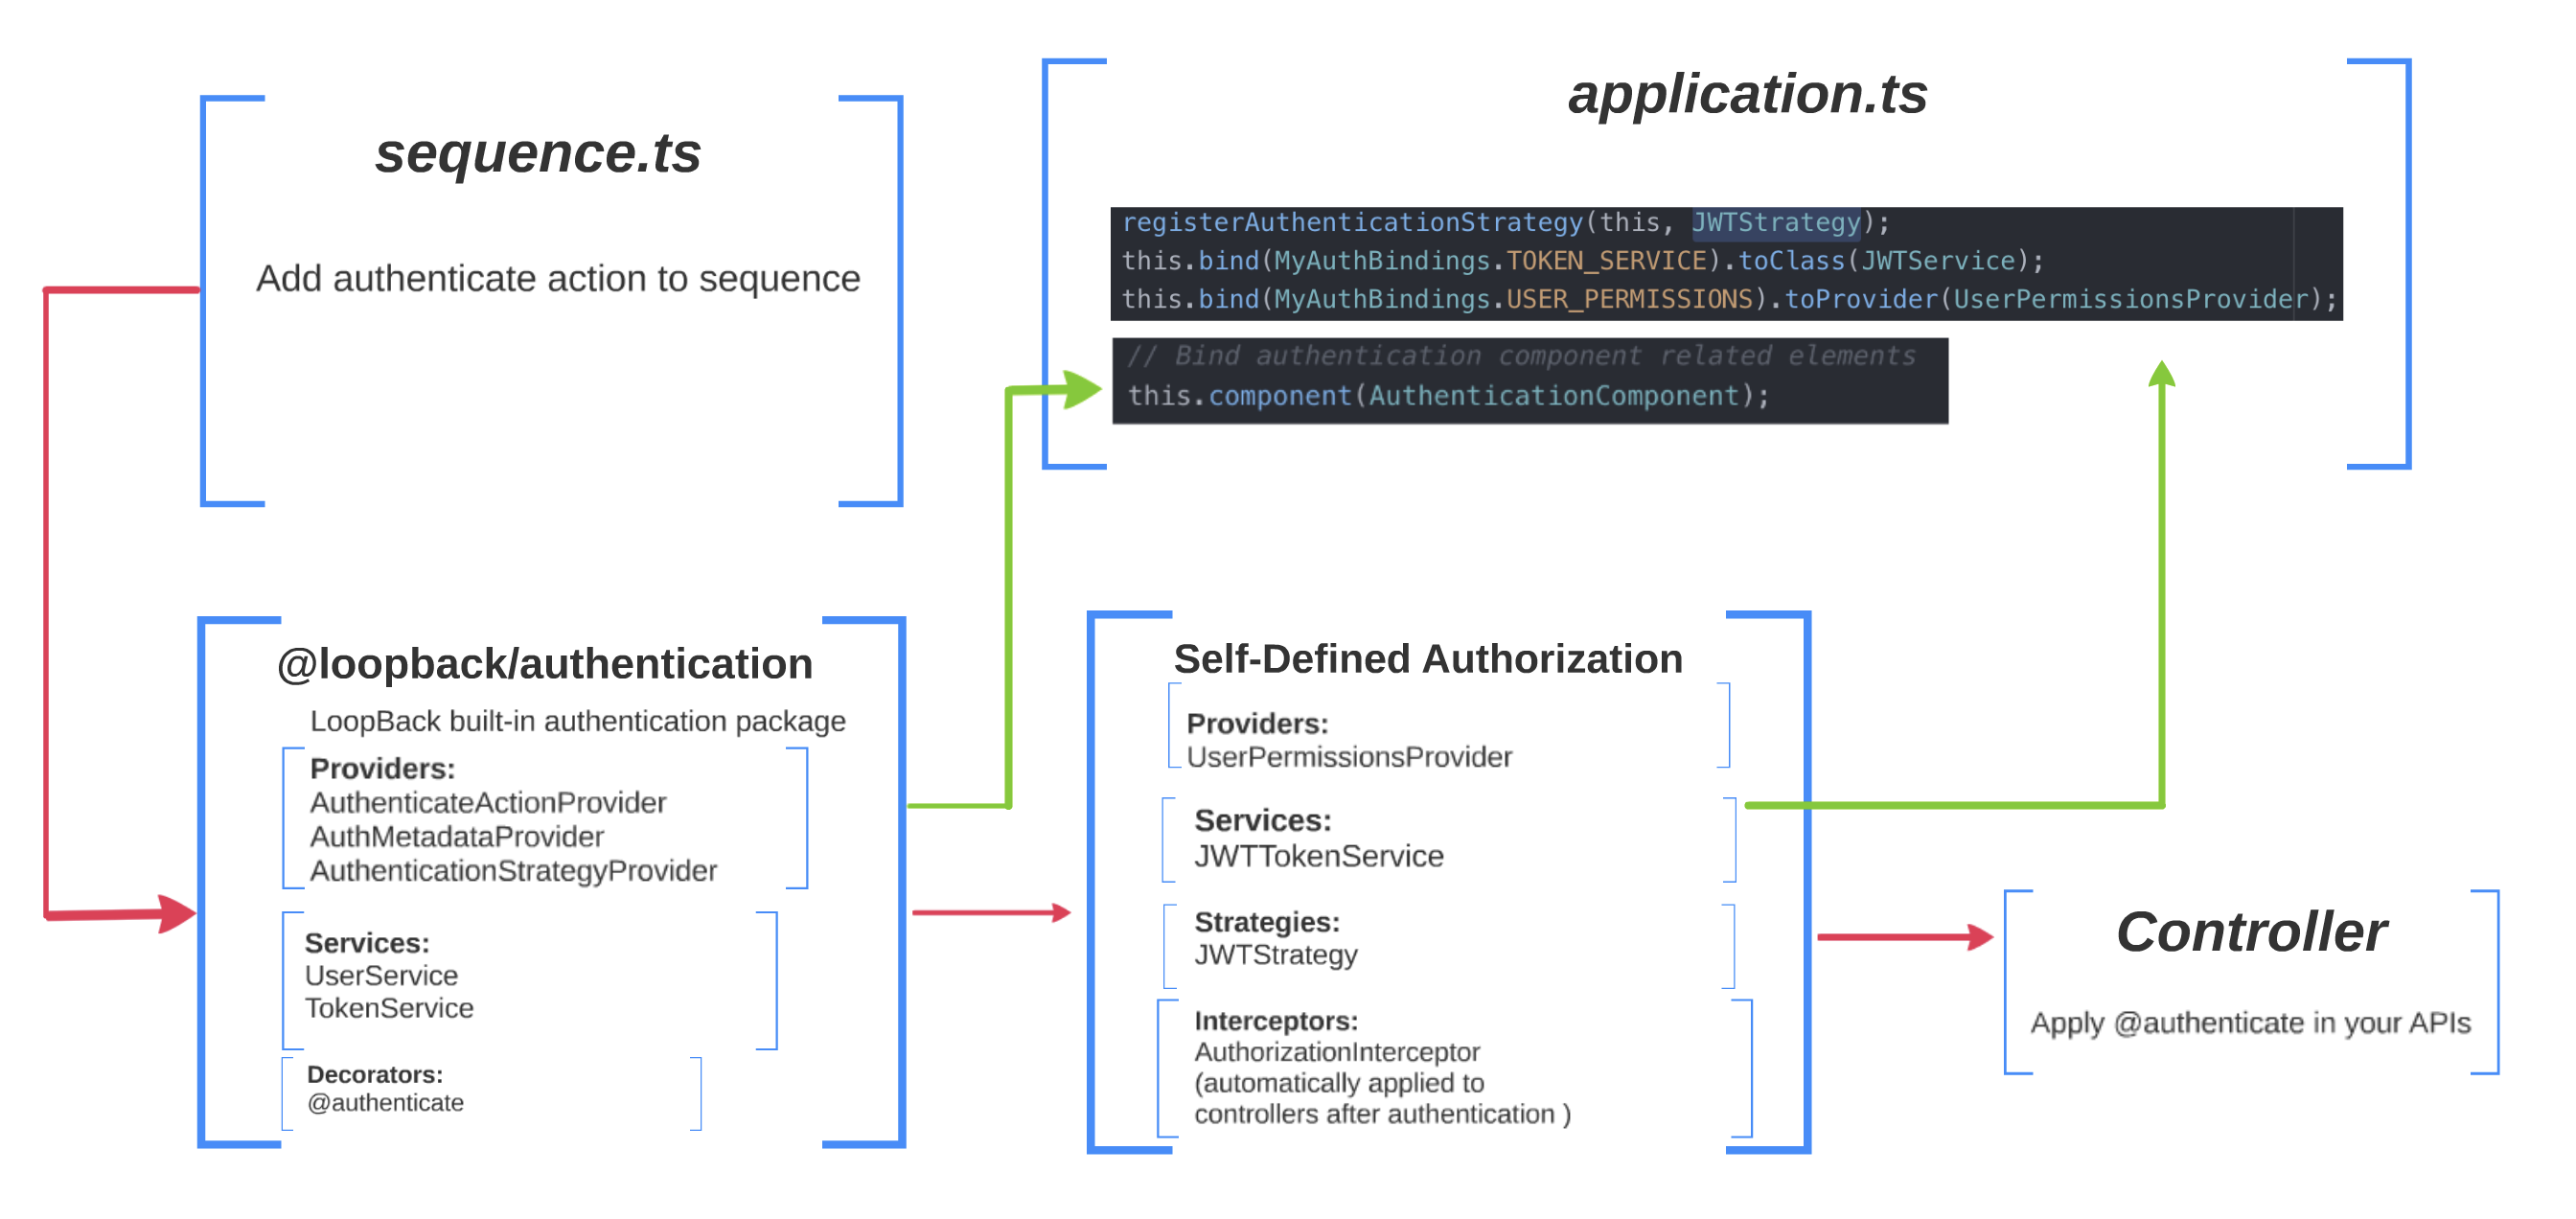
LoopBack Authentication Package
The one in the middle is the @loopback/authentication package. It has three main components:
-
Providers:
- AuthMetadataProvider: this reads the decorator metadata from the controller methods wherever the
@authenticatedecorator is used. - AuthenticateActionProvider: this provides the authentication action which uses AuthenticationStrategyProvider to obtain a registered authentication strategy (if one exists), calls the authenticate(request) method of the given authentication strategy, and places the user profile on the request context.
- AuthenticationStrategyProvider: this is the extension point for you to add your own authentication strategies. I will show you how to do that later. It also has the job of finding a strategy of a given name (if existed), and returning it to AuthenticateActionProvider.
- AuthMetadataProvider: this reads the decorator metadata from the controller methods wherever the
-
Services: all services in this package are interfaces. You can create your own services as well.
- TokenService: an interface for generating and verifying an authentication token.
- UserService: an interface for performing the login action in an authentication strategy, and for converting a User object into a UserProfile object. To keep this project as simple as possible, I am not going to use this interface. I will integrate this to the TokenService.
-
Decorators:
@authenticate. Annotate the APIs that need authentication with this decorator.
Self-defined Authorization
The one in the bottom left is our self-defined authorization. It has three components:
-
Providers:
- UserPermissionsProvider: this will check user's permission. We will create different user permissions for different users. This provider will be invoked in AuthorizationInterceptor.
-
Strategies: this is where we add our own authentication strategies.
- JWTStrategy: we are going to create a custom authentication strategy based on JSON Web Token.
-
Services:
- JWTService: a service associate with JWTStrategy to generate and verify JWT.
-
Interceptors:
- AuthorizationInterceptor: a middle layer comes after authentication that use UserPermissionsProvider to verify user's permission. You can find more information about LoopBack 4 Interceptor at here.
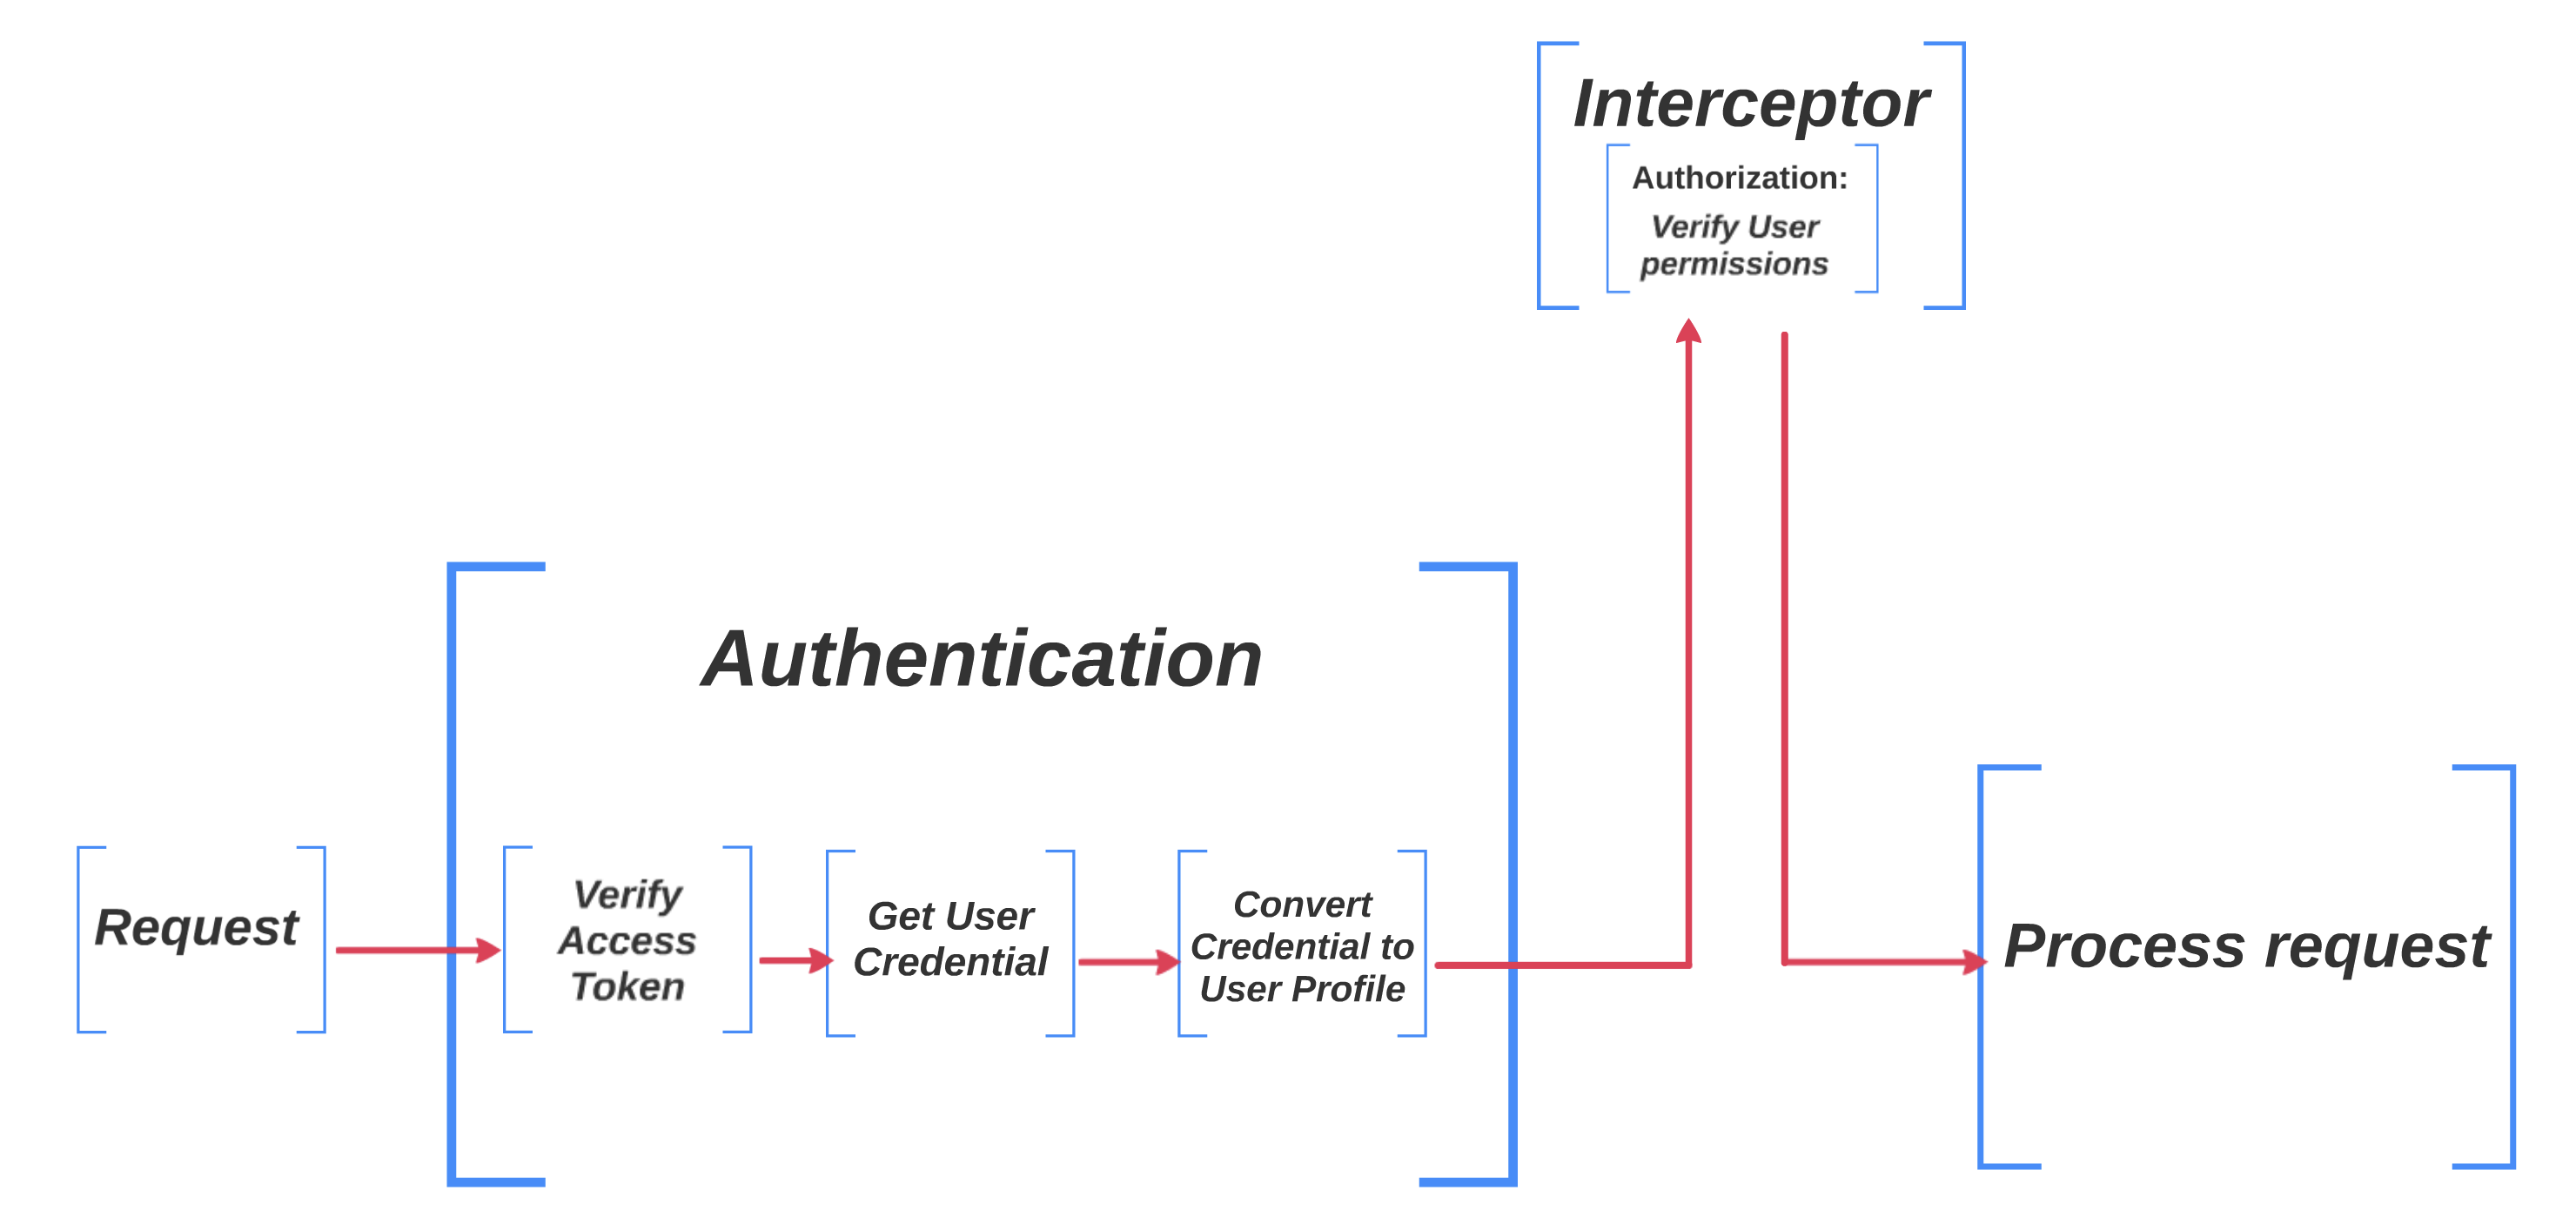
Here is a diagram to show you what will happen after an API call.
application.ts, sequence.ts and controller�
In order to use the all of above in our project, we have three more steps to complete:
- Bind everything in
application.ts.application.tsis like the main function of LoopBack project. - Add authenticate action into
sequence.ts. A sequence contains a list of actions that is performed for each request. - Put
@authenticatedecorator above your APIs.
You can check this tutorial or this shopping example for more information of LoopBack 4 Authentication package.
Install @loopback/authentication
Simply run npm install --save @loopback/authentication@latest in your project root.
Reminder: We are using @loopback/authentication@2.1.0 in this project. If you want to use other versions, you may need to change you code accordingly. You may also need to run npm outdated in your project root to see if other LoopBack packages need update.
Refactor Model
In previous episodes, we used UUIDs as our character IDs. But UUIDs are 36 digits string IDs. We can not let user use UUIDs to login. So we will use email instead of UUID.
To keep this project as simple as possible, a user can only own one character. So user and character are basically the same thing. character model holds all user information.
In src/controllers/character.models, remove id and add email and password properties.
@property({
  type: 'string',
  id: true,
  required: true,
})
email?: string;

@property({
  type: 'string',
  required: true,
})
password: string;
Besides, we need to add user permission to character model.
import {PermissionKey} from '../authorization';
@property.array(String)
permissions: PermissionKey[];
permissions is an array of PermissionKeys. We will create PermissionKey later.
Self-Defined Authorization Component
First, let's create a folder 'authorization' in src to hold everything in this episode. This will be our self-defined authorization package.
I will show you how to create everything step by step. You can also check here for my authorization folder.
Users Permissions
Let's create permissions for users. An API may have one or more required permissions. Users need to have all of the required permissions to access that API.
Create permission-key.ts in src/authorization.
export const enum PermissionKey {
  // For accessing own (logged in user) profile
  ViewOwnUser = 'ViewOwnUser',
  // For creating a user
  CreateUser = 'CreateUser',
  // For updating own (logged in user) profile
  UpdateOwnUser = 'UpdateOwnUser',
  // For deleting a user
  DeleteOwnUser = 'DeleteOwnUser',

  //admin
  // For updating other users profile
  UpdateAnyUser = 'UpdateAnyUser',
  // For accessing other users profile.
  ViewAnyUser = 'ViewAnyUser',
  // For deleting a user
  DeleteAnyUser = 'DeleteAnyUser',
}
This file holds all permissions. ViewOwnUser, CreateUser, UpdateOwnUser, DeleteOwnUser are for regular users. UpdateAnyUser, ViewAnyUser, DeleteAnyUser are for admins only.
Interfaces and Types
To make it easier to import, we will put all of useful interfaces, types, and schemas together.
Create types.ts in src/authorization.
import {PermissionKey} from './permission-key';

export interface UserPermissionsFn {
  (
    userPermissions: PermissionKey[],
    requiredPermissions: RequiredPermissions,
  ): boolean;
}

export interface MyUserProfile  {
  id: string;
  email: string;
  name: string;
  permissions: PermissionKey[];
}

export interface RequiredPermissions {
  required: PermissionKey[];
}

export const UserProfileSchema = {
  type: 'object',
  required: ['email', 'password', 'name'],
  properties: {
    email: {
      type: 'string',
      format: 'email',
    },
    password: {
      type: 'string',
      minLength: 8,
    },
    name: {type: 'string'},
  },
};

export const UserRequestBody = {
  description: 'The input of create user function',
  required: true,
  content: {
    'application/json': {schema: UserProfileSchema},
  },
};

export interface Credential  {
  email: string;
  password: string;
  permissions: PermissionKey[];
}

export const CredentialsSchema = {
  type: 'object',
  required: ['email', 'password'],
  properties: {
    email: {
      type: 'string',
      format: 'email',
    },
    password: {
      type: 'string',
      minLength: 8,
    },
  },
};

export const CredentialsRequestBody = {
  description: 'The input of login function',
  required: true,
  content: {
    'application/json': {schema: CredentialsSchema},
  },
};
MyUserProfile is the format of our user profile. It is the information needed to perform authentication and authorization.
UserProfileSchema and CredentialsSchema are the formats of request input. We use them to validate request input in controller.
Binding Self-Defined Authorization Component
Create keys.ts in src/authorization. MyAuthBindings is the self-defined component that we need to bind to application.ts. TokenServiceConstants is the value we will use later in token service.
import {BindingKey} from '@loopback/context';
import {UserPermissionsFn} from './types';
import {TokenService} from '@loopback/authentication';
/**
 * Binding keys used by this component.
 */
export namespace MyAuthBindings {
  export const USER_PERMISSIONS = BindingKey.create<UserPermissionsFn>(
    'userAuthorization.actions.userPermissions',
  );

  export const TOKEN_SERVICE = BindingKey.create<TokenService>(
    'services.authentication.jwt.tokenservice',
  );
}

export namespace TokenServiceConstants {
  export const TOKEN_SECRET_VALUE = 'myjwts3cr3t';
  export const TOKEN_EXPIRES_IN_VALUE = '600';
}
Providers
The LoopBack authorization package gives us three providers for authorization: strategies, action, and metadata. We need to customize our own provider for users permissions.
Create folder providers in src, then inside providers, create user-permissions.provider.ts.
import {Provider} from '@loopback/context';
import {PermissionKey} from '../permission-key';
import {UserPermissionsFn, RequiredPermissions} from '../types';
import {intersection} from 'lodash';

export class UserPermissionsProvider implements Provider<UserPermissionsFn> {
  constructor() {}

  value(): UserPermissionsFn {
    return (userPermissions, requiredPermissions) =>
      this.action(userPermissions, requiredPermissions);
  }

  action(
    userPermissions: PermissionKey[],
    requiredPermissions: RequiredPermissions,
  ): boolean {
    return intersection(userPermissions, requiredPermissions.required).length
      === requiredPermissions.required.length;
  }
}
It will compare a user's permissions and required permissions, and allow the user to get access if and only if this user has all of the required permissions.
Strategies
The AuthenticationStrategyProvider can find a registered strategy by its name. We will create our own custom authentication strategy and then specify its name in the @authenticate decorator. It will based on the JSON Web Token.
First, run npm install jsonwebtoken --save in your project root to install the JWT package.
Create a folder strategies in src/authorization. Then inside strategies, create a file named JWT.strategy.ts. This is our custom authentication strategy.
import {Request, HttpErrors} from '@loopback/rest';
import {inject} from '@loopback/core';
import {AuthenticationStrategy,
        AuthenticationMetadata,
        AuthenticationBindings,
        TokenService,
} from '@loopback/authentication';
import {MyUserProfile,
        UserPermissionsFn,
        RequiredPermissions,} from '../types';
import {MyAuthBindings,} from '../keys';

export class JWTStrategy implements AuthenticationStrategy{
  name: string = 'jwt';

  constructor(
    @inject(AuthenticationBindings.METADATA)
    public metadata: AuthenticationMetadata,
    @inject(MyAuthBindings.USER_PERMISSIONS)
    protected checkPermissons: UserPermissionsFn,
    @inject(MyAuthBindings.TOKEN_SERVICE)
    protected tokenService: TokenService,
  ) {}
  async authenticate(request: Request): Promise<MyUserProfile | undefined> {
    const token: string = this.extractCredentials(request);
    try{
      const user: MyUserProfile = await this.tokenService.verifyToken(token) as MyUserProfile;
      return user;
    } catch (err) {
      Object.assign(err, {code: 'INVALID_ACCESS_TOKEN', statusCode: 401,});
      throw err;
    }
  }

  extractCredentials(request: Request): string {
    if (!request.headers.authorization) {
      throw new HttpErrors.Unauthorized(`Authorization header not found.`);
    }
    const authHeaderValue = request.headers.authorization;

    if (!authHeaderValue.startsWith('Bearer')) {
      throw new HttpErrors.Unauthorized(
        `Authorization header is not of type 'Bearer'.`,
      );
    }
    const parts = authHeaderValue.split(' ');
    if (parts.length !== 2)
      throw new HttpErrors.Unauthorized(
        `Authorization header value has too many parts. It must follow the pattern: 'Bearer xx.yy.zz' where xx.yy.zz is a valid JWT token.`,
      );
      const token = parts[1];
      return token;
  }
}
You can even use multiple strategies in one project, if needed.
Interceptor
Interceptor is a middle layer comes after authentication. After the authentication strategy verified user's access token, interceptor will verify use's permission.
Run lb4 interceptor in your project root.
? Interceptor name: authorize
? Is it a global interceptor? Yes
? Global interceptors are sorted by the order of an array of group names bound to ContextBindings.GLOBAL_INTERCEPTOR_ORDERED_GROUPS. See https://loopback.io/doc/en/lb4/Interceptors.html#order-of-invocation-for-interceptors.
Group name for the global interceptor: ('')
   create src/interceptors/authorize.interceptor.ts
   update src/interceptors/index.ts

Interceptor authorize was created in src/interceptors/
Then change src/interceptors/authorize.interceptor.ts to this:
import {
  inject,
  globalInterceptor,
  Interceptor,
  InvocationContext,
  InvocationResult,
  Provider,
  ValueOrPromise,
} from '@loopback/context';
import {Getter} from '@loopback/core';
import {HttpErrors} from '@loopback/rest';
import {MyUserProfile,
        MyAuthBindings,
        UserPermissionsFn,
        RequiredPermissions,} from '../authorization';
import {AuthenticationMetadata,AuthenticationBindings} from '@loopback/authentication';


/**
 * This class will be bound to the application as an `Interceptor` during
 * `boot`
 */
@globalInterceptor('', {tags: {name: 'authorize'}})
export class AuthorizationInterceptor implements Provider<Interceptor> {
  constructor(
    @inject(AuthenticationBindings.METADATA)
    public metadata: AuthenticationMetadata,
    @inject(MyAuthBindings.USER_PERMISSIONS)
    protected checkPermissons: UserPermissionsFn,
    @inject.getter(AuthenticationBindings.CURRENT_USER)
    public getCurrentUser: Getter<MyUserProfile>,
  ) {}

  /**
   * This method is used by LoopBack context to produce an interceptor function
   * for the binding.
   *
   * @returns An interceptor function
   */
  value() {
    return this.intercept.bind(this);
  }

  /**
   * The logic to intercept an invocation
   * @param invocationCtx - Invocation context
   * @param next - A function to invoke next interceptor or the target method
   */
  async intercept(
    invocationCtx: InvocationContext,
    next: () => ValueOrPromise<InvocationResult>,
  ) {
    if (!this.metadata) return await next();

    const result = await next();

    const requiredPermissions = this.metadata.options as RequiredPermissions;
    const user = await this.getCurrentUser();
    if(!this.checkPermissons(user.permissions, requiredPermissions)){
      throw new HttpErrors.Forbidden('INVALID_ACCESS_PERMISSION');
    }
    return result;
  }
}
A global interceptor will be automatically applied to all methods in controllers.
Services
Create a folder services in src/authorization, then inside services, create a file named JWT.service.ts. This is a service that generates and verifies JWT tokens, and will be used by JWTStrategy.
import {inject} from '@loopback/context';
import {HttpErrors} from '@loopback/rest';
import {promisify} from 'util';
import {TokenService} from '@loopback/authentication';
import {TokenServiceConstants} from '../keys';
import {MyUserProfile, Credential} from '../types';
import {repository} from '@loopback/repository';
import {CharacterRepository} from '../../repositories';
import * as _ from 'lodash';
import {toJSON} from '@loopback/testlab';

const jwt = require('jsonwebtoken');
const signAsync = promisify(jwt.sign);
const verifyAsync = promisify(jwt.verify);

export class JWTService implements TokenService {
  constructor(
    @repository(CharacterRepository)
    public characterRepository: CharacterRepository,
  ) {}

  async verifyToken(token: string): Promise<MyUserProfile> {
    if (!token) {
      throw new HttpErrors.Unauthorized(
        `Error verifying token : 'token' is null`,
      );
    }

    const decryptedToken = await verifyAsync(token, TokenServiceConstants.TOKEN_SECRET_VALUE);
    let userProfile = _.pick(decryptedToken, ['id', 'email', 'name', `permissions`]);
    return userProfile;
  }

  async generateToken(userProfile: MyUserProfile): Promise<string> {
    const token = await signAsync(userProfile, TokenServiceConstants.TOKEN_SECRET_VALUE, {
      expiresIn: TokenServiceConstants.TOKEN_EXPIRES_IN_VALUE,
    });

    return token;
  }

  async getToken(credential: Credential): Promise<string> {
    const foundUser = await this.characterRepository.findOne({
      where: {email: credential.email},
    });
    if (!foundUser) {
      throw new HttpErrors['NotFound'](
        `User with email ${credential.email} not found.`,
      );
    }

    if (credential.password != foundUser.password) {
      throw new HttpErrors.Unauthorized('The credentials are not correct.');
    }
    const currentUser: MyUserProfile = _.pick(toJSON(foundUser), ['email', 'name', 'permissions']) as MyUserProfile;
    const token = await this.generateToken(currentUser);
    return token;
  }
}
You can also create your own authentication services, like Hash Password service in the shopping example.
Putting Everything Together
Binding all the Pieces in application.ts��
Open src/application.ts, and add the following imports.
import {asGlobalInterceptor} from '@loopback/context';
import {MyAuthBindings,
        JWTService,
        JWTStrategy,
        UserPermissionsProvider
} from './authorization';
import {AuthorizationInterceptor} from './interceptors';
import {AuthenticationComponent,
       registerAuthenticationStrategy,
} from '@loopback/authentication';
Then, add the following lines in the constructor.
constructor(options: ApplicationConfig = {}) {
  super(options);
  //add
  // Bind authentication component related elements
  this.component(AuthenticationComponent);

  // Bind JWT & permission authentication strategy related elements
  registerAuthenticationStrategy(this, JWTStrategy);
  this.bind(MyAuthBindings.TOKEN_SERVICE).toClass(JWTService);
  this.bind(MyAuthBindings.USER_PERMISSIONS).toProvider(UserPermissionsProvider);
If you have more authentication strategies, add them in this way:
registerAuthenticationStrategy(this, NewStrategy);
Specifying the Authentication Action in sequence.ts
In src/sequence.ts, add the following imports.
import {
  AuthenticationBindings,
  AuthenticateFn,
} from '@loopback/authentication';
Then add those lines in the handle function.
async handle(context: RequestContext) {
  try {
    const {request, response} = context;
    const route = this.findRoute(request);
    const args = await this.parseParams(request, route);

    //add authentication actions
    await this.authenticateRequest(request);

    const result = await this.invoke(route, args);
    this.send(response, result);
  } catch (err) {
    if (
      err.code === 'AUTHENTICATION_STRATEGY_NOT_FOUND' ||
      err.code === 'USER_PROFILE_NOT_FOUND'
    ) {
      Object.assign(err, {statusCode: 401 /* Unauthorized */});
    }
    this.reject(context, err);
    return;
  }
}
This will check for authentication for every request.
Authenticate APIs
Our Authentication and Authorization components are ready to use. Now we can apply their decorators to our REST API endpoints.
CharacterController
Open src/controllers/character.controller.ts, add the following imports.
import {
  MyUserProfile,
  Credential,
  MyAuthBindings,
  PermissionKey,
  CredentialsRequestBody,
  UserRequestBody,
  UserProfileSchema,
  JWTService,
} from '../authorization';
import {authenticate,
        TokenService,
        AuthenticationBindings,
} from '@loopback/authentication';
Inject TOKEN_SERVICE and CURRENT_USER in the constructor.
@inject(MyAuthBindings.TOKEN_SERVICE)
public jwtService: JWTService,
@inject.getter(AuthenticationBindings.CURRENT_USER)
public getCurrentUser: Getter<MyUserProfile>,
Then let's make some changes to the @post /characters API.
@post('/characters', {
  responses: {
    '200': {
      description: 'Character model instance',
      content: {'application/json': {schema: {'x-ts-type': Character}}},
    },
  },
})
async create(
  @requestBody(UserRequestBody) character: Character
): Promise<Character> {
    character.permissions = [PermissionKey.ViewOwnUser,
                             PermissionKey.CreateUser,
                             PermissionKey.UpdateOwnUser,
                             PermissionKey.DeleteOwnUser];
    if (await this.characterRepository.exists(character.email)){
      throw new HttpErrors.BadRequest(`This email already exists`);
    }
    else {
      const savedCharacter = await this.characterRepository.create(character);
      delete savedCharacter.password;
      return savedCharacter;
    }
}
Put UserRequestBody in @requestBody decorator to specify the format of request body. That is how we validate the format of email and password fields.
Because this API is used to create a regular character, we will assign ViewOwnUser, CreateUser, UpdateOwnUser, and DeleteOwnUser permissions to the new character.
We also need to create an API for login.
@post('/characters/login', {
  responses: {
    '200': {
      description: 'Token',
      content: {},
    },
  },
})
async login(
  @requestBody(CredentialsRequestBody) credential: Credential,
): Promise<{token: string}> {
  const token = await this.jwtService.getToken(credential);
  return {token};
}
This API will use JWTService to verify user email and password, and then generate a JWT based on necessary credential information, like email, password and permissions.
The next API we need is @get /characters/me. It will show the user current logged in.
@get('/characters/me', {
  responses: {
    '200': {
      description: 'The current user profile',
      content: {
        'application/json': {
          schema: UserProfileSchema,
        },
      },
    },
  },
})
@authenticate('jwt', {"required": [PermissionKey.ViewOwnUser]})
async printCurrentUser(
): Promise<MyUserProfile> {
  return await this.getCurrentUser();
}
We will authenticate this API with @authenticate('jwt', {"required": [PermissionKey.ViewOwnUser]}). The first parameter jwt specify which authentication strategy you want to use for this API. If you have more than one strategy, make your choice here. The second parameter is an object which has one field required (array of PermissionKey). It specifies which permissions are required to access this API. In this case, the only required permission is ViewOwnUser. Because this API only shows current logged-in user information. You can customize permissions based on your APIs.
To get current logged-in user information, simply call this.getCurrentUser().
The above three APIs show you most of the use cases. You should now have enough knowledge on how to apply LoopBack 4 authentication to your APIs.
Let me show you one more example before we're done.
AdminController
Let's create another controller for admins. Admins should have privilege to view, update, and delete any user.
Here is how we create an admin.
@post('/admin', {
  responses: {
    '200': {
      description: 'create admin',
      content: {'application/json': {schema: {'x-ts-type': Character}}},
    },
  },
})
async create(
  @param.query.string('admin_code') admin_code: string,
  @requestBody() character: Character,
): Promise<Character> {
    if(admin_code != '901029'){
      throw new HttpErrors.Forbidden('WRONG_ADMIN_CODE');
    }

    character.permissions = [PermissionKey.ViewOwnUser,
                             PermissionKey.CreateUser,
                             PermissionKey.UpdateOwnUser,
                             PermissionKey.DeleteOwnUser,
                             PermissionKey.UpdateAnyUser,
                             PermissionKey.ViewAnyUser,
                             PermissionKey.DeleteAnyUser];
    if (await this.characterRepository.exists(character.email)){
      throw new HttpErrors.BadRequest(`This email already exists`);
    }
    else {
      const savedCharacter = await this.characterRepository.create(character);
      delete savedCharacter.password;
      return savedCharacter;
    }
}
It is very similar to the @post /characters API. The difference is it requires an admin_code to create an admin with three more permissions: UpdateAnyUser, ViewAnyUser, and DeleteAnyUser.
This is an API to show the information of all users that match the filter criteria.
@get('/admin/characters', {
  responses: {
    '200': {
      description: 'Array of Character model instances',
      content: {
        'application/json': {
          schema: {type: 'array', items: {'x-ts-type': Character}},
        },
      },
    },
  },
})
@authenticate('jwt', {"required": [PermissionKey.ViewAnyUser]})
async find(
  @param.query.object('filter', getFilterSchemaFor(Character)) filter?: Filter,
): Promise<Character[]> {
  return await this.characterRepository.find(filter);
}
As you can see, this requires ViewAnyUser permission.
You can check my controllers here
Applying This to Your Own Project
In this episode, we covered how to combine your self-defined authorization strategies and services with @loopback/authentication and how to apply it to your API.
You can always design your own strategies and services based on your project needs. For example, you may want to have a password hashing service, so that you don't directly save a user's raw password in the database. Here is an example of how to implement a password hashing service.
What's Next?
Next episode, we will deploy this project to cloud. In the meantime, you can learn more about LoopBack in past blogs.