Important:
Prerequisite: Install StrongLoop software as described in 安装 StrongLoop.
Recommended: Read LoopBack 核心概念.
LoopBack 应用自带API浏览器,可以帮助你在开发时方便地测试你的API
你肯定不是唯一使用你刚刚创建的API的人,所以你需要为API写些文档方便其他开发人员使用。幸运的是LoopBack会自动生成开发人员入口和API浏览器。
从github中获得教程内容,并checkout当前章节,再安装所有的依赖包:
$ git clone https://github.com/strongloop/loopback-getting-started.git
$ cd loopback-getting-started
$ git checkout step1
$ npm install
运行 API 浏览器
执行以下命令启动应用程序:
$ slc run
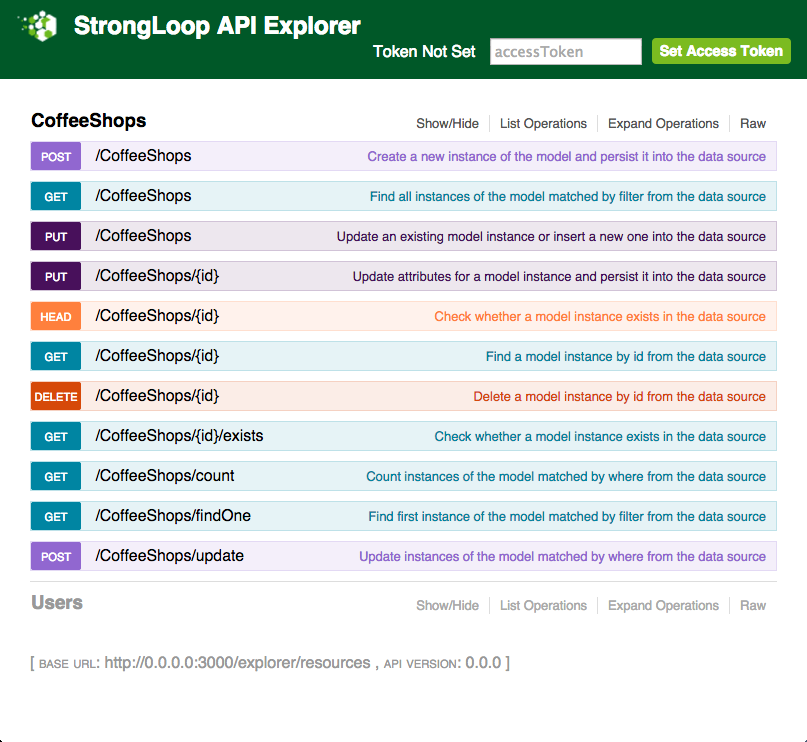
在浏览器中输入 http://localhost:3000/explorer。你可以看到现在你的应用中包含两个模型 - Users 和 CoffeeShops:
 </figure>
除了我们定义的CoffeeShop模型,默认情况下,Loopback会为每个应用程序生成User模型及相对应的REST API。
关于LoopBack的内建模型
事实上,为了照顾到大多数应用场景,LoopBack还创建了其他几个内建模型。
- Application model - contains metadata for a client application that has its own identity and associated configuration with the LoopBack server.
- User model - register and authenticate users of your app locally or against third-party services.
- Access control models - ACL, AccessToken, Scope, Role, and RoleMapping models for controlling access to applications, resources, and methods.
- Email model - send emails to your app users using SMTP or third-party services.
The built-in models (except for Email) extend PersistedModel, so they have automatically have a full complement of create, update, and delete (CRUD) operations.
Note:
By default, only the User model is exposed over REST. To expose the other models, change the model’s public property to true in /server/model-config.json. See Exposing models for more information. Use caution: exposing some of these models over public public API may be a security risk.
查看CoffeeShop模型
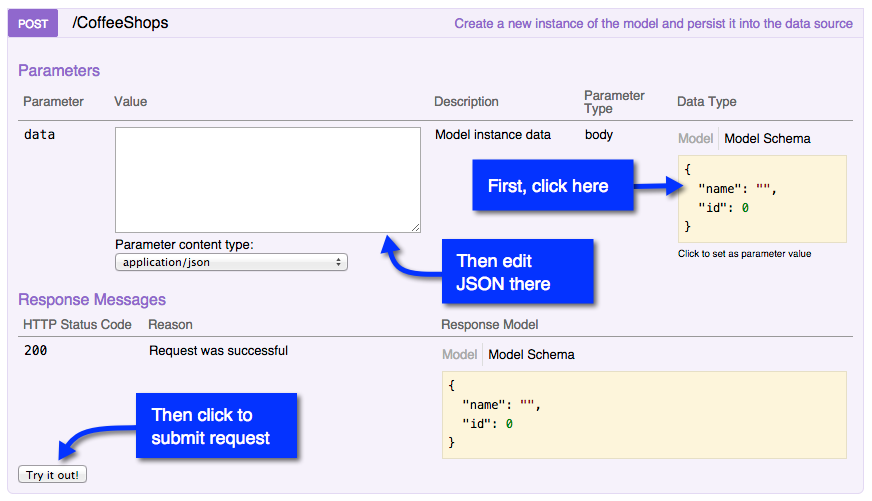
我们可以通过API浏览器进一步查看CoffeeShop模型的详情。点击 CoffeeShops 会罗列出相关的API接口(endpoints)
 </figure>
仔细查看所有展开的API接口,你会发现通过这些接口你可以对CoffeeShop模型进行常用的CRUD操作。
选择第一行 - “POST /CoffeeShops Create a new instance of the model and persist it into the data source” 会展开相应的操作:
 </figure>
请根据以上示图的操作步骤:
- 首先点击 “Model Schema” 获得一个可编辑的JSON数据模版
-
在
name属性中你可以填入Coffee Shop的名称. 请注意,你无需输入id属性,因为在创建一个新的CoffeeShop时,LoopBack会自动生成一个Uniq id。{ "name": "My Coffee Shop", "id": 0 } - 然后点击 Try it out!
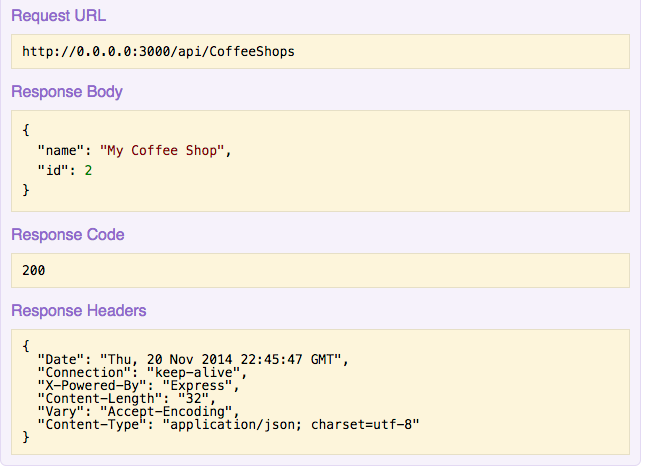
然后你就可以看到服务器对你提交的请求的响应, 例如:
 </figure>
在Response Body 中,你可以看到刚才你输入的那段JSON。这说明新建的CoffeeShop对象已被添加到数据源中。
现在我们再选择 - “**GET /CoffeeShops Find all instances of the model matched by filter from the data source” ** 查看这个端点的操作:
点击 Try it out! 会获得所有的CoffeeShop对象。你应该看到刚才我们通过POST API创建的CoffeeShop对象。
Non-public Information
试用用户验证和授权功能
现在你也许已经在思考安全性问题了,比如何非授权用户创建CoffeeShop对象。没关系,LoopBack提供了完整的用户验证和授权的方案。请按以下步骤了解如何使用用户验证和授权功能。
首先我们在API浏览器中关闭CoffeeShop模型,然后展开Users 模型。
基本步骤如下:
- 使用email和密码创建一个新的用户
- 使用email和密码登陆,在登陆操作返回的结果中,你可以找到id属性和用户的access token。
- 将登陆结果中获得的access token填入 accessToken 字段.
- 点击 Set Access Token.
思考一下你究竟可以进行哪些操作,其中有多少是需要管理员权限的。
Next: 在下一个 将API连接至一个数据源 章节中, 你将学习如何将数据模型储存到类似MongoDB那样的数据库中。