Building an Online Game With LoopBack 4 (Part 1)

Originally published on strongloop.com
Part 1: Building a Simple LoopBack Project With MongoDB
Introduction
"Ready to build amazing things?" asks the LoopBack 4 homepage before encouraging you to try the open source framework.
"Try LoopBack 4 now."
In this series, I'm going to do exactly that! Join me as I create an API web game using LoopBack 4.
The main purpose of this series is to help you learn LoopBack 4 and how to use it to easily build your own API and web project. We'll do so by creating a new project I'm working on: an online web text-based adventure game. In this game, you can create your own account to build characters, fight monsters and find treasures. You will be able to control your character to take a variety of actions: attacking enemies, casting spells, and getting loot. This game should also allow multiple players to log in and play with their friends.
Some brief background on myself, first. I graduated from college last year. I don't have any background on web or game development. I am sure most of you have better understanding than me on those fields. If I can do this, you can do it too - perhaps even better!
Why LoopBack 4?
LoopBack 4 is an open source framework that can help you build REST API. You can use LB4 to automatically generate simple APIs in couple of minutes without any coding. You can even easily connect your project to many popular databases. For this project, I will use MongoDB as my database. I don't even need to know how to use MongoDB as LB4 will handle everyting for me. Isn't this like magic?
Another great advantage of LB4 is that it is extensible. LoopBack artifacts can be managed by types. New artifact types can be introduced. Instances for a given type can be added, removed, or replaced. Organizing artifacts in a hierarchy of extension points/extensions decouples providers and consumers. You can write your own extensions to augment the framework.
Project Plan
In this series, my goals are to build the following functionality into the game:
- The ability for users to create their own character and customize their character.
- The ability for users to equip their character with weapon, armor, and skill.
- Establish basic functionality for the game: attack, defend, and cast spells.
- User authorization and role-based access control.
- The ability for multiple users login and play at the same time.
- User Interface (UI).
- Deploying to the cloud, such as IBM cloud, AWS, Google Cloud or Azure.
This is a diagram for the relationships between character, weapon, armor, and skill.
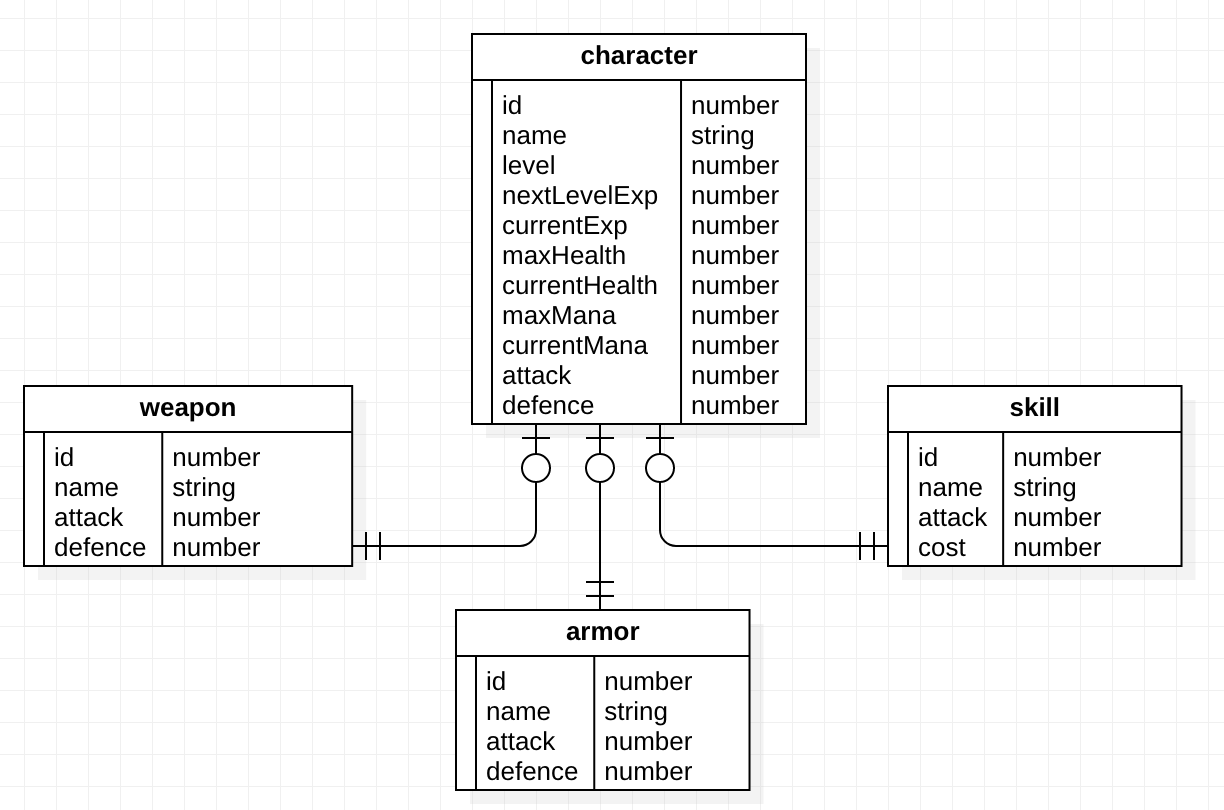
In this first part of the series, we will cover character model.
You can check my code here for this episode.
In this Episode
To begin things, I will start with the easiest task: auto-generate APIs for users to create their character and connect to MongoDB.
Before We Start
There are some prerequisites you may want to catch up on before we start.
-
Basic concepts of TypeScript, Javascript and Node.js.
I also highly recommend you to check these two examples:
This episode is based on those examples. You don't have to understand how they work, just keep in mind what function we can achieve. We will dig deep into that later.
Initializing Scaffolding
LoopBack 4 provides a CLI (command line interface) to help create your project.
Simply run lb4 app in a folder you want to use the CLI. Disable "Docker" when it asks you to "Select features to enable in the project"
wenbo:firstgameDemo wenbo$ lb4 app
? Project name: firstgame
? Project description: firstgameDemo
? Project root directory: firstgame
? Application class name: FirstgameApplication
? Select features to enable in the project Enable tslint, Enable prettier,
Enable mocha, Enable loopbackBuild, Enable vscode, Enable repositories, Ena
ble services
There are four important components in a LB4 project: Model, Datasource, Repository, and Controller. Let's create them one by one.
Model
A model is like the class in Java or a table in relational database. It is an entity with one or more properties. A model may also have relationships with other models. For example, a student model could have properties like studentID, name, and GPA. It may also have one or more entity of course model and belong to a school model.
We will delve more deeply into the model relationship in next blog. In this episode let's simply create a character model first. The character model has following properties:
- id: number (id property)
- name: string (required)
- level: number (1)
- nextLevelExp: number (100)
- currentExp: number (0)
- maxHealth: number (100)
- currentHealth: number (100)
- maxMana: number (50)
- currentMana: number (50)
- attack: number (20)
- defence: number (5)
Run lb4 model in the project folder we just created by using CLI (run cd firstgame first).
? Model class name: character
? Please select the model base class Entity (A persisted model with an ID)
? Allow additional (free-form) properties? No
Let's add a property to Character
Enter an empty property name when done

? Enter the property name: id
? Property type: number
? Is id the ID property? Yes
? Is it required?: No
? Default value [leave blank for none]:

Let's add another property to Character
Enter an empty property name when done

? Enter the property name: name
? Property type: string
? Is it required?: Yes
? Default value [leave blank for none]:

Let's add another property to Character
Enter an empty property name when done

? Enter the property name: level
? Property type: number
? Is it required?: No
? Default value [leave blank for none]: 1

...
The first property is id. It's like the primary key in relational database. We don't need to specify id as we will auto generate id.
The second property is name. That is the only thing we need to specify.
All of other properties like level, attack and defence are default. We will not need to provide specifics.
If you go to /src/models, you will see character.model.ts. We don't need to do anything about it at this point. We will come back in following episode.
DataSource
We connect to the database in LB4 using datasource. LB4 supports almost all of the popular databases. In this project and series I will use MongoDB. If you don't know how to use MongoDB, don't worry! LB4 will take care everything for you. You only need to install mongoDB first.
After installation, run lb4 datasource in your project root.
wenbo:firstgame wenbo$ lb4 datasource
? Datasource name: mongo
? Select the connector for mongo: MongoDB (supported by StrongLoop)
? Connection String url to override other settings (eg: mongodb://username:password@hostna
me:port/database):
? host: localhost
? port: 27017
? user:
? password: [hidden]
? database: mongo
Fill host with localhost and port with 27017.
This will build a connection between your project and MongoDB.
Repository
The repository is like a connecter between the datasource and models. One of its jobs is to act like database injecter and extracter: when you want to create or fetch an entity of a model, repository will help you inject data into database or extract data from database.
Run lb4 repository in your project root.
wenbo:firstgame wenbo$ lb4 repository
? Please select the datasource MongoDatasource
? Select the model(s) you want to generate a repository Character
? Please select the repository base class DefaultCrudRepository (Legacy juggler bridge)
   create src/repositories/character.repository.ts
   update src/repositories/index.ts
You will find character.repository.ts in src/repositories. It's all we need at this point.
Controller
Controller is the most important component. It contains the code for all of your project functions and handles all business logic. In this series We will spend the majority of our time on controller.
Run lb4 controller in your project root to create default controller.
wenbo:firstgame wenbo$ lb4 controller
? Controller class name: character
? What kind of controller would you like to generate? REST Controller with CRUD functions
? What is the name of the model to use with this CRUD repository? Character
? What is the name of your CRUD repository? CharacterRepository
? What is the type of your ID? number
? What is the base HTTP path name of the CRUD operations? /characters
   create src/controllers/character.controller.ts
   update src/controllers/index.ts
This will generate all basic APIs for character, including post, get, patch, put, and delete.
If you have tried the Todo tutorial, you probably already noticed the auto increment id feature. When you call the post API multiple times (leave id blank), the id increased by 1 every time. This feature is supported by the in-memory database. But we are using MongoDB in this project. If we want to have that feature, we need to do that programmatically.
Go to src/controllers and open character.controller.ts with your favourite editor.
  @post('/characters', {
    responses: {
      '200': {
        description: 'Character model instance',
        content: {'application/json': {schema: {'x-ts-type': Character}}},
      },
    },
  })
  async create(@requestBody() character: Character): Promise<Character> {
    //add following lines
    let characterId = 1;
    while(await this.characterRepository.exists(characterId)){
      characterId ++;
    }
    character.id = characterId;
    //add above lines
    return await this.characterRepository.create(character);
  }
Add those lines into the post /character. That will traverse your database to find a unique character id. Since this is a very bad programing practice, we will try to improve it in next episode.
API Explorer
LoopBack 4 has a build-in API explorer for you to play and test your API.
To start your project, run npm start in the project root.
wenbo:firstgame wenbo$ npm start

> firstgame@1.0.0 prestart /Users/xiaocase/Documents/learnlb/MyAPI/firstgameDemo/firstgame
> npm run build


> firstgame@1.0.0 build /Users/xiaocase/Documents/learnlb/MyAPI/firstgameDemo/firstgame
> lb-tsc es2017 --outDir dist


> firstgame@1.0.0 start /Users/xiaocase/Documents/learnlb/MyAPI/firstgameDemo/firstgame
> node .

Server is running at http://[::1]:3000
Try http://[::1]:3000/ping
Go to http://[::1]:3000 and open explorer. You will see this:
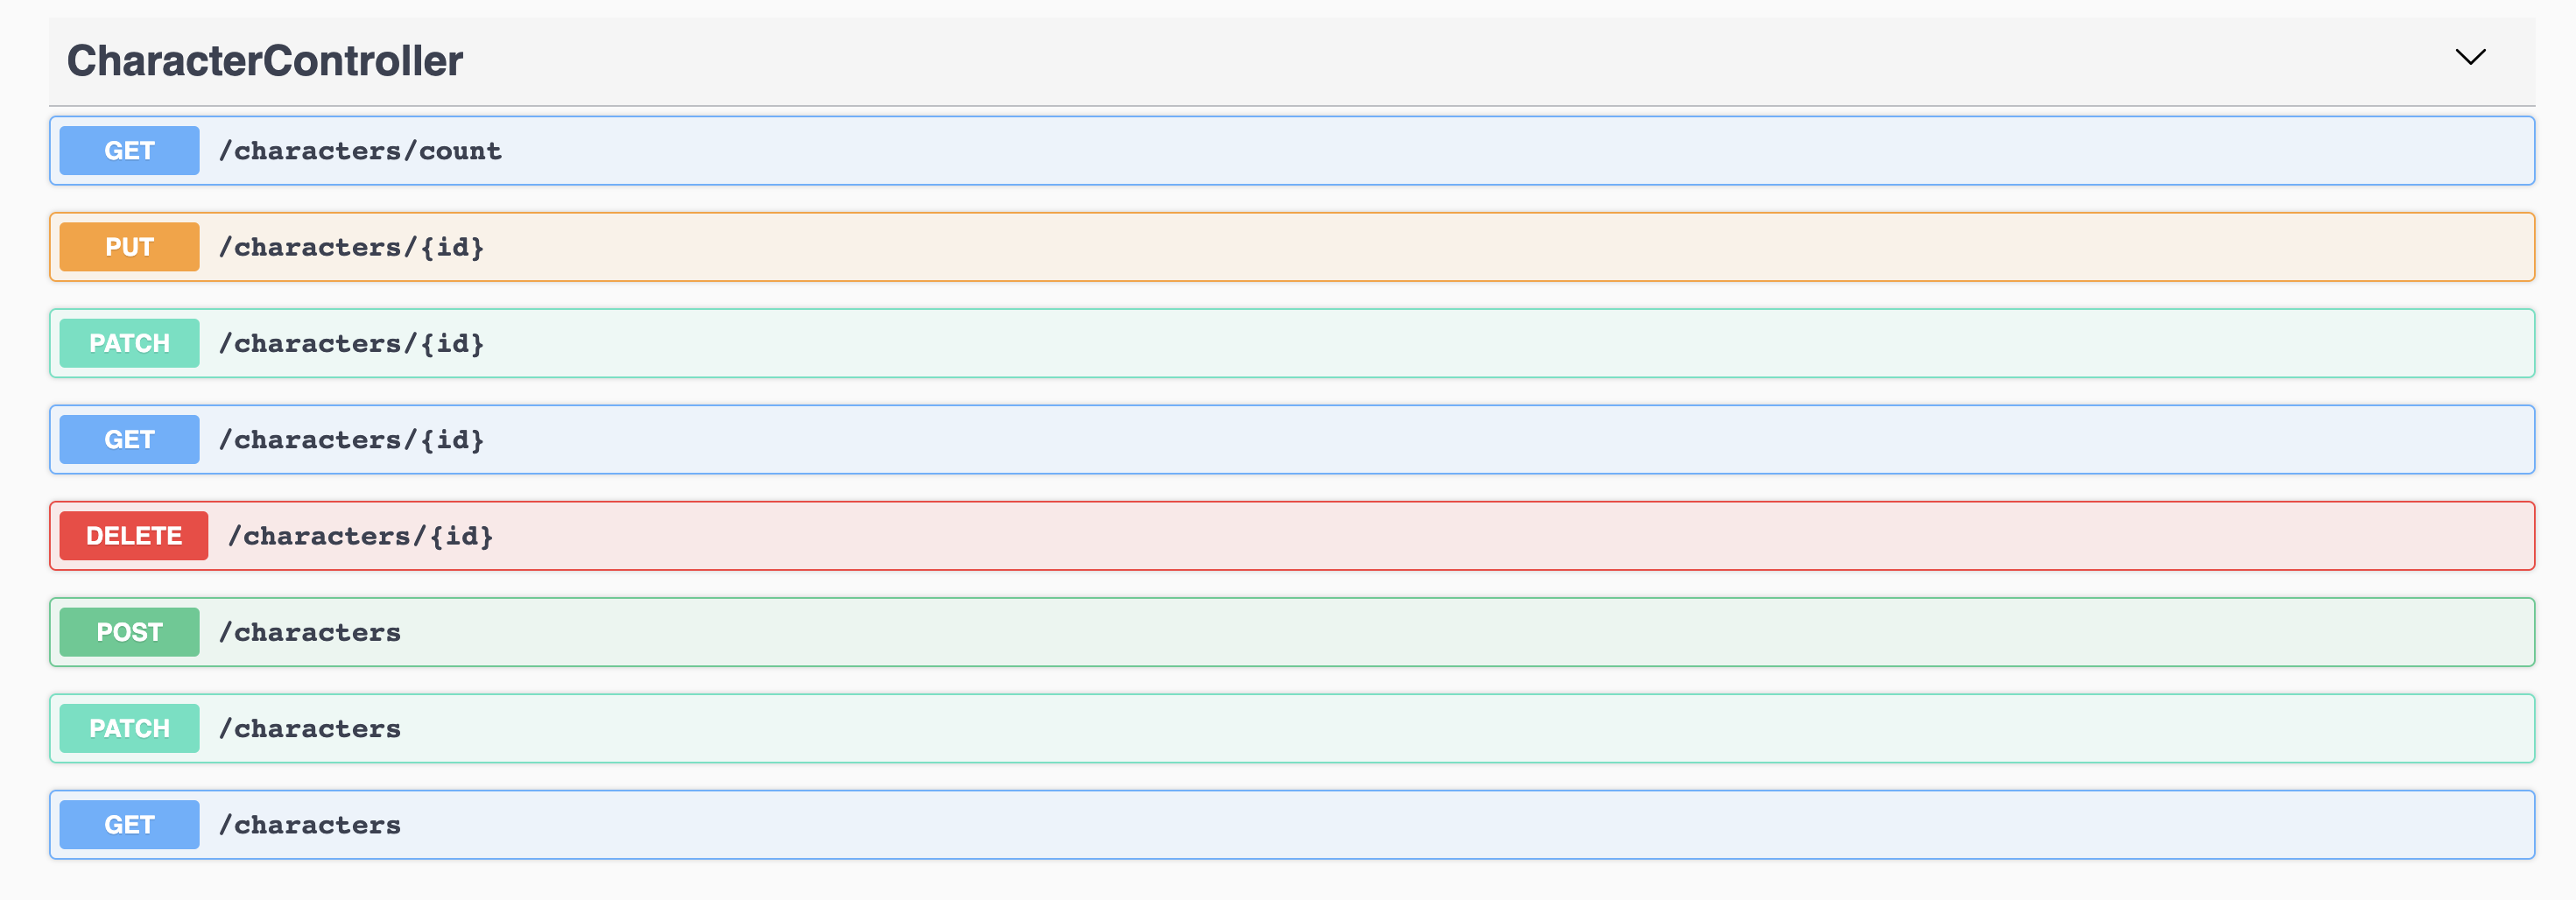
This shows the basic APIs we just created.
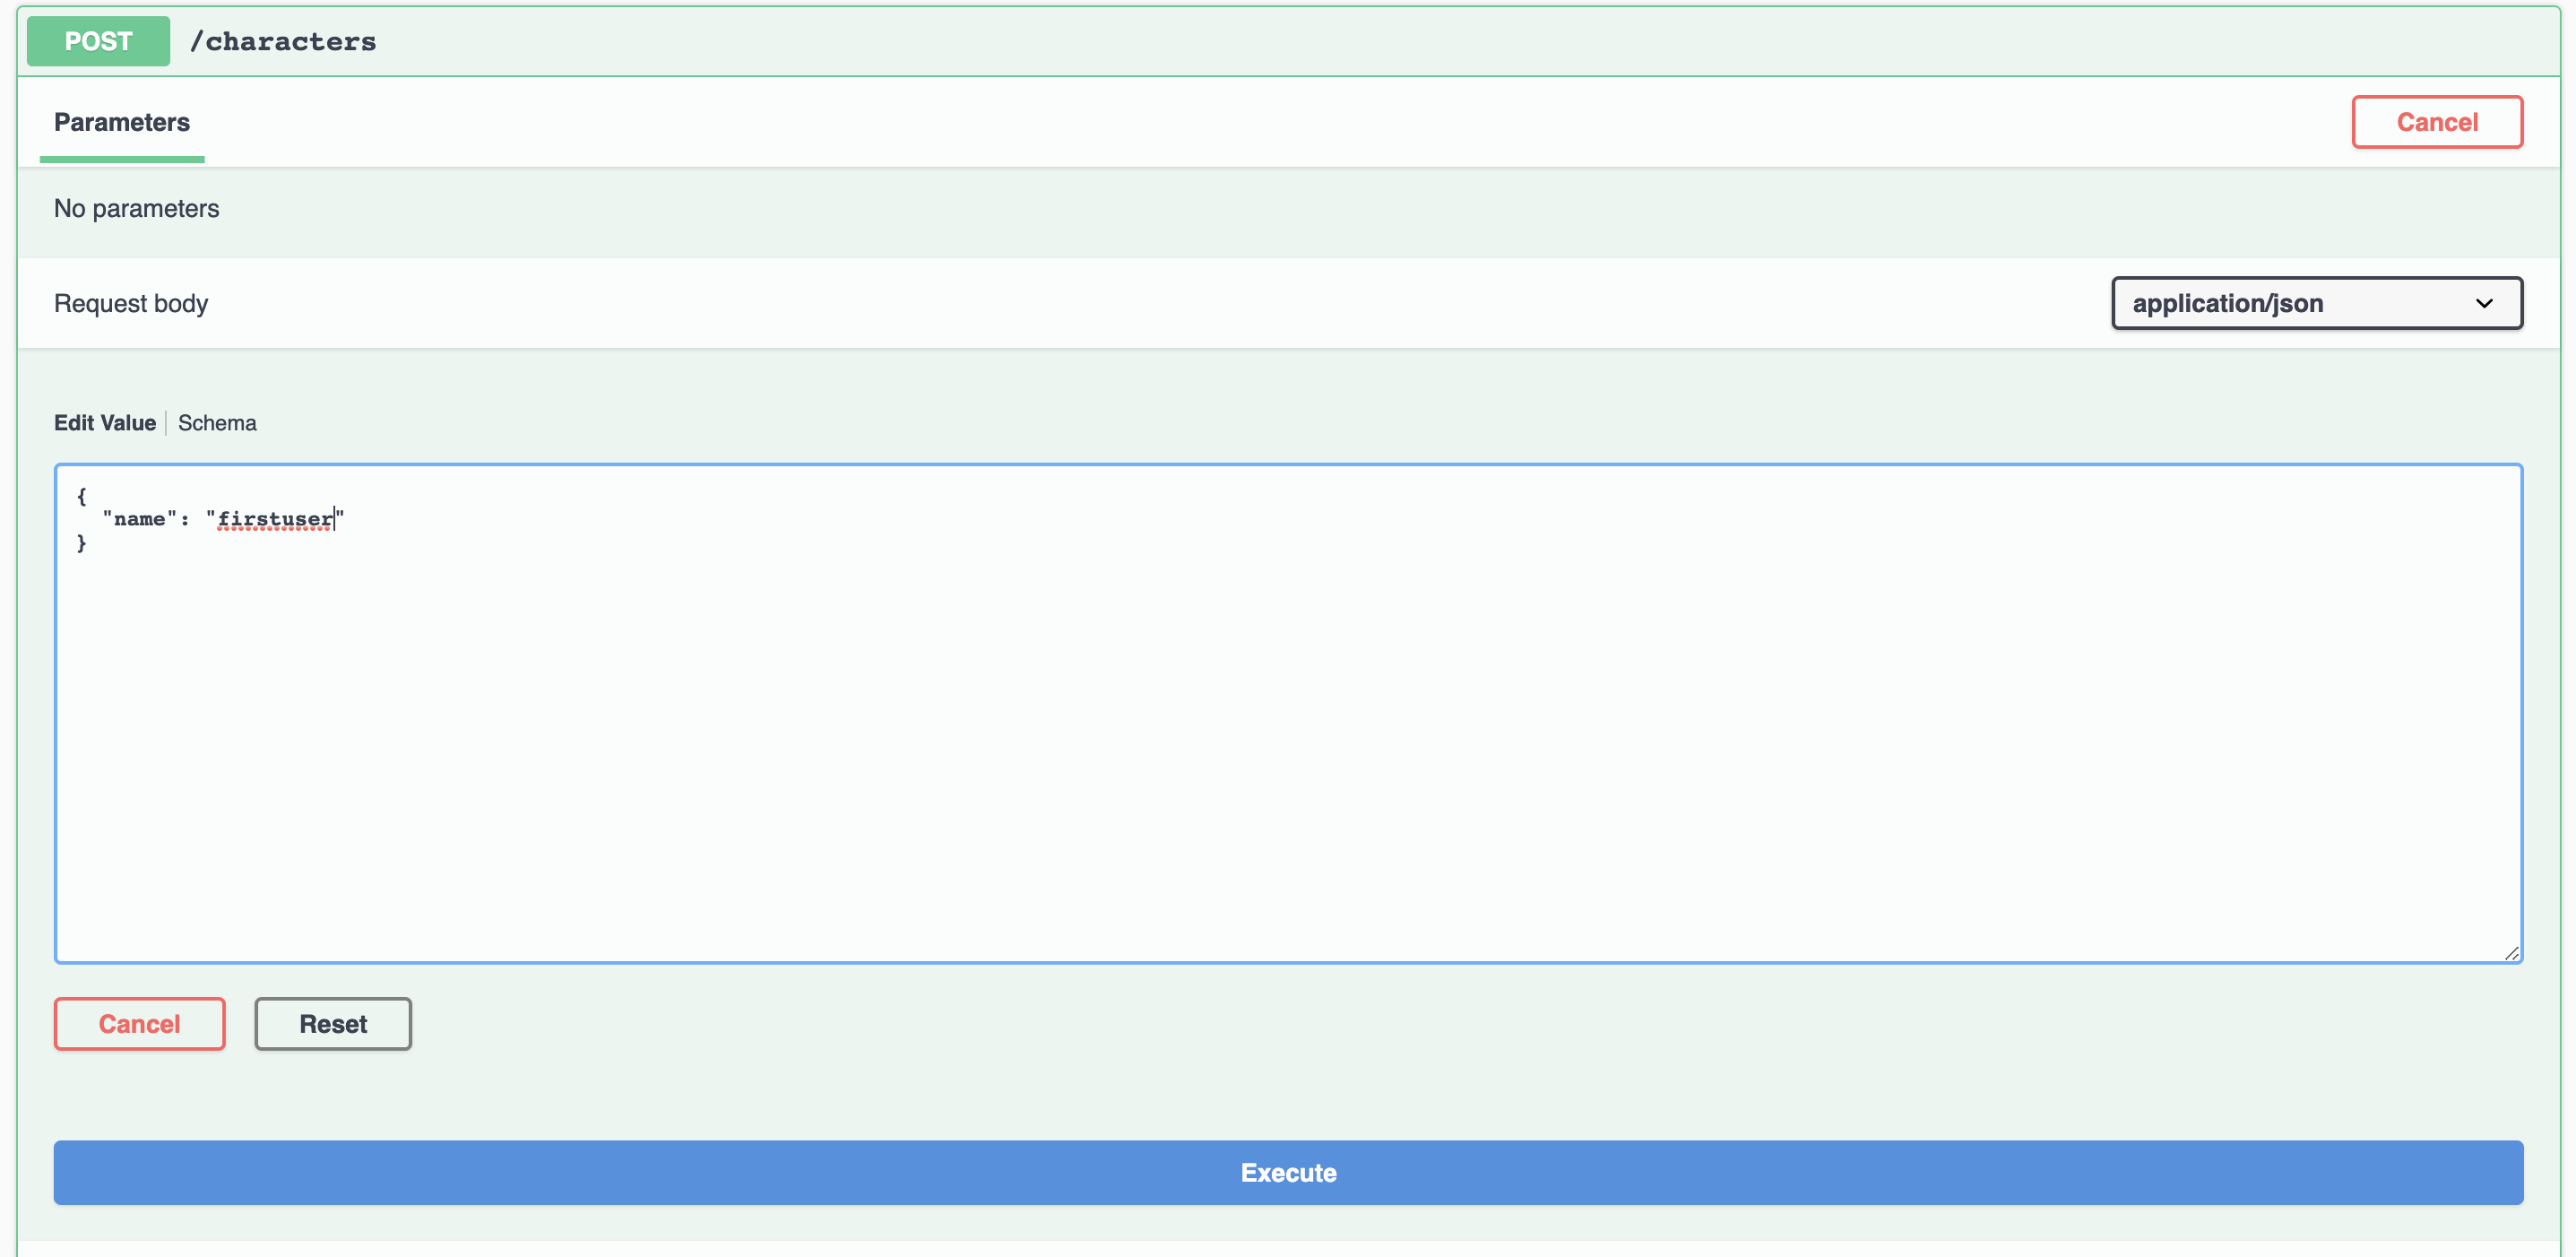
Now let's try to create a character. Open post /character and click "try it out". You only need to input a name for character, so you can leave the others blank.
Then we can try to get information for the character. Open get /character/{id} and click "try it out". Input "1" as character Id.

Applying This to Your Own Project
In this episode, we covered the how to create simple APIs. You can do the same to create a start point for your own project, for example, a student registration system which has a student model with properties like studentId, name, major, and course.
On the other hand, you have the freedom to choose any database you want. LB4 supports most databases very well. Here is an example that uses SOAP webservices as datasource.
What's Next?
In next episode, we will add weapon, armor, skill model and handle the relationship between models.
In the meantime, you can learn more about LoopBack in past blogs.