Building an Online Game With LoopBack 4, Part 2 - Generating Universally Unique ID and Managing Models Relationships

Originally published on strongloop.com
Part 2: Generating Universally Unique ID and Managing Models Relationships
Introduction
In this series, I’m going to help you learn LoopBack 4 and how to use it to easily build your own API and web project. We’ll create a new project I’ve been working on: an online web text-based adventure game. In this game, you can create your own account to build characters, fight monsters and find treasures. You will be able to control your character to take a variety of actions: attacking enemies, casting spells, and getting loot. This game also allows multiple players to log in and play with their friends.
Previously on Building an Online Game With LoopBack 4
In the previous episode, we created a foundation for our project. Now we have some basic APIs to create, edit, and delete a character.
Here is the previous episode:
In This Episode
First, we will use a third-party library in our LoopBack 4 project to generate unique character IDs. Then we will create weapon, armor, and skill models and build relationships between those models.
Loopback 4 supports three relations for now:
We will use HasOne in this episode.
You can check here for the code of this episode.
Universally Unique ID (UUID)
In the last episode, we used a while loop to generate continuous character IDs. However, that could be disaster in a real world application. Because fetching data from database is expensive. We don't want to do that hundreds times to just find a unique character ID. On the other hand, we don't really need continuous IDs, just unique IDs to distinguish characters. So we will use a better approach to generate universally unique IDs (UUID).
MongoDB can generate unique IDs for us. You can check more details here for how to do that. However, this approach may result in changing a lot of code.
So, we are going to use a third-party library called uuid. It's very easy to use and I think it's a good idea to show you how to use a third-party library in LoopBack 4 project. Run npm install --save @types/uuid at your project root to install it.
Then go back to src/models/character.model.ts and change the type of id to string. Because uuid can only generate string IDs.
  @property({
    //type: 'number',
    type: 'string',
    id: true,
  })
  //id?: number;
  id?: string;
Go to src/controllers/character.controller.ts. In the get /characters/{id} API, change the type of id to string.
  @get('/characters/{id}', {
    responses: {
      '200': {
        description: 'Character model instance',
        content: {'application/json': {schema: {'x-ts-type': Character}}},
      },
    },
  })
  async findById(
    //@param.path.number('id') id: number
    @param.path.string('id') id: string
  ): Promise<Character> {
    return await this.characterRepository.findById(id);
  }
Then do the same thing for patch /characters/{id}, put /characters/{id}, and del /characters/{id} APIs.
The uuid can generate 36 digits string IDs. The implementation of uuid library is using some high distinction values (like DNS, local time, IP address etc) as the seed to randomly generate strings to reduce the chance of duplication. We can simply call the function uuid() to use this library.
Remember how we generated a character ID in the last episode? We can do it in a very elegant way by using default keyword in model.
Open src/controllers/character.controller.ts and remove following code from post /characters API:
@post('/characters', {
  responses: {
    '200': {
      description: 'Character model instance',
      content: {'application/json': {schema: {'x-ts-type': Character}}},
    },
  },
})
async create(@requestBody() character: Character): Promise<Character> {
  /**remove this
  let characterId = 1;
  while(await this.characterRepository.exists(characterId)){
    characterId ++;
  }
  character.id = characterId;
  */
    return await this.characterRepository.create(character);
}
Open src/models/character.model.ts, and add the following import. This will import uuid so we can use it in our code.
import {v4 as uuid} from 'uuid';
Add the following line to generate character ID as default:
  @property({
    type: 'string',
    id: true,
    //add this line
    default: () => uuid(),
  })
  id?: string;
That is how we generate UUID for character. We will use the same way to generate UUID for other models later.
Model Relations
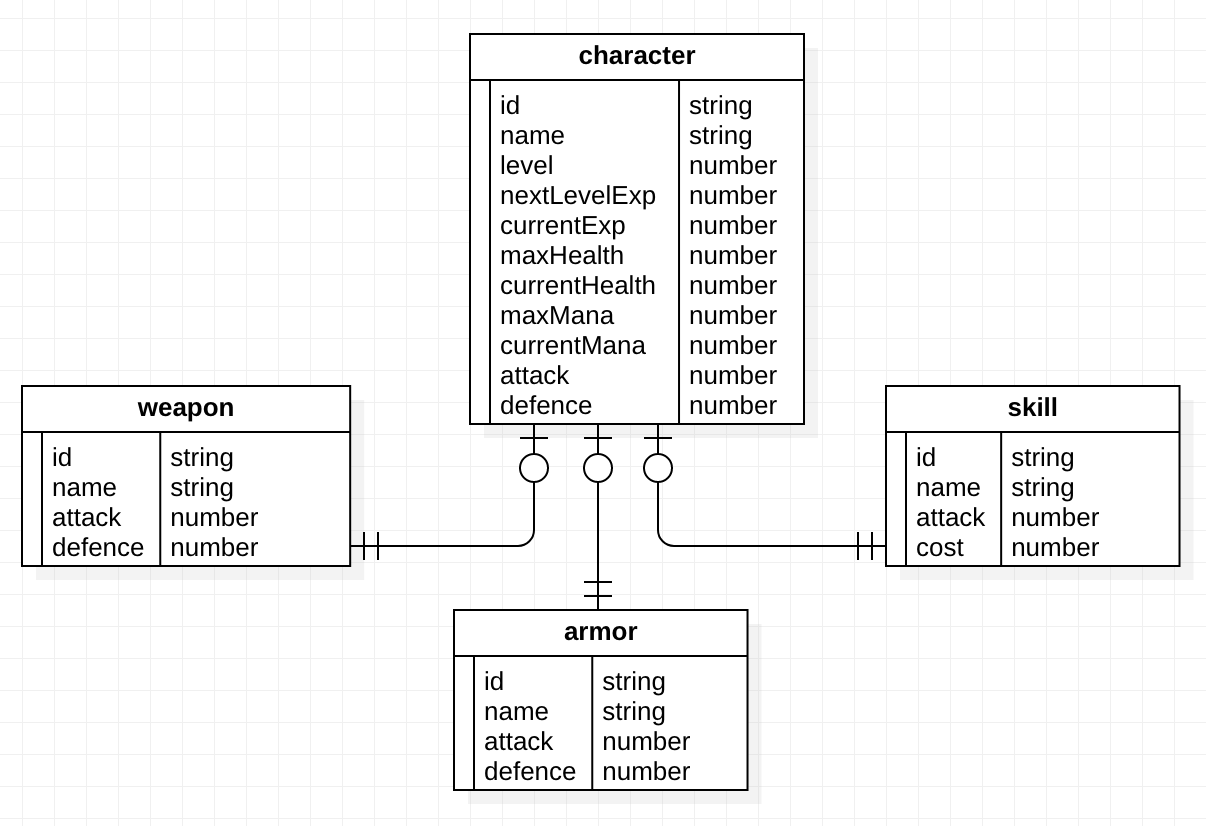
We will create weapon, armor, and skill models. Each character may have one weapon, one armor, and one skill. It is a HasOne relationship.
Last episode, we built APIs for character in the order of model, datasource, repository, and controller. Now we will do it in the same way for weapon, armor, and skill. Note that we are not going to cover controller today, because I will have a whole episode focused on the work required (and there is a lot!).
Model
First, we need to create weapon model. It's very similar to what we did in last episode. Run lb4 model at project root.
wenbo:firstgame wenbo$ lb4 model
? Model class name: weapon
? Please select the model base class Entity (A persisted model with an ID)
? Allow additional (free-form) properties? No
Let's add a property to Weapon
Enter an empty property name when done

? Enter the property name: id
? Property type: string
? Is id the ID property? Yes
? Is it required?: No
? Default value [leave blank for none]:

Let's add another property to Weapon
Enter an empty property name when done

? Enter the property name: name
? Property type: string
? Is it required?: Yes
? Default value [leave blank for none]:

Let's add another property to Weapon
Enter an empty property name when done

? Enter the property name: attack
? Property type: number
? Is it required?: Yes
? Default value [leave blank for none]:

Let's add another property to Weapon
Enter an empty property name when done

? Enter the property name: defence
? Property type: number
? Is it required?: Yes
? Default value [leave blank for none]:
Do the same thing for armor and skill.
Defining hasOne Model Relation in Model
Now let's add relationships to character model to indicate that a character has one weapon, armor, and skill. You can check here for more details on model relationship. You can also take a look at the TodoList tutorial to see how it handles a relationship.
Add the following imports to the head of character.model.ts.
import {Armor} from './armor.model';
import {Weapon} from './weapon.model';
import {Skill} from './skill.model';
Then add the following code into character.model.ts after those auto-generated properties. That means each character may have one weapon, armor, and skill.
  @hasOne(() => Armor)
  armor?: Armor;

  @hasOne(() => Weapon)
  weapon?: Weapon;

  @hasOne(() => Skill)
  skill?: Skill;
Next, we need to add a relationship for weapon.model.ts as well. Add the following imports to the head.
import {Character} from './character.model';
import {v4 as uuid} from 'uuid';
Then add this code after those auto-generated properties.
  @belongsTo(() => Character)
    characterId: string;
This gives weapon another property characterId means identifies the character this weapon belongs to. It's similar to the foreign key in a relational database.
Don't forget to generate UUID for weapon:
@property({
  type: 'string',
  id: true,
  //add this line
  default: () => uuid(),
})
id?: string;
Do the same thing for armor.model.ts and skill.model.ts. Now our models are all set.
You can check my code for all models at here.
Datasource
There is no need to create new datasource. We can use the MongoDB we created in last episode.
Repository
Run lb4 repository at your project root.
? Please select the datasource MongoDatasource
? Select the model(s) you want to generate a repository Weapon
? Please select the repository base class DefaultCrudRepository (Legacy juggler bridge)
   create src/repositories/weapon.repository.ts
   update src/repositories/index.ts
Then create repositories for armor and skill in the same way.
Defining hasOne Model Relation in Repository
Let's add relations for character.repository.ts first. Add following imports:
import {HasOneRepositoryFactory, juggler, repository} from '@loopback/repository';
import {Armor, Weapon, Skill} from '../models';
import {Getter} from '@loopback/core';
import {ArmorRepository} from './armor.repository';
import {WeaponRepository} from './weapon.repository';
import {SkillRepository} from './skill.repository';
Add the following code before the constructor:
  public armor: HasOneRepositoryFactory<
    Armor,
    typeof Character.prototype.id
  >;

  public weapon: HasOneRepositoryFactory<
    Weapon,
    typeof Character.prototype.id
  >;

  public skill: HasOneRepositoryFactory<
    Skill,
    typeof Character.prototype.id
  >;
This means character may have one weapon, armor, and skill ID. Then we are able to find the correct entity by that ID.
Then change the constructor to this:
  constructor(
    @inject('datasources.mongo') dataSource: MongoDataSource,
    @repository.getter(ArmorRepository)
    protected armorRepositoryGetter: Getter<ArmorRepository>,
    @repository.getter(WeaponRepository)
    protected weaponRepositoryGetter: Getter<WeaponRepository>,
    @repository.getter(SkillRepository)
    protected skillRepositoryGetter: Getter<SkillRepository>,
  ) {
    super(Character, dataSource);
    this.armor = this.createHasOneRepositoryFactoryFor('armor', armorRepositoryGetter);
    this.weapon = this.createHasOneRepositoryFactoryFor('weapon', weaponRepositoryGetter);
    this.skill = this.createHasOneRepositoryFactoryFor('skill', skillRepositoryGetter);
  }
This can help you to assign weapon, armor, and skill to character.
On the other hand, what we need to do for the weapon.repository.ts is kind of the same. Instead of HasOneRepositoryFactory, we add BelongsToAccessor before constructor.
  public readonly character: BelongsToAccessor<
    Character,
    typeof Weapon.prototype.id
  >;
And change the constructor to this:
  constructor(
    @inject('datasources.mongo') dataSource: MongoDataSource,
    @repository.getter('CharacterRepository')
    protected characterRepositoryGetter: Getter<CharacterRepository>,
  ) {
    super(Weapon, dataSource);
    this.character = this.createBelongsToAccessorFor('character',characterRepositoryGetter);
  }
Don't forget to add imports at the head of weapon.repository.ts.
import {BelongsToAccessor, juggler, repository} from '@loopback/repository';
import {Character} from '../models';
import {inject} from '@loopback/core';
import {CharacterRepository} from './character.repository';
Then do the same thing for armor.repository.ts and skill.repository.ts. And our repositories are all set.
You can check my code for all repositories at here.
Applying This to Your Own Project
In this episode, we used a third-party library to generate UUID. You can easily use any external library in you LoopBack 4 project.
We also built relations between character, weapon, aromr, and skill. In a real world application, most of entities have relationships between each other. You can use LoopBack 4 to easily manage that in your project.
What's Next?
In our next episode, we will do a lot of coding in controller to create weapon, armor, skill and equip a character with them. Controller is where you achieve most of your project functions and business logic. I am sure we will have a lot of fun in next episode.
In the meantime, you can learn more about LoopBack in past blogs.