Overview
Important: Please read Relations first.
Note:
This relation best works with databases that support foreign key constraints (SQL). Using this relation with NoSQL databases will result in unexpected behavior, such as the ability to create a relation with a model that does not exist. We are working on a solution to better handle this. It is fine to use this relation with NoSQL databases for purposes such as navigating related models, where the referential integrity is not critical.
A hasMany relation denotes a one-to-many connection of a model to another
model through referential integrity. The referential integrity is enforced by a
foreign key constraint on the target model which usually references a primary
key on the source model. This relation indicates that each instance of the
declaring or source model has zero or more instances of the target model. For
example, in an application with customers and orders, a customer can have many
orders as illustrated in the diagram below.

The diagram shows target model Order has property customerId as the foreign key to reference the declaring model Customer’s primary key id.
To add a hasMany relation to your LoopBack application and expose its related
routes, you need to perform the following steps:
- Add a property to your model to access related model instances.
- Add a foreign key property in the target model referring to the source model’s id.
- Modify the source model repository class to provide access to a constrained target model repository.
- Call the constrained target model repository CRUD APIs in your controller methods.
Defining a hasMany Relation
This section describes how to define a hasMany relation at the model level
using the @hasMany decorator. The relation constrains the target repository by
the foreign key property on its associated model. The following example shows
how to define a hasMany relation on a source model Customer and a target
model Order.
/src/models/customer.model.ts
import {Order} from './order.model';
import {Entity, property, hasMany} from '@loopback/repository';

export class Customer extends Entity {
  @property({
    type: 'number',
    id: true,
  })
  id: number;

  @property({
    type: 'string',
    required: true,
  })
  name: string;

  @hasMany(() => Order)
  orders?: Order[];

  constructor(data: Partial<Customer>) {
    super(data);
  }
}
The definition of the hasMany relation is inferred by using the @hasMany
decorator. The decorator takes in a function resolving the target model class
constructor and optionally a custom foreign key to store the relation metadata.
The decorator logic also designates the relation type and tries to infer the
foreign key on the target model (keyTo in the relation metadata) to a default
value (source model name appended with Id in camel case, same as LoopBack 3).
It also calls property.array() to ensure that the type of the property is
inferred properly as an array of the target model instances.
The decorated property name is used as the relation name and stored as part of
the source model definition’s relation metadata. The property type metadata is
also preserved as an array of type Order as part of the decoration. (Check
Relation Metadata section below for
more details)
A usage of the decorator with a custom foreign key name for the above example is as follows:
// import statements
class Customer extends Entity {
  // constructor, properties, etc.
  @hasMany(() => Order, {keyTo: 'customerId'})
  orders?: Order[];
}
Add the source model’s id as the foreign key property (customerId) in the
target model.
/src/models/order.model.ts
import {Entity, model, property} from '@loopback/repository';

@model()
export class Order extends Entity {
  @property({
    type: 'number',
    id: true,
    required: true,
  })
  id: number;

  @property({
    type: 'string',
    required: true,
  })
  name: string;

  @property({
    type: 'number',
  })
  customerId?: number;

  constructor(data?: Partial<Order>) {
    super(data);
  }
}

export interface OrderRelations {
  // describe navigational properties here
}

export type OrderWithRelations = Order & OrderRelations;
The foreign key property (customerId) in the target model can be added via a
corresponding belongsTo relation, too.
/src/models/order.model.ts
import {Entity, model, property, belongsTo} from '@loopback/repository';
import {Customer, CustomerWithRelations} from './customer.model';

@model()
export class Order extends Entity {
  @property({
    type: 'number',
    id: true,
    required: true,
  })
  id: number;

  @property({
    type: 'string',
    required: true,
  })
  name: string;

  @belongsTo(() => Customer)
  customerId: number;

  constructor(data?: Partial<Order>) {
    super(data);
  }
}

export interface OrderRelations {
  customer?: CustomerWithRelations;
}

export type OrderWithRelations = Order & OrderRelations;
LB4 also provides an CLI tool lb4 relation to generate hasMany relation for
you. Before you check out the
Relation Generator
page, read on to learn how you can define relations to meet your requirements.
Relation Metadata
LB4 uses three keyFrom, keyTo and name fields in the hasMany relation
metadata to configure relations. The relation metadata has its own default
values for these three fields:
| Field Name | Description | Default Value | Example |
|---|---|---|---|
keyFrom |
the primary key of the source model | the id property of the source model | Customer.id |
keyTo |
the foreign key of the target model | the source model name appended with `Id` in camel case | Order.customerId |
name |
the name of the relation | decorated property name | Customer.orders |
We recommend to use default values. If you’d like to customize the foreign key name, you’ll need to specify some fields through the relation decorator.
For customizing the foreign key name, keyTo field needs to be specified via
@hasMany decorator. The following example shows how to customize the foreign
key name as my_customer_id instead of customerId:
// import statements
@model()
export class Customer extends Entity {
  // constructor, properties, etc.

  @hasMany(() => Order, {keyTo: 'my_customer_id'})
  orders: Order[];
}
// import statements
@model()
export class Order extends Entity {
  // constructor, properties, etc.

  @property({
    type: 'number',
  })
  my_customer_id: number; // customized foreign key name
}
Notice that if you decorate the corresponding customized foreign key of the
target model with @belongsTo, you also need to specify the belongsTo
relation name in the name field of its relation metadata. See
BelongsTo for more details.
// import statements
@model()
export class Order extends Entity {
  // constructor, properties, etc.

  // specify the belongsTo relation name if a customized name is used here
  @belongsTo(() => Customer, {name: 'customer'}) // the name of this belongsTo relation
  my_customer_id: number; // customized foreign key name
}
If you need to use another attribute other than the id property to be the source
key, customizing keyFrom field would allow you to do so:
export class Customer extends Entity {
  @property({
    type: 'number',
    id: true,
  })
  id: number;

  // if you'd like to use this property as the source id
  // of a certain relation that relates to a model `Review`
  @property({
    type: 'number',
  })
  authorId: number; // not primary key

  @hasMany(() => Review, {keyFrom: 'authorId'})
  reviews?: Review[];

  @hasMany(() => Order)
  orders?: Order[];

  // ..constructor
  }
}
Notice that if you decorate the corresponding foreign key of the target model
with @belongsTo, you also need to specify the keyTo field of its relation
metadata. See BelongsTo for more
details.
// import statements
@model()
export class Review extends Entity {
  // constructor, properties, etc.

  // specify the keyTo if the source key is not the id property
  @belongsTo(() => Customer, {keyTo: 'authorId'})
  customerId: number; // default foreign key name
}
Important: It is user’s responsibility to make sure the non-id source key doesn’t have duplicate value. Besides, LB4 doesn’t support composite keys for now. e.g joining two tables with more than one source key. Related GitHub issue: Composite primary/foreign keys
If you need to use different names for models and database columns, to use
my_orders as db column name other than orders for example, the following
setting would allow you to do so:
// import statements
@model()
export class Customer extends Entity {
  // constructor, properties, etc.
  @hasMany(() => Order, {_relationMetadata_}, {name: 'my_orders'})
  orders: Order[];
}
Notice: the name field in the third parameter is not part of the relation
metadata. It’s part of property definition.
Configuring a hasMany relation
The configuration and resolution of a hasMany relation takes place at the
repository level. Once hasMany relation is defined on the source model, then
there are a couple of steps involved to configure it and use it. On the source
repository, the following are required:
-
In the constructor of your source repository class, use Dependency Injection to receive a getter function for obtaining an instance of the target repository. Note: We need a getter function, accepting a string repository name instead of a repository constructor, or a repository instance, in order to break a cyclic dependency between a repository with a hasMany relation and a repository with the matching belongsTo relation.
- Declare a property with the factory function type
HasManyRepositoryFactory<targetModel, typeof sourceModel.prototype.id>on the source repository class. - call the
createHasManyRepositoryFactoryForfunction in the constructor of the source repository class with the relation name (decorated relation property on the source model) and target repository instance and assign it the property mentioned above.
The following code snippet shows how it would look like:
/src/repositories/customer.repository.ts
import {Order, Customer, CustomerRelations} from '../models';
import {OrderRepository} from './order.repository';
import {
  DefaultCrudRepository,
  juggler,
  HasManyRepositoryFactory,
  repository,
} from '@loopback/repository';
import {inject, Getter} from '@loopback/core';

export class CustomerRepository extends DefaultCrudRepository<
  Customer,
  typeof Customer.prototype.id,
  CustomerRelations
> {
  public readonly orders: HasManyRepositoryFactory<
    Order,
    typeof Customer.prototype.id
  >;
  constructor(
    @inject('datasources.db') protected db: juggler.DataSource,
    @repository.getter('OrderRepository')
    orderRepositoryGetter: Getter<OrderRepository>,
  ) {
    super(Customer, db);
    this.orders = this.createHasManyRepositoryFactoryFor(
      'orders',
      orderRepositoryGetter,
    );
  }
}
The following CRUD APIs are now available in the constrained target repository
factory orders for instances of customerRepository:
createfor creating a target model instance belonging to source model instance (API Docs)findfinding target model instance(s) belonging to source model instance (API Docs)deletefor deleting target model instance(s) belonging to source model instance (API Docs)patchfor patching target model instance(s) belonging to source model instance (API Docs)
Here is an example of creating the related models:
const myCustomer = await customerRepository.create({id: 1, name: 'Fiorio'});
const orderData = {id: 1, customerId: myCustomer.id};
// create the related order
customerRepository.orders(myCustomer.id).create(orderData);
Note:
Notice that CustomerRepository.create() expects a Customer model only, navigational properties are not expected to be included in the target data. For instance, the following request will be rejected:
customerRepository.create({
` id: 1,
name:’invalid request’,
orders:[{id: 1, customerId: 1}]
})`
For updating (full replace of all properties on a PUT endpoint for
instance) a target model you have to directly use this model repository. In this
case, the caller must provide both the foreignKey value and the primary key
(id). Since the caller already has access to the primary key of the target
model, there is no need to go through the relation repository and the operation
can be performed directly on DefaultCrudRepository for the target model
(OrderRepository in our example).
Using hasMany constrained repository in a controller
The same pattern used for ordinary repositories to expose their CRUD APIs via
controller methods is employed for hasMany repositories. Once the hasMany
relation has been defined and configured, controller methods can call the
underlying constrained repository CRUD APIs and expose them as routes once
decorated with
Route decorators. It
will require the value of the foreign key and, depending on the request method,
a value for the target model instance as demonstrated below.
src/controllers/customer-orders.controller.ts
import {post, param, requestBody} from '@loopback/rest';
import {CustomerRepository} from '../repositories/';
import {Customer, Order} from '../models/';
import {repository} from '@loopback/repository';

export class CustomerOrdersController {
  constructor(
    @repository(CustomerRepository)
    protected customerRepository: CustomerRepository,
  ) {}

  @post('/customers/{id}/order')
  async createOrder(
    @param.path.number('id') customerId: typeof Customer.prototype.id,
    @requestBody() orderData: Order,
  ): Promise<Order> {
    return this.customerRepository.orders(customerId).create(orderData);
  }
}
In LoopBack 3, the REST APIs for relations were exposed using static methods
with the name following the pattern __{methodName}__{relationName}__ (e.g.
Customer.__find__orders). We recommend to create a new controller for each
relation in LoopBack 4. First, it keeps controller classes smaller. Second, it
creates a logical separation of ordinary repositories and relational
repositories and thus the controllers which use them. Therefore, as shown above,
don’t add order-related methods to CustomerController, but instead create a
new CustomerOrdersController class for them.
Note:
The type of orderData above will possibly change to Partial<Order> to exclude
certain properties from the JSON/OpenAPI spec schema built for the requestBody
payload. See its GitHub
issue to follow the discussion.
Querying related models
Different from LB3, LB4 creates a different inclusion resolver for each relation
type to query related models. Each relation has its own inclusion resolver
inclusionResolver. And each repository has a built-in property
inclusionResolvers as a registry for its inclusionResolvers. Here is a diagram
to show the idea:
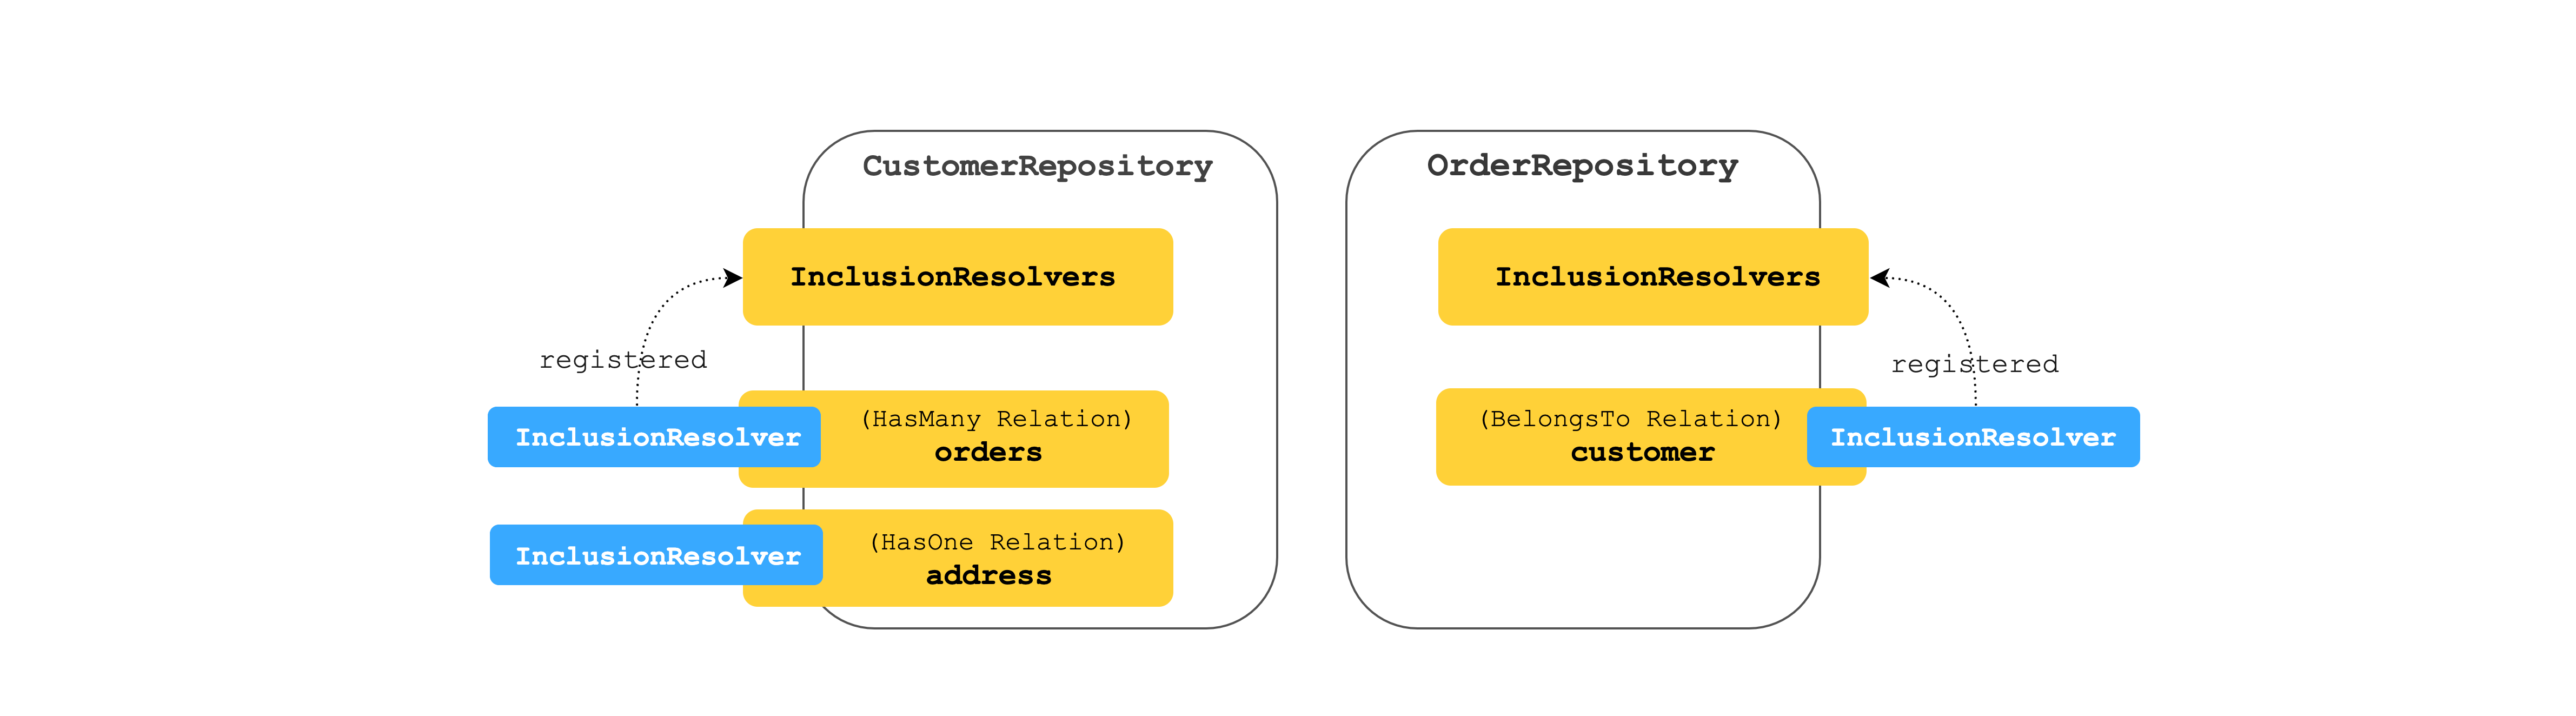
A hasMany relation has an inclusionResolver function as a property. It
fetches target models for the given list of source model instances.
Use the relation between Customer and Order we show above, a Customer has
many Orders.
After setting up the relation in the repository class, the inclusion resolver allows users to retrieve all customers along with their related orders through the following code at the repository level:
customerRepo.find({include: ['orders']});
or use APIs with controllers:
GET http://localhost:3000/customers?filter[include][]=orders
Enable/disable the inclusion resolvers
- Base repository classes have a public property
inclusionResolvers, which maintains a map containing inclusion resolvers for each relation. - The
inclusionResolverof a certain relation is built when the source repository class calls thecreateHasManyRepositoryFactoryForfunction in the constructor with the relation name. - Call
registerInclusionResolverto add the resolver of that relation to theinclusionResolversmap. (As we realized in LB3, not all relations are allowed to be traversed. Users can decide to which resolvers can be added.)
The following code snippet shows how to register the inclusion resolver for the has-many relation ‘orders’:
export class CustomerRepository extends DefaultCrudRepository {
  orders: HasManyRepositoryFactory<Order, typeof Customer.prototype.id>;

  constructor(
    dataSource: juggler.DataSource,
    orderRepositoryGetter: Getter<OrderRepository>,
  ) {
    super(Customer, dataSource);

    // we already have this line to create a HasManyRepository factory
    this.orders = this.createHasManyRepositoryFactoryFor(
      'orders',
      orderRepositoryGetter,
    );

    // add this line to register inclusion resolver
    this.registerInclusionResolver('orders', this.orders.inclusionResolver);
  }
}
-
We can simply include the relation in queries via
find(),findOne(), andfindById()methods. For example, these queries return all customers with theirOrders:if you process data at the repository level:
customerRepository.find({include: ['orders']});this is the same as the url:
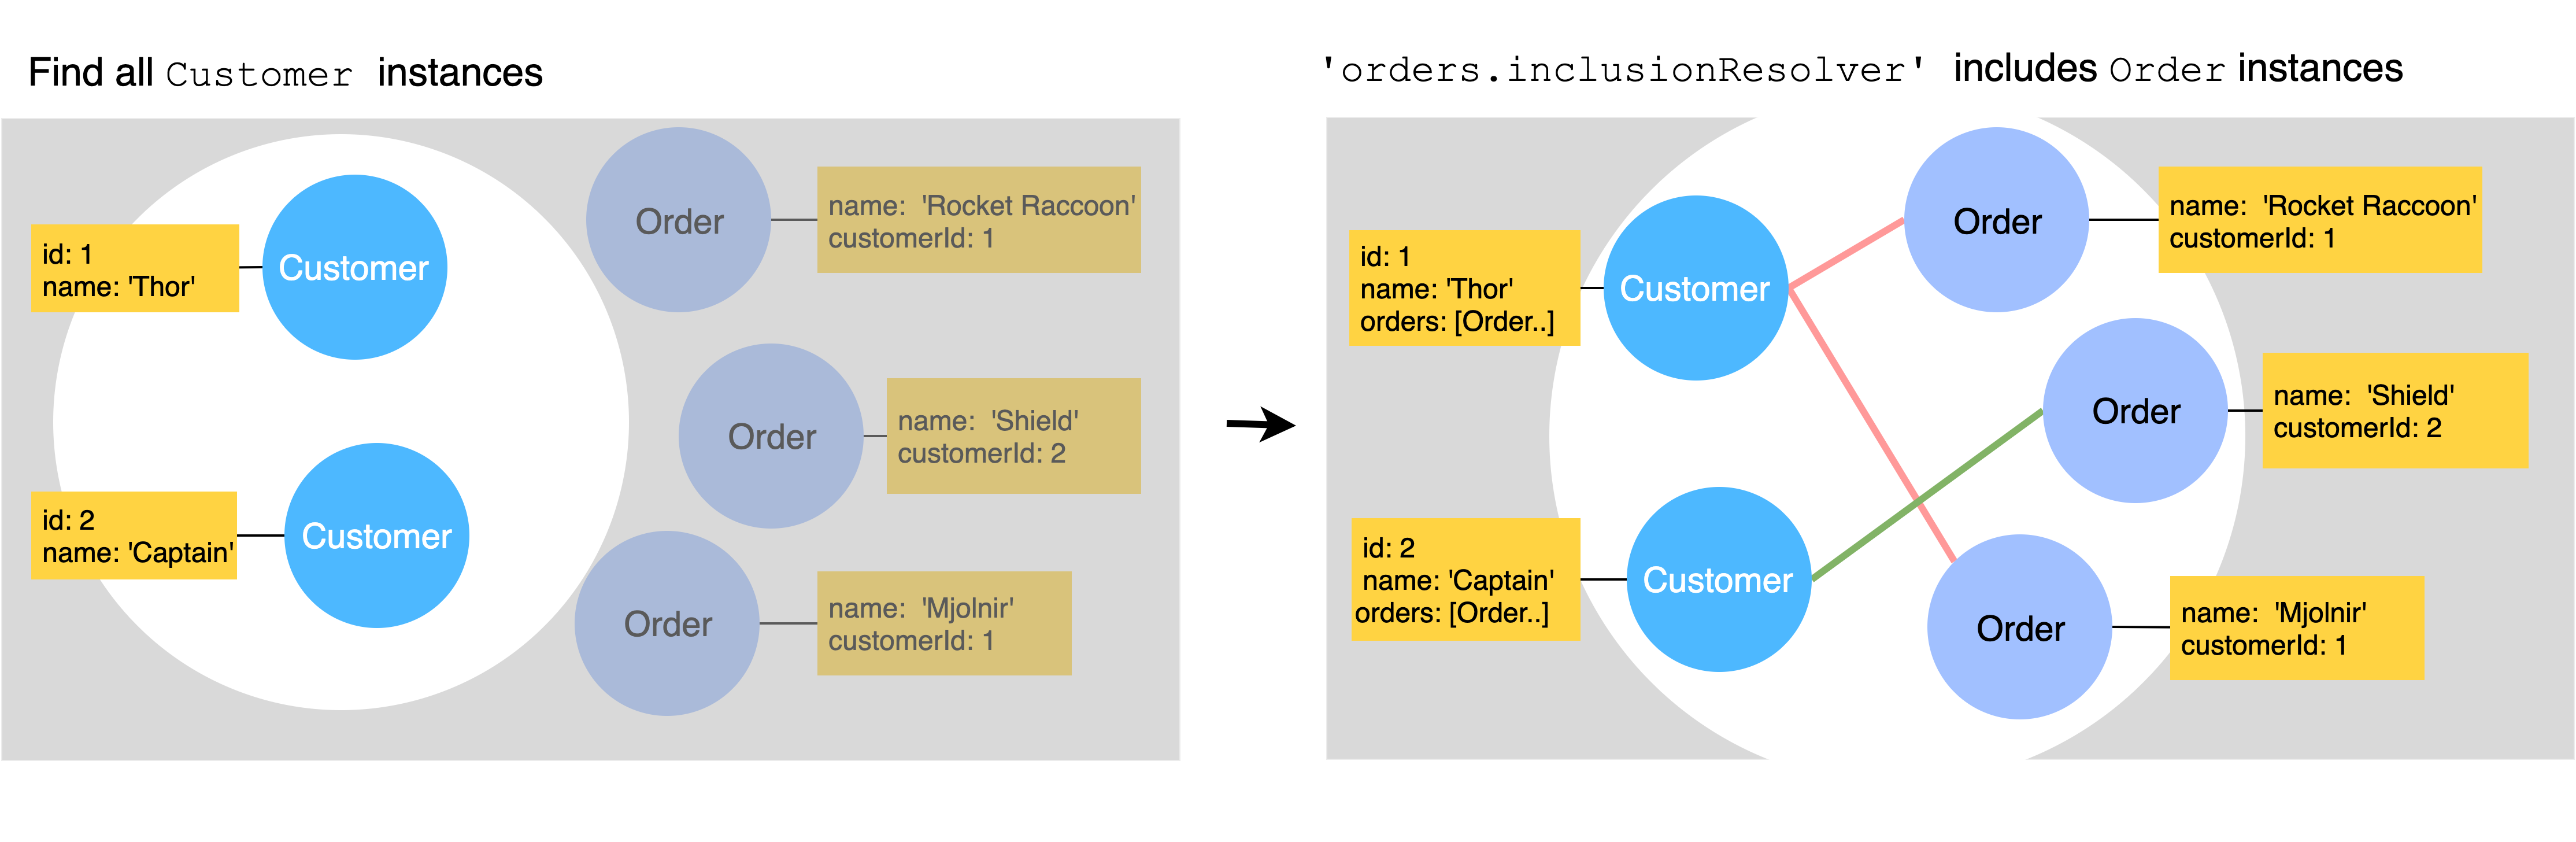
GET http://localhost:3000/customers?filter[include][]=orderswhich returns:
[
  {
    id: 1,
    name: 'Thor',
    orders: [
      {name: 'Mjolnir', customerId: 1},
      {name: 'Rocket Raccoon', customerId: 1},
    ],
  },
  {
    id: 2,
    name: 'Captain',
    orders: [{name: 'Shield', customerId: 2}],
  },
];
Here is a diagram to make this more intuitive:
- You can delete a relation from
inclusionResolversto disable the inclusion for a certain relation. e.gcustomerRepository.inclusionResolvers.delete('orders')
Query multiple relations
It is possible to query several relations or nested include relations with custom scope. Once you have the inclusion resolver of each relation set up, the following queries would allow you traverse data differently:
In our example, we have relations:
CustomerhasOne anAddress- denoted asaddress.CustomerhasManyOrders - denoted asorders.OrderhasManyManufacturer- denoted asmanufacturers.
To query multiple relations, for example, return all customers including their orders and address, in Node API:
customerRepo.find({include: ['orders', 'address']});
Equivalently, with url, you can do:
GET http://localhost:3000/customers?filter[include][0][relation]=orders&filter[include][1][relation]=address
This gives
[
  {
    id: 1,
    name: 'Thor',
    addressId: 3
    orders: [
      {name: 'Mjolnir', customerId: 1},
      {name: 'Rocket Raccoon', customerId: 1},
    ],
    address:{
          id: 3
          city: 'Thrudheim',
          province: 'Asgard',
          zipcode: '8200',
    }
  },
  {
    id: 2,
    name: 'Captain',
    orders: [{name: 'Shield', customerId: 2}], // doesn't have a related address
  },
]
To query nested relations, for example, return all customers including their orders and include orders’ manufacturers , this can be done with filter:
customerRepo.find({
  include: [
    {
      relation: 'orders',
      scope: {
        include: ['manufacturers'],
      },
    },
  ],
});
( You might use encodeURIComponent(JSON.stringify(filter)) to convert the
filter object to a query string.)
which gives
{
  id: 1,
  name: 'Thor',
  addressId: 3
  orders: [
    {
      name: 'Mjolnir',
      customerId: 1
    },
    {
      name: 'Rocket Raccoon',
      customerId: 1,
      manufacturers:[ // nested related models of orders
        {
          name: 'ToysRUs',
          orderId: 1
        },
                {
          name: 'ToysRThem',
          orderId: 1
        }
      ]
    },
  ],
}
You can also have other query clauses in the scope such as where, limit,
etc.
customerRepo.find({
  include: [
    {
      relation: 'orders',
      scope: {
        where: {name: 'ToysRUs'},
        include: ['manufacturers'],
      },
    },
  ],
});
The Where clause above filters the result of orders.
Tip: Make sure that you have all inclusion resolvers that you need REGISTERED, and all relation names should be UNIQUE.