Tip: Missing instructions for your LoopBack 3 use case? Please report a Migration docs issue on GitHub to let us know.
This example is migrated from loopback-example-access-control, and uses the authentication and authorization system in LoopBack 4 to implement the access control.
App Scenario
In this example, we create “Startkicker” (a basic Kickstarter-like application) to demonstrate authentication and authorization mechanisms in LoopBack. The application consists of four types of users:
- guest
- owner
- team member
- administrator
Each user type has permission to perform tasks based on their role and the application’s ACL (access control list) entries.
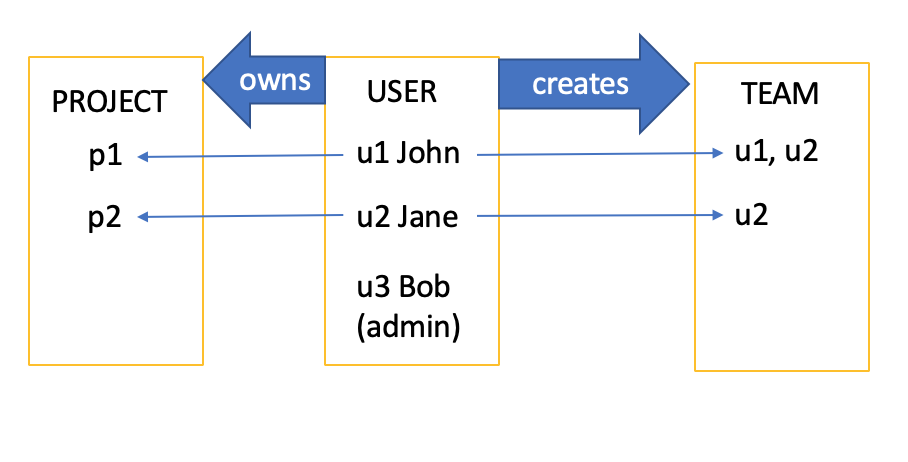
Here is the diagram that describes the models:
And the following operations can be processed by different roles:
- /projects/list-projects
- guest, admin, owner, teamMember
- /projects/view-all
- admin
- /projects/{id}/show-balance
- owner, teamMember
- /projects/{id}/donate
- admin, owner, teamMember
- /projects/{id}/withdraw
- owner
This application includes some pre-created data. They are shown in the above diagram. For example, as you can see, u1 owns project1, and u1 created a team with u1 and u2 as members. This means u1 is the owner of project1, and u1 and u2 are the team members of project1. And u3 is the admin.
Differences Between LoopBack 3 and 4
LoopBack 3 has several built-in models that consists of a RBAC system. The
models are User, Role, RoleMapping, ACL, and AccessToken. You can
learn how they work together in the
Controlling data access
tutorial.
The LoopBack 4 authorization system gives developers the flexibility to implement the RBAC on their own. You can leverage popular third-party libraries like casbin or Auth0 for the role mapping.
This guide includes a demo for using casbin and using Auth0(TBD)
Migrating Example to LoopBack 4 with Casbin
Let’s migrate the LoopBack 3 access control example to LoopBack 4.
Here is an overview of the steps:
- Create models (migrates model properties)
- Set up login endpoint (migrates User endpoint)
- Set up project endpoints (migrates Project endpoints)
- Set up authentication (migrates boot/authentication.js)
- Set up authorization (This is the core of the tutorial, migrates role resolvers and model acls)
- Seed data (migrates boot/sample-models.js)
Creating models
There are four models involved in this example. Three of them are migrated from
the original models
(Project, Team, User). And we add one more model UserCredentials to
separate the sensitive information from the User model.
You can run lb4 model to create the 4 models, and then run lb4 repository to
create their corresponding persistency layers.
A LoopBack 3 model provides 3 layers: data shape, persistency, REST APIs, whereas LoopBack 4 model only describes the data shape. Therefore in this section we also need to create repositories for data persistency. You can read about the differences in document migrating model definitions and built-in APIs.
To keep the tutorial concise and focus on the core implementation, the detailed commands are listed in the reference model creation.
Setting up login endpoint
LoopBack 3 has a default User model with a bunch of pre-defined APIs exposed. In
this example, since we create the User model from scratch, we need to add the
required endpoints in the UserController. In the demo we only need
User/login.
This application uses token based authentication. A user logs in by providing correct credentials (email and password) in the payload of ‘User/login’, then gets a token back with its identity information encoded and includes it in the header of next requests.
To create the login endpoint, we first run lb4 controller to create a
UserController (see user controller creation).
Then add a new controller function login decorated with the REST decorators
that describe the request and response (see
the complete user controller file).
The core logic of login does 3 things:
- call
userService.verifyCredentials()to verify the credentials and find the right user. - call
userService.convertToUserProfile()to convert the user into a standard principal shared across the authentication and authorization modules. - call
jwtService.generateToken()to encode the principal that carries the user’s identity information into a JSON web token.
To keep the controller file concise and to organize the token and user-related utils, we will create the token service and user service in section Setting up authentication.
Setting up project endpoints
Next let’s create the 5 project endpoints which will be used to demo the access of different roles. We start from creating a controller for Project (see project controller creation). Then incrementally add the following endpoints:
/project/listProjects: show all the projects but hide thebalancefield/project/viewAll: show all the projects with the full information/project/{id}/findById: show a project’s information/projects/{id}/donate: donate to a project/projects/{id}/withdraw: withdraw from a project
The complete code can be found in src/controller/project.controller.ts
Setting up authentication
Note: This section will be simplified by the following GitHub issue: loopback-next#4753
This demo uses token based authentication, and it uses the jwt authentication
strategy to verify a user’s identity. The authentication setup is borrowed from
loopback4-example-shopping.
The authentication system aims to understand who sends the request. It
retrieves the token from a request, decodes the user’s information in it as
principal, then passes the principal to the authorization system which will
decide the principal’s access later.
To simplify the implementation for readers, we extracted the services and
bindings into a component in folder src/components/jwt-authentication, it
consists of the following files:
- creating the jwt authentication strategy to decode the user profile from token. See file jwt.auth.strategy.ts.
- creating the token service to organize utils for token operations. See file jwt.service.ts.
- creating user service to organize utils for user operations. see file user.service.ts.
- adding OpenAPI security specification to your app so that the explorer has an Authorize button to setup the token for secured endpoints. See file security.spec.ts.
- creating bindings for the above services. See file keys.ts.
You can enable the jwt authentication by mounting the authentication component in the application constructor:
src/application.ts
// Add this line to import the component
import {JWTAuthenticationComponent} from './components/jwt-authentication';

export class AccessControlApplication extends BootMixin(
  ServiceMixin(RepositoryMixin(RestApplication)),
) {
  constructor(options: ApplicationConfig = {}) {
    // ...
    // Add this line to mount the jwt authentication component
    this.component(JWTAuthenticationComponent);
    // ...
  }
}
Finally decorate the 4 project endpoints (excluding the public listProjects)
with @authenticate('jwt'). See example for endpoint
viewAll
Setting up authorization
Background
The authorization system aims to decide, given a principal passed from the authentication system, whether it has access to a resource.
In LoopBack 3, the access control rules for APIs are described by a model configuration property called ‘acls’. In our case they were defined in models/project.json.
For example, the acl for endpoint /projects/{id}/findById is:
{
  "accessType": "READ",
  "principalType": "ROLE",
  "principalId": "teamMember",
  "permission": "ALLOW",
  "property": "findById"
},
It means only team members have access to the resource returned by
/projects/{id}/findById. And the authorization system is responsible to figure
out whether a principal is a team member of project${id}, which is considered
as role resolving.
Role Resolving
Role resolving is the core of an RBAC system. In the original application, you
create and register role resolvers to resolve a role at run time. Role admin
is defined in
sample-models.js
and teamMember is defined and registered in
role-resolver.
In the migrated application, we use a 3rd-party library casbin to resolve the role.
Using Casbin
- Overview of casbin
Casbin is a powerful and efficient
open-source access control library. It uses policies to make decisions: whether
a subject can perform an action on a certain object. It enforces the policy in
the classic {subject, object, action} form or a customized form as you
defined, both allow and deny authorizations are supported. And it manages the
role-user mappings and role-role mappings (aka role hierarchy in RBAC).
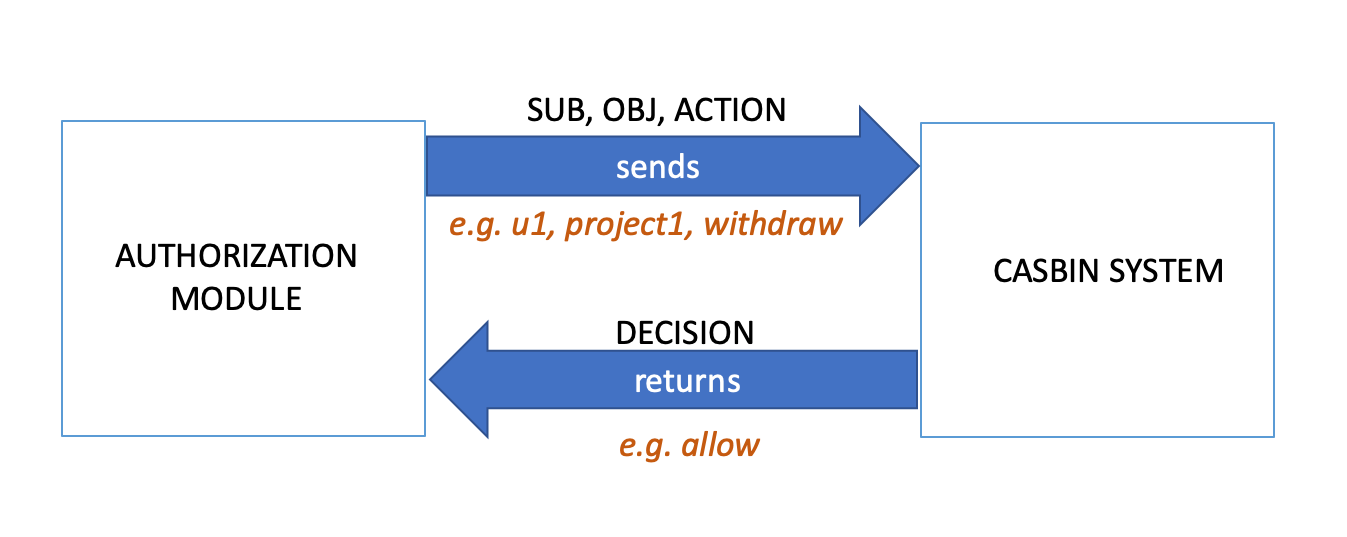
In our example, the casbin system works as a whole to make decisions. The following diagram explains how the authorization system and casbin system work together:
- Model and Policies
If you are not familiar with casbin, you can take a look of the brief summary of our usage of casbin in the reference.
The Casbin system consists of a model file and policy files. The model file describes the shape of request, policy, role mapping, and the decision rules. And to optimize the enforcers, policies are divided into multiple smaller ones based on roles.
Here is the screenshot of the model file and policy file of role “teamMember”, different colors maps to different concepts:
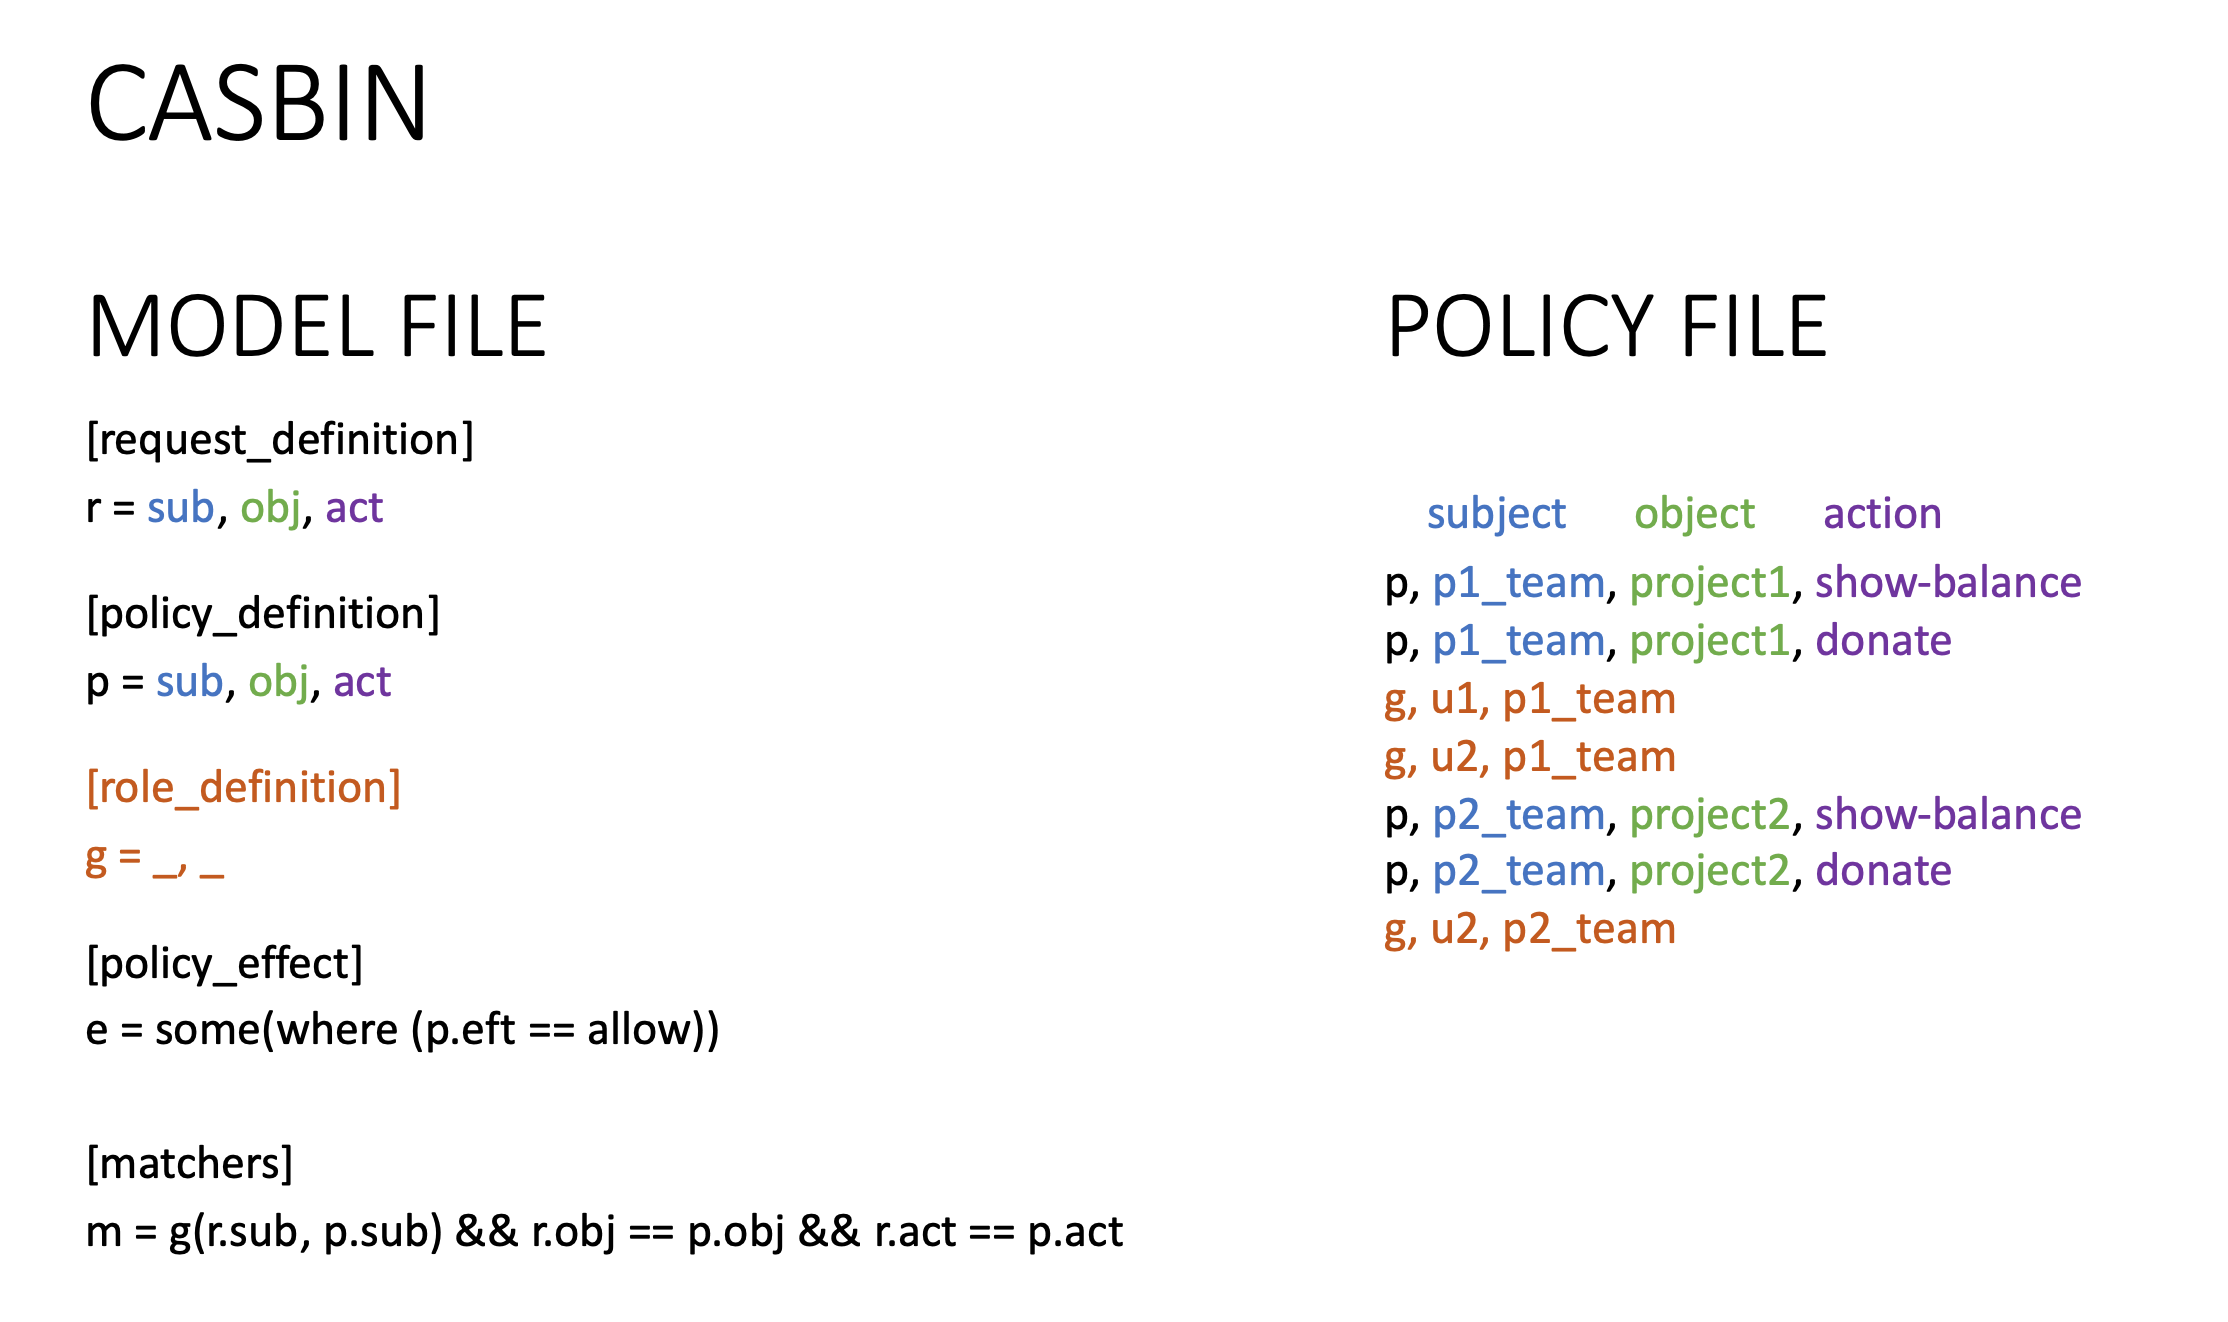
Based on the screenshot, suppose u2(user with id 2) makes a request to ‘/projects/1/donate’, the authorization system will send subject as u2, object as project1, action as donate to casbin. And since u2 inherits role p1_team, and p1_team can perform donate on project1, casbin system returns allow to the authorization system.
Migrating Authorization
First let’s migrate the ACLs. Access control information is considered as
authorization metadata, and provided in decorator @authorize(). Referring back
to the Project controller file, we can now specify the following fields for each
endpoint:
- resource: the resource name, it’s ‘project’ in this controller
- scopes: it maps to the action in the casbin policy
- allowedRoles: since the casbin system handles the role resolving, this field is for optimizing the comparison scope. E.g. when executing the enforcer to make decision, only compares with the policies in the admin policy file.
To make the tutorial concise, the code details is omitted here. You can find the ACLs and how the endpoints are decorated in file src/controller/project.controller.ts
Next, we write the authorizer that calls casbin enforcers to make the decision.
-
Create an authorizer that retrieves the authorization metadata from context, then execute casbin enforcers to make decision.
If you are not familiar with the concept authorizer, you can learn it in the document Programming Access Policies
The complete authorizer file can be found in components/casbin-authorization/services/casbin.authorizer.ts. It retrieves the three required fields from the authorization context: subject from
principal,resourceas object, and action, to invoke casbin enforcers and make decision. -
Create a voter for instance level endpoints to append the project id to the resource name
Class level means operations applied to all projects like
/projects/*, whereas instance level operation applies to a certain project like/project{id}/*. For instance level endpoints, the resource name should include the resource’sid. Since theidcomes from the request, the endpoint metadata cannot provide it and therefore we define the pre-process logic in a voter to generate the resource name asproject${id}, then passes it to the authorizer.The complete voter file can be found in file components/casbin-authorization/services/assign-project-instance-id.voter.ts
-
Create casbin enforcers
A casbin enforcer is configured with a policy file. It compares the given data with the policy file and returns a decision when invoked. To optimize the scope and speed of the access check, this example splits the policies into separate files per role. The authorizer will only invoke the enforcers for allowed role(s).
The complete enforcer file can be found in file components/casbin-authorization/services/casbin.enforcers.ts
-
Write casbin model and policies
Since the model and policy are already covered in section Using Casbin, we will not repeat it here. The corresponding files are defined in folder fixtures/casbin.
-
Mount the casbin authorization system as a component
The casbin authorizer, voter and enforcers above are packed under component ‘src/components/casbin-authorization’. You can export their bindings in a component file and mount the component in the application constructor:
src/application.ts
</div>
   // Add this line to import the component
   import {CasbinAuthorizationComponent} from './components/casbin-authorization';

   export class AccessControlApplication extends BootMixin(
     ServiceMixin(RepositoryMixin(RestApplication)),
   ) {
     constructor(options: ApplicationConfig = {}) {
       // ...
       // Add this line to mount the casin authorization component
       this.component(CasbinAuthorizationComponent);
       // ...
     }
   }
-
Casbin persistency and synchronize(2nd Phase implementation, TBD)
This will be supported at the 2nd phase of implementation. The plan is to have model or operation hooks to update the casbin policies when new data created. It requires a persistent storage for casbin policies (see reference in casbin policy persistence). Here is an overview of the hooks:
- when create a new project
- create a set of p, project${id}_owner, action policies
- create a set of p, project${id}_team, action policies
- add a new user to a team
- find the projects owned by the team owner, then create role inherit rules g, u${id}, project${id}_team
- add a new endpoint(operation)
- for each of its allowed roles, add p, ${role}, action policy
- when create a new project
Summary
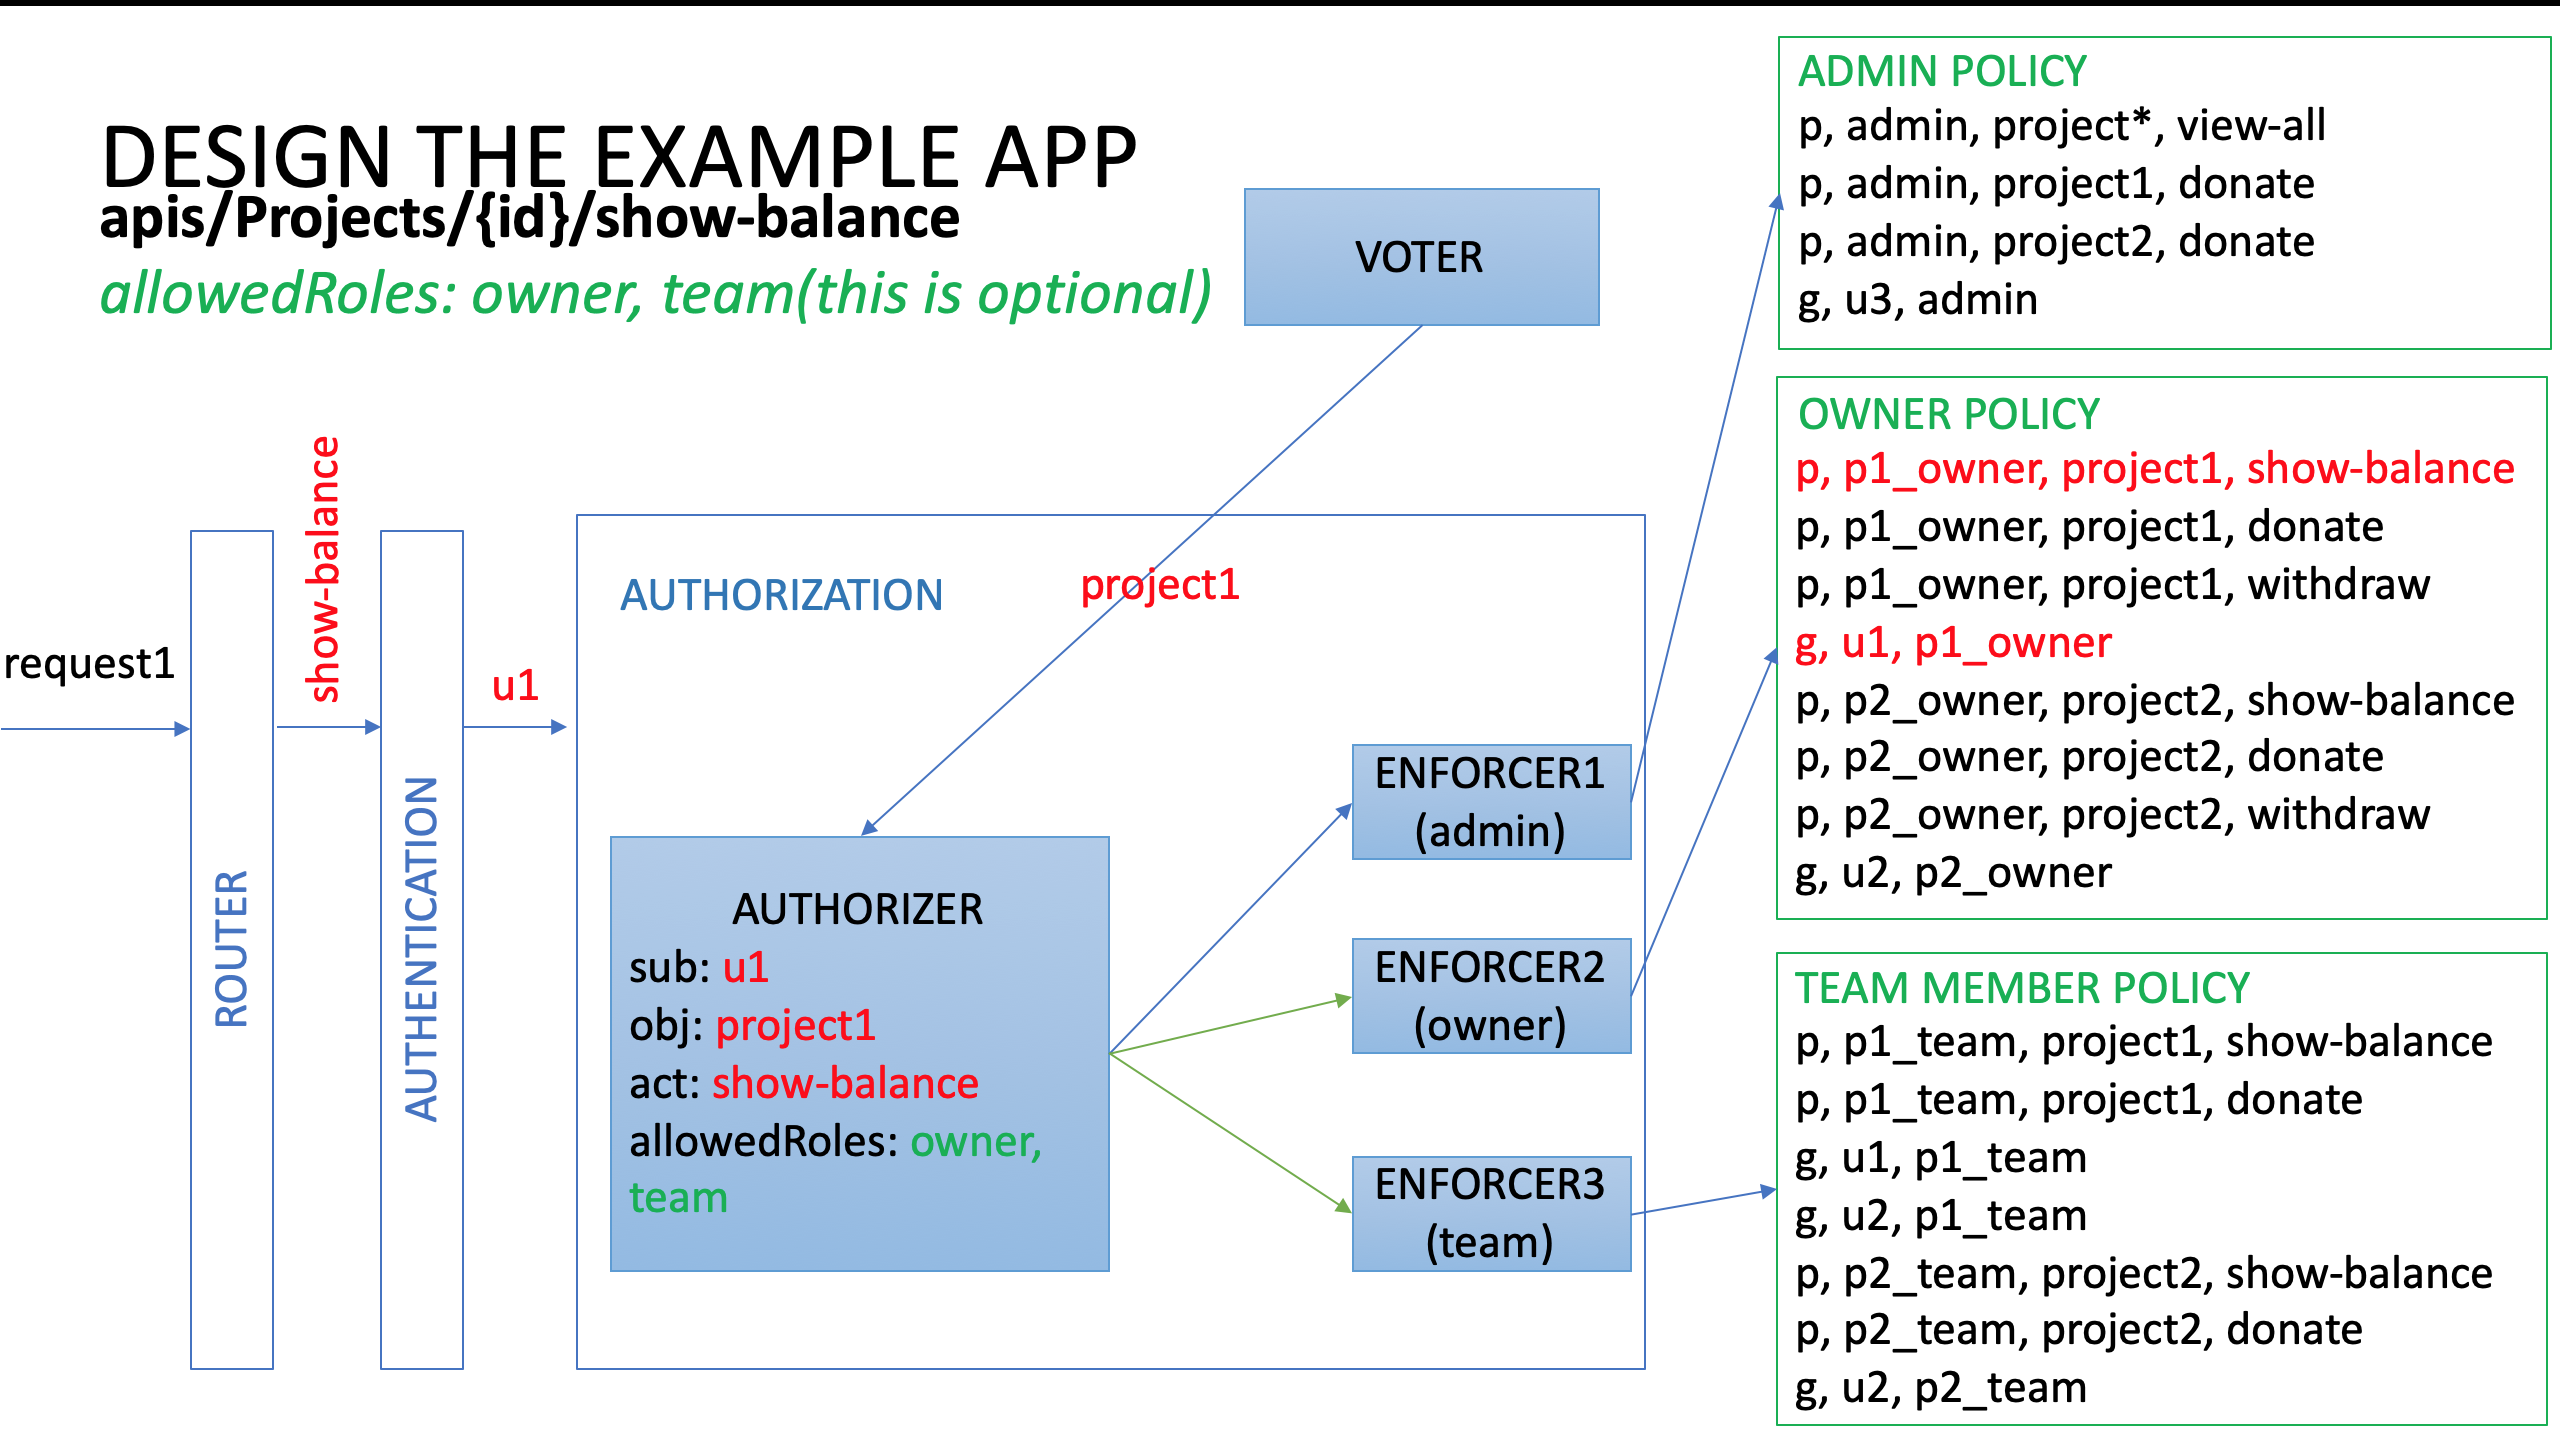
The following diagram summarizes the authorization mechanism described above:
Seeding Data
The application has pre-created data to try each role’s permission. The original
example seeds data in the boot script, now they are migrated to an observer file
called sample.observer.ts.
Since the data are already generated in db.json, that observer file is
skipped by default.
Try It Out
Start the application:
- Run
npm startto start the application. - Open the explorer
Try the ‘admin’ role:
- Login as admin first (user Bob)
- Go to UserController, try endpoint
users/loginwith {“email”: “bob@projects.com”, “password”: “opensesame”}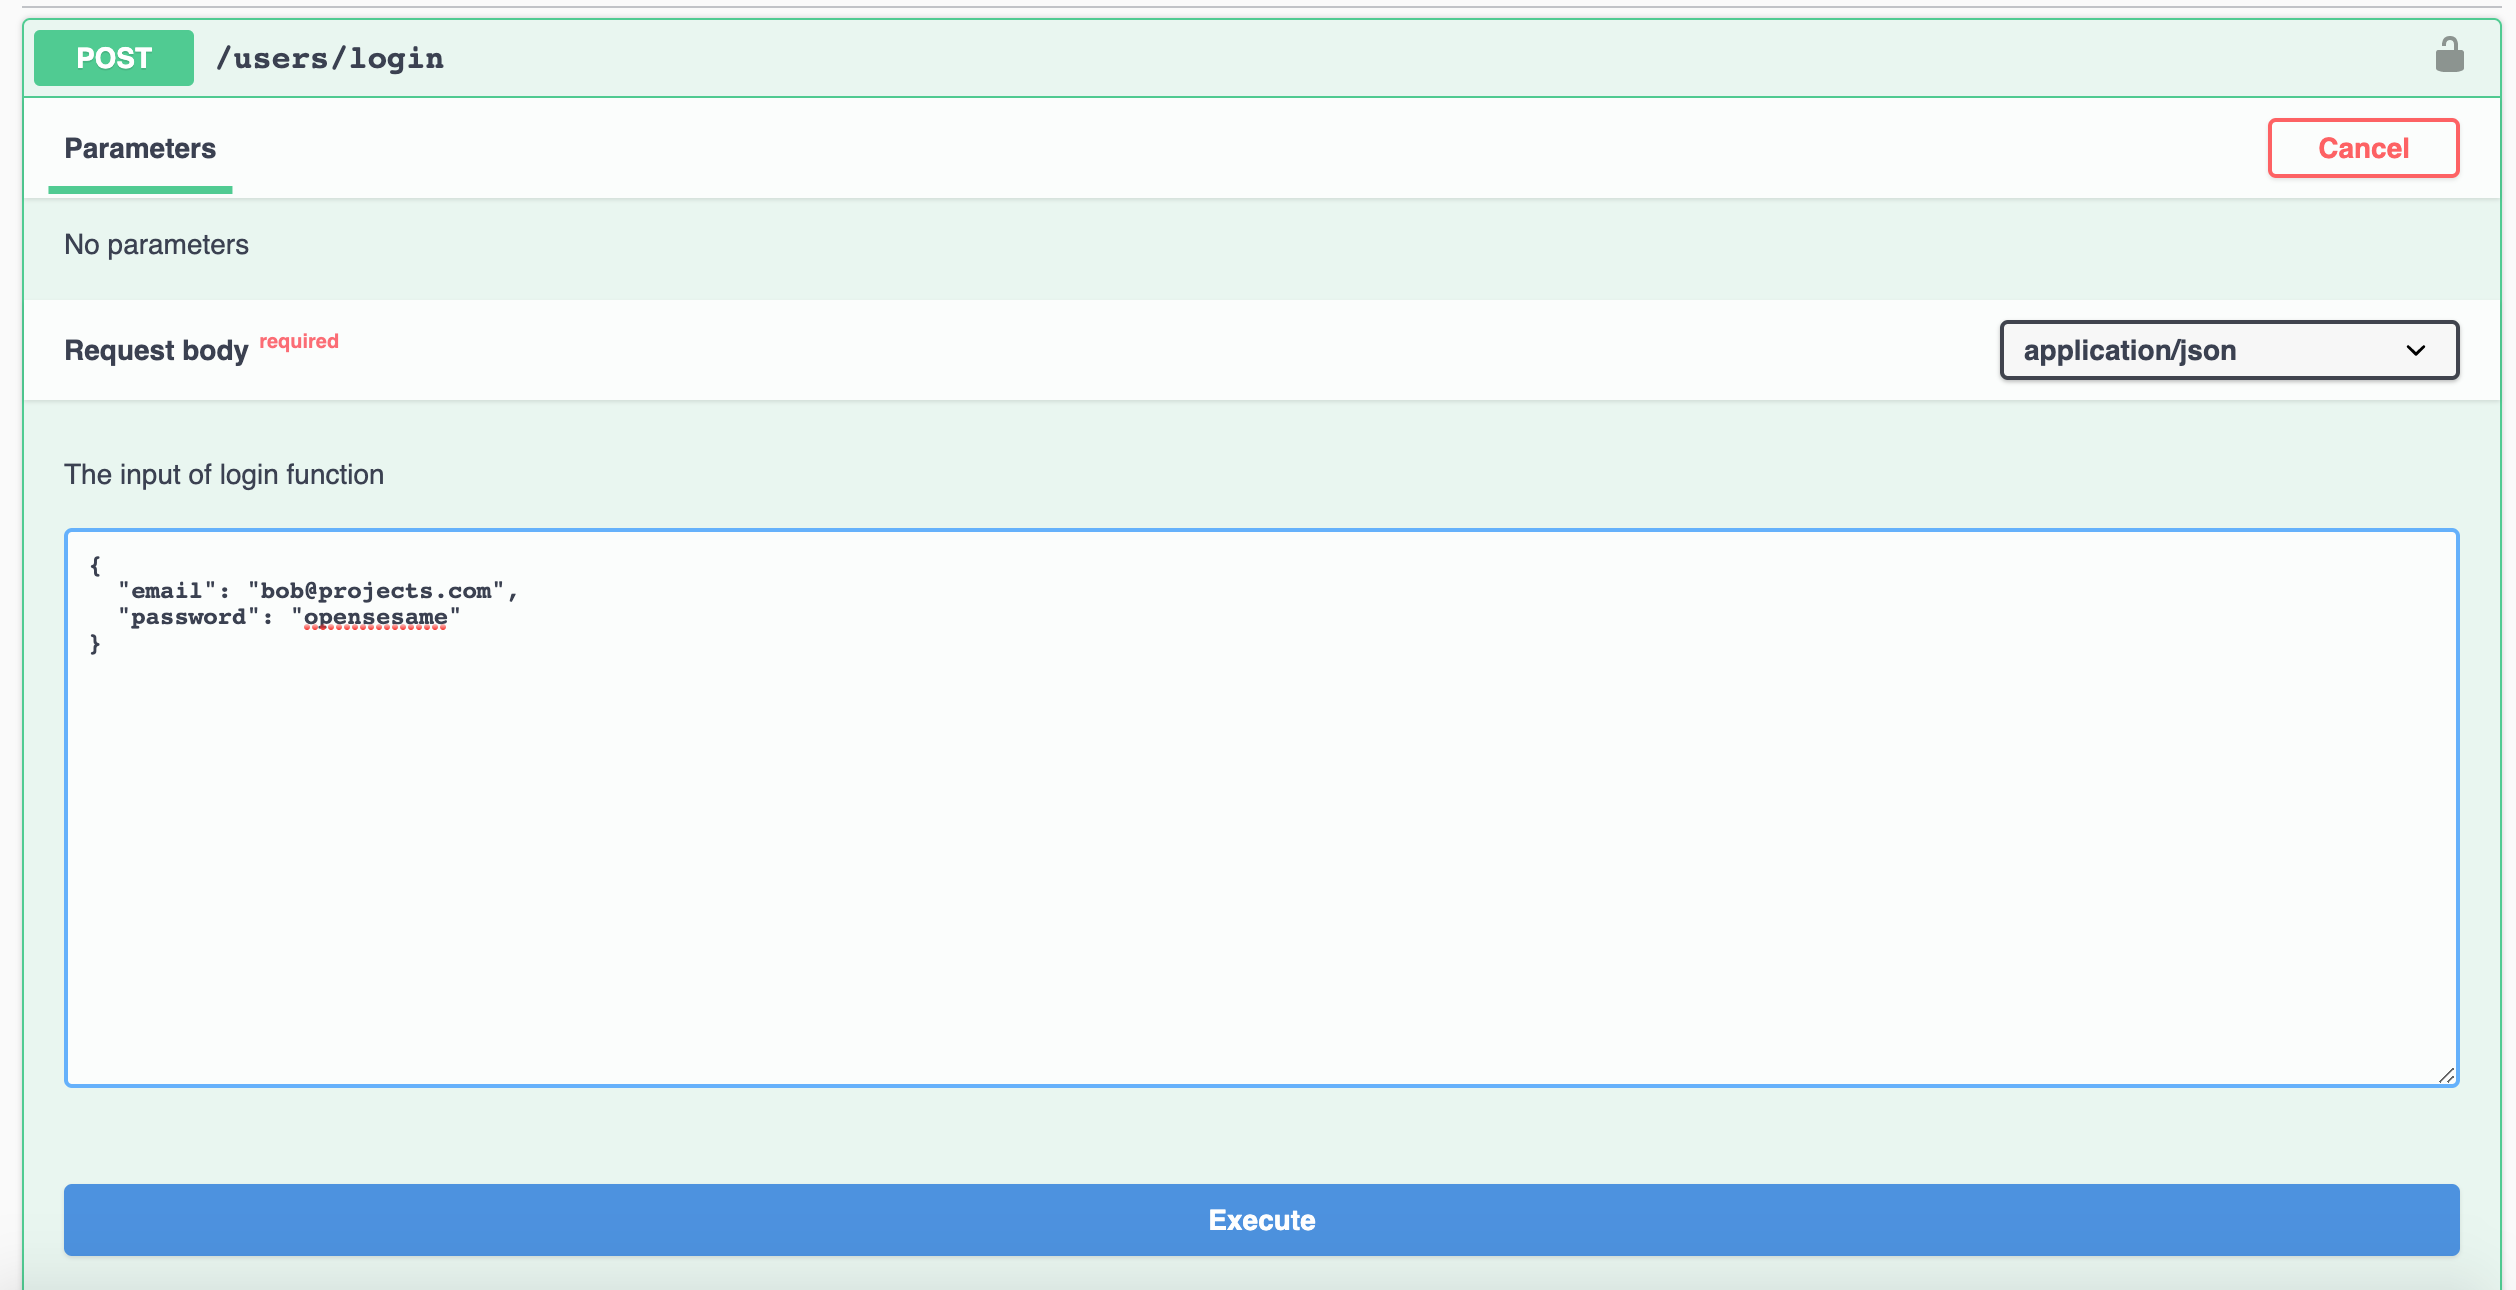
- Get the returned token
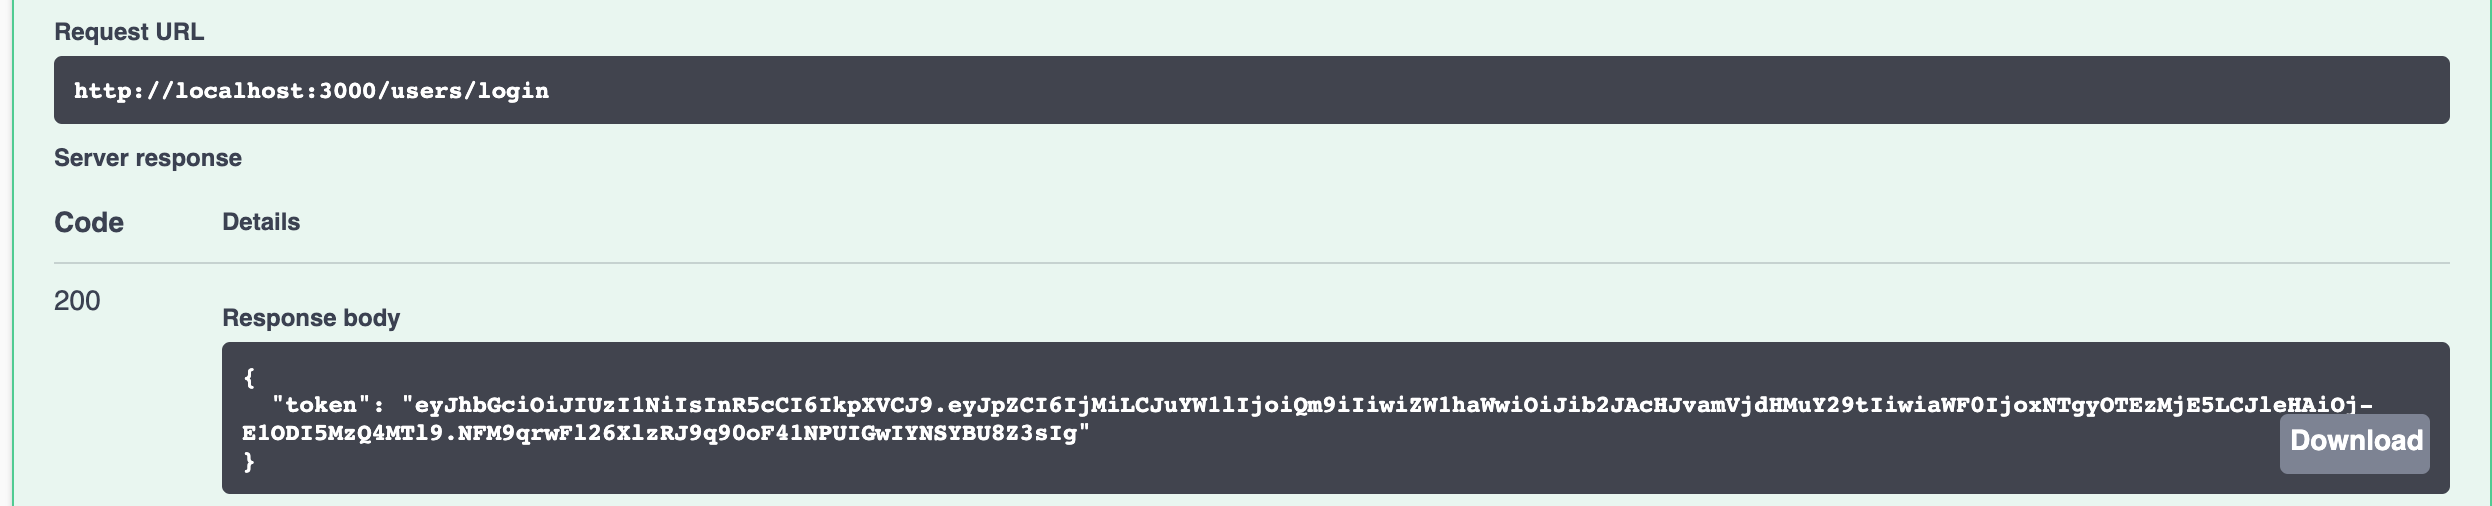
- Click the authorize button and paste the token
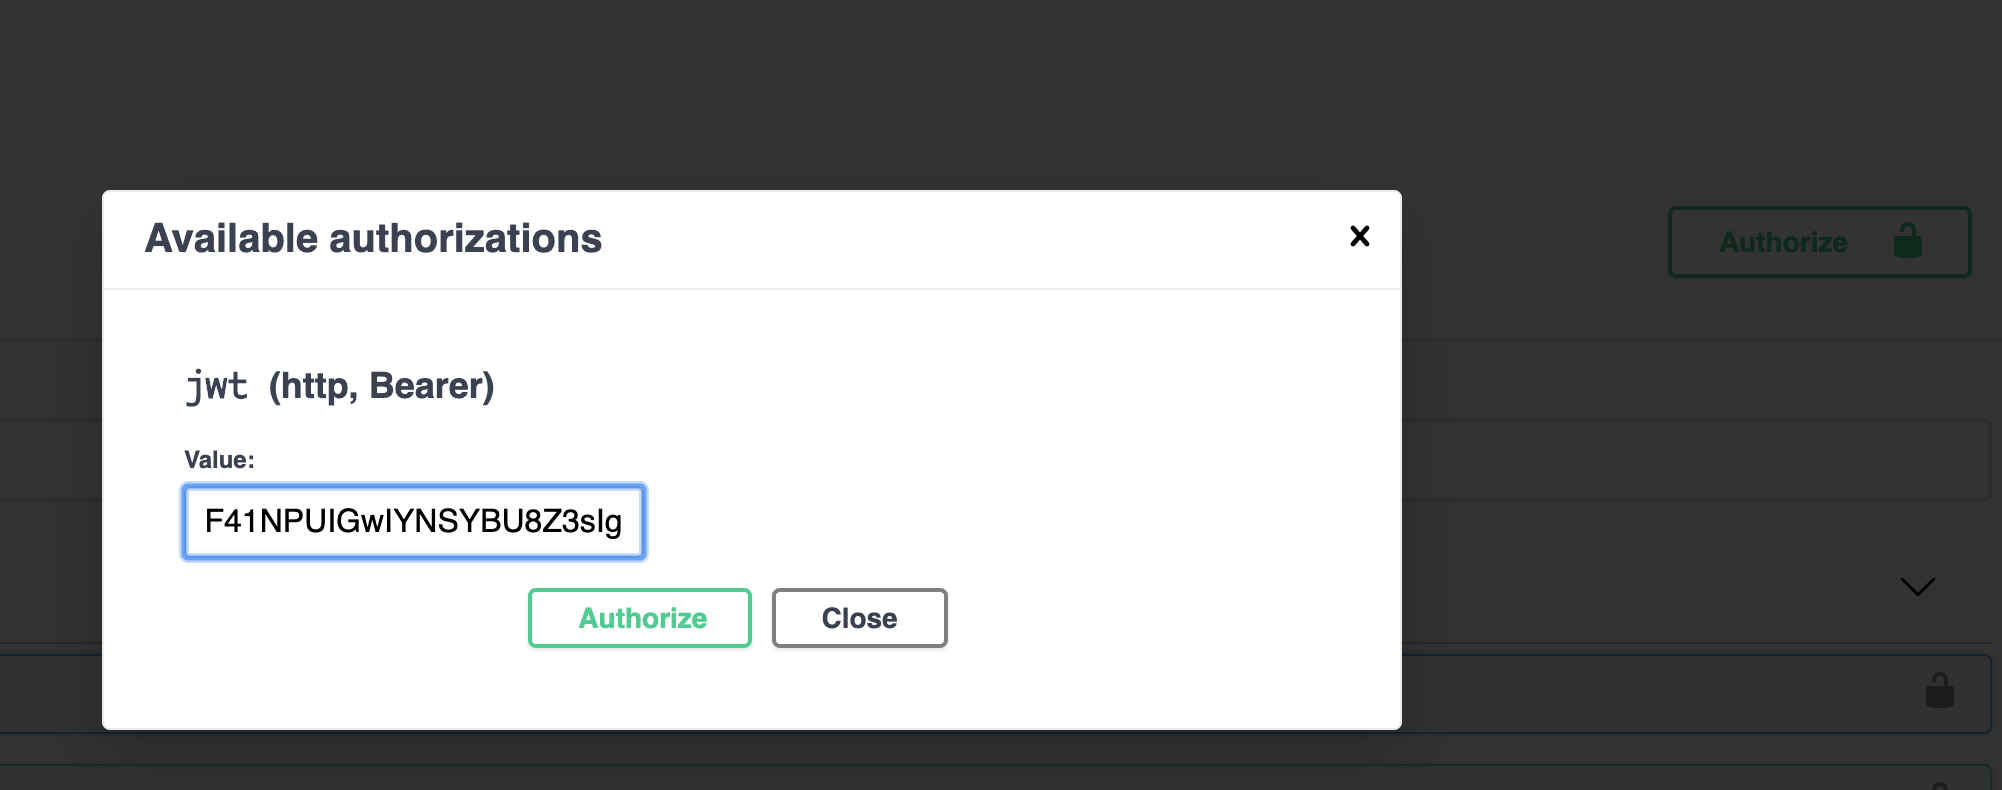
- Go to UserController, try endpoint
- Try the 5 endpoints, ‘show-balance’ and ‘withdraw’ will return 401, others
succeed
- A sample screenshot for ‘withdraw’:
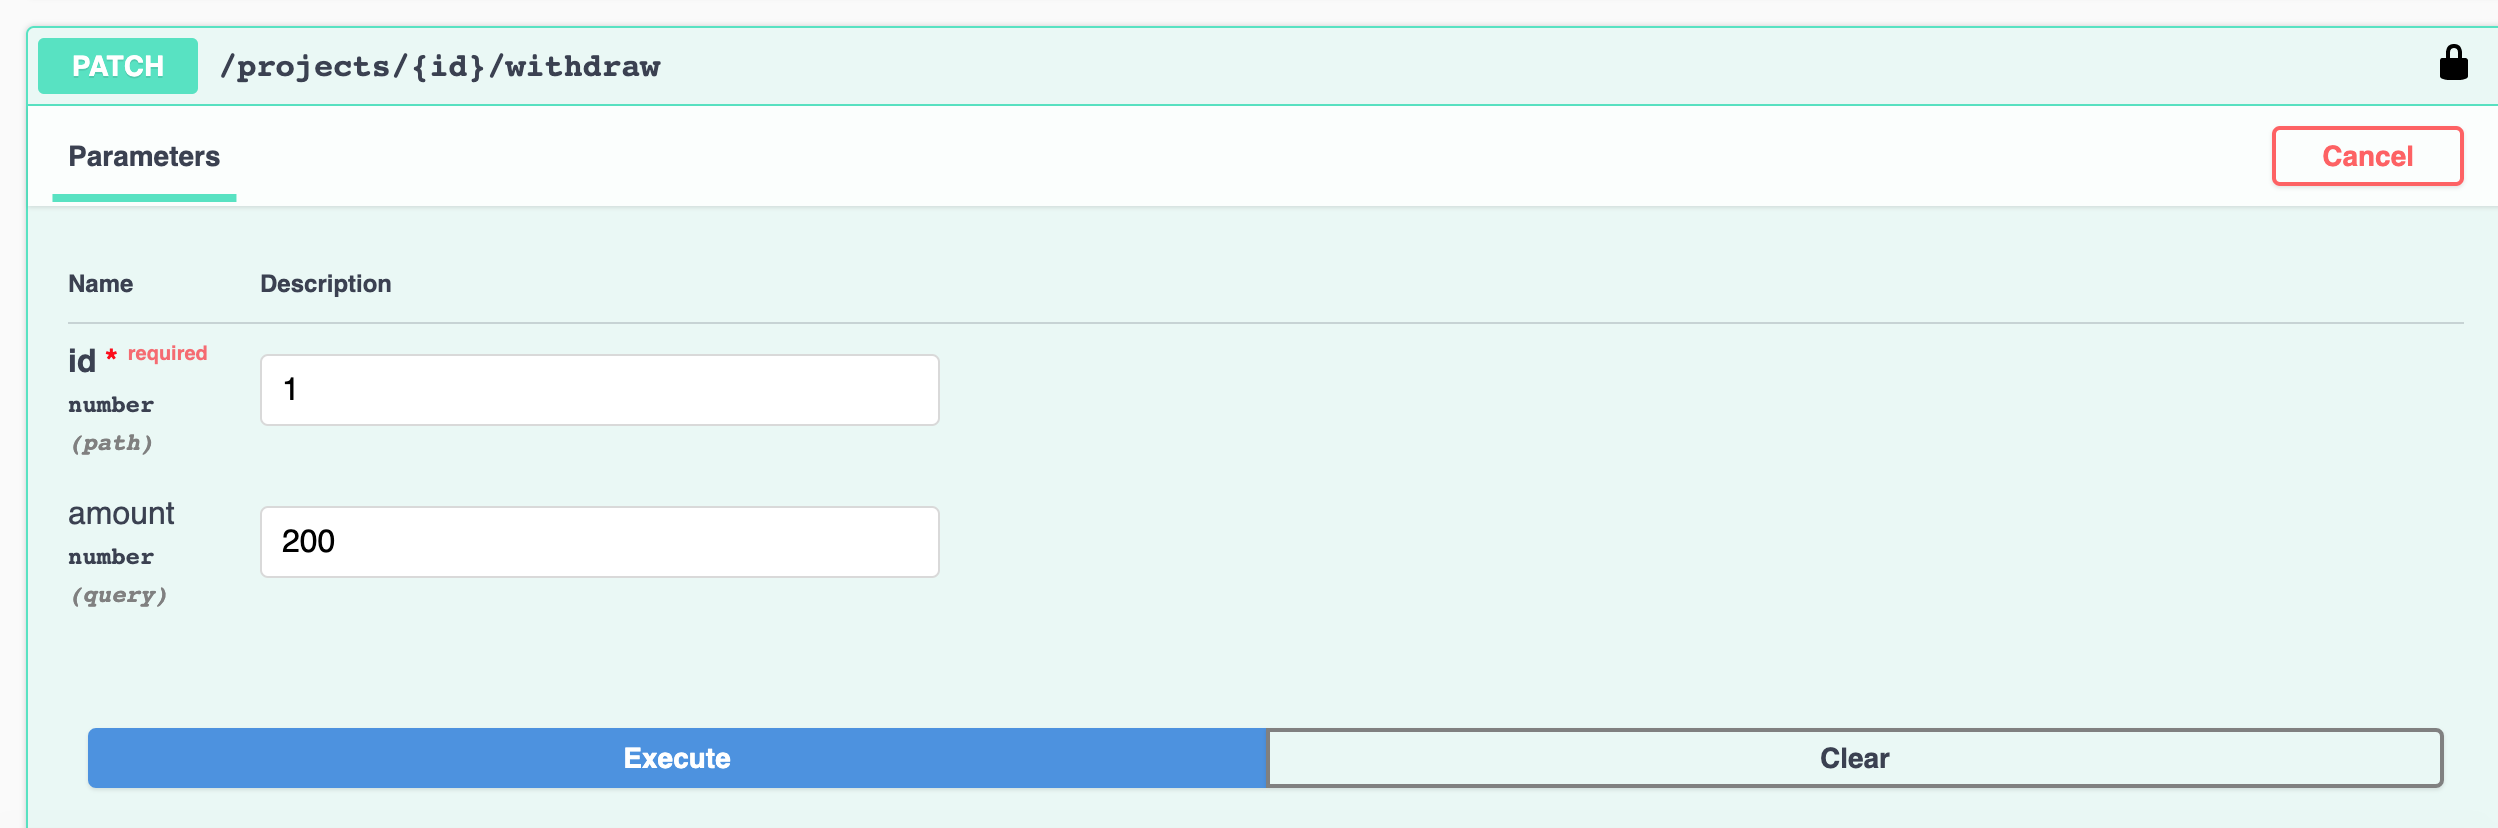
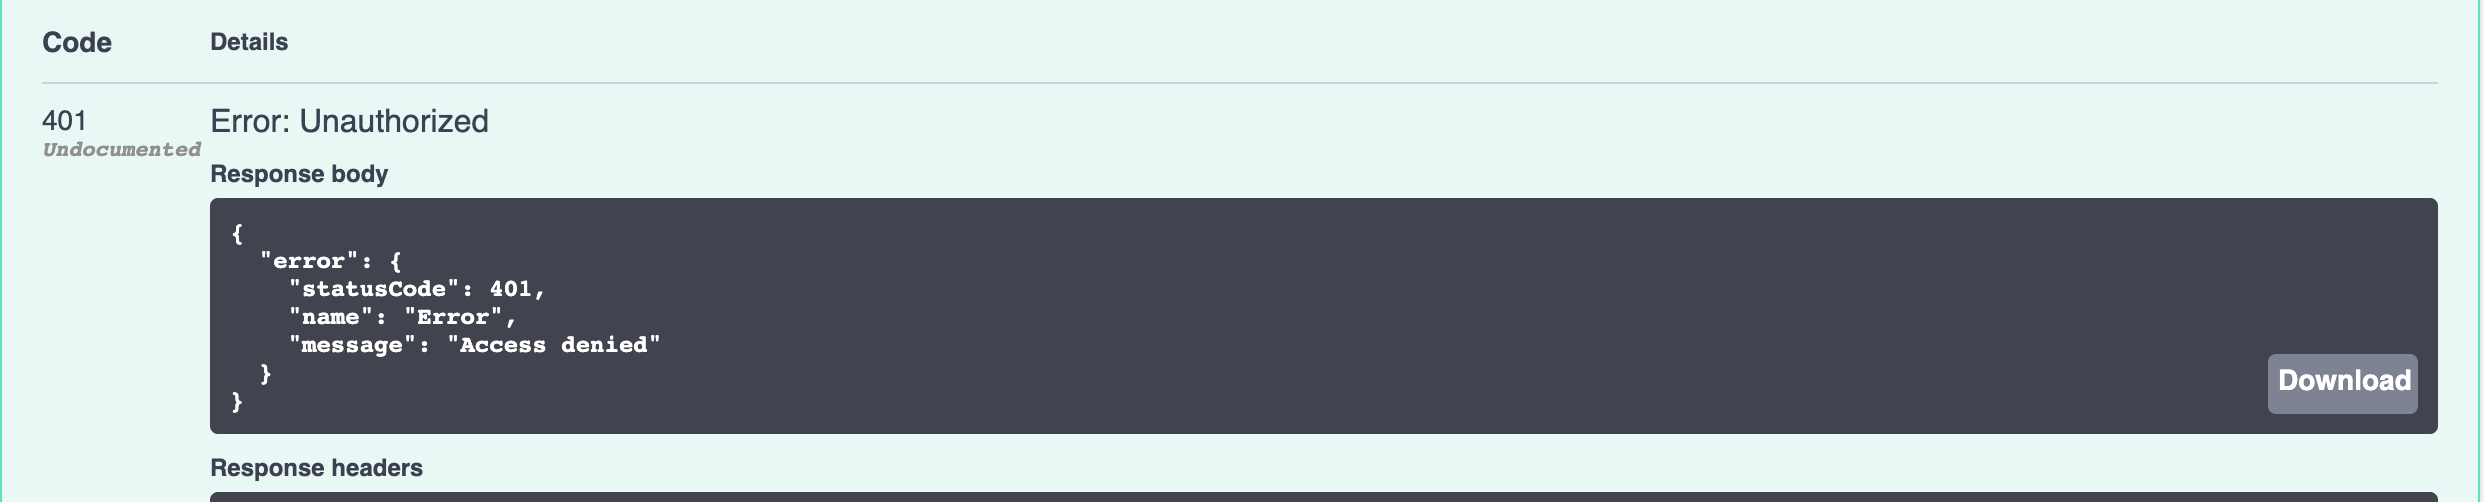
- A sample screenshot for ‘withdraw’:
Try the ‘owner’ role:
- Login as owner (user John)
- Go to UserController, try endpoint
users/loginwith {“email”: “John@projects.com”, “password”: “opensesame”} - Get the returned token
- Click authorize button and paste the token
- Go to UserController, try endpoint
- Try the 5 endpoints, ‘view-all’ will return 401, others succeed
Try the ‘team-member’ role:
- Login as team-member (user Jane)
- Go to UserController, try endpoint
users/loginwith {“email”: “Jane@projects.com”, “password”: “opensesame”} - Get the returned token
- Click authorize button and paste the token
- Go to UserController, try endpoint
- Try the 5 endpoints, ‘show-balance’ and ‘donate’ will succeed, others returns 401
References
Model Creation
Import model User, Project, Team from the LB3 application by the migration
CLI:
$ lb4 import-lb3-models <path_to_loopback-example-access-control> --outDir src/models
Choose model User, Project, Team for the prompt.
For model UserCredentials, you need to create it by lb4 model:
$ lb4 model
? Model class name: UserCredentials
? Please select the model base class Entity (A persisted model with an ID)
? Allow additional (free-form) properties? Yes
Model UserCredentials will be created in src/models/user-credentials.model.ts

Lets add a property to UserCredentials
Enter an empty property name when done

? Enter the property name: id
? Property type: number
? Is id the ID property? Yes
? Is id generated automatically? No
? Is it required?: Yes
? Default value [leave blank for none]:

Lets add another property to UserCredentials
Enter an empty property name when done

? Enter the property name: password
? Property type: string
? Is it required?: Yes
? Default value [leave blank for none]:

Lets add another property to UserCredentials
Enter an empty property name when done

? Enter the property name: userId
? Property type: number
? Is it required?: Yes
? Default value [leave blank for none]:

Lets add another property to UserCredentials
Enter an empty property name when done

? Enter the property name:
   create src/models/user-credentials.model.ts
   update src/models/index.ts

Model UserCredentials was created in src/models/
Considering the difference between the original application and the migrated one, you need to adjust the properties a bit for the three migrated models.
- For
Project, open filesrc/models/project.model.ts- decorate
ownerIdwith@belongsTo(() => User)and remove the generated@propertydecorator. balanceshould be a required property: change it frombalance?tobalance
- decorate
- For
Team, open filesrc/models/team.model.ts- replace
memberIdwithmemberIdsas an array:@property({ type: 'array', itemType: 'number', required: true, }) memberIds: number[];
- replace
- For
User, open filesrc/models/user.model.ts- remove
passwordbecause we have aUserCredentialmodel created to separate it fromUser
- remove
- For all the three models above, allow generating their
idfield:@property({ type: 'number', id: 1, // change it from `true` to `false` generated: false, updateOnly: true, }) // change it from optional `id?` to required `id` id: number;
Create corresponding repositories:
$ lb4 repository
? Please select the datasource DbDatasource
? Select the model(s) you want to generate a repository Project, Team, UserCredentials, User
? Please select the repository base class DefaultCrudRepository (Juggler bridge)
Create relations:
ProjectbelongsToUser
lb4 relation
? Please select the relation type belongsTo
? Please select source model Project
? Please select target model User
? Foreign key name to define on the source model ownerId
? Relation name owner
? Allow Project queries to include data from related User instances? Yes
Tip:
Please delete the generated controller file src/controllers/project-user.controller.ts to keep the exposed endpoints clean.
UserhasOneUserCredentials
lb4 relation
? Please select the relation type hasOne
? Please select source model User
? Please select target model UserCredentials
? Foreign key name to define on the target model userId
? Source property name for the relation getter (will be the relation name) userCredentials
? Allow User queries to include data from related UserCredentials instances? Yes
Tip:
Please delete the generated controller file src/controllers/user-user-credentials.controller.ts to keep the exposed endpoints clean.
UserhasManyTeam
lb4 relation
? Please select the relation type hasMany
? Please select source model User
? Please select target model Team
? Foreign key name to define on the target model ownerId
? Source property name for the relation getter (will be the relation name) teams
? Allow User queries to include data from related Team instances? Yes
Tip:
Please delete the generated controller file src/controllers/user-team.controller.ts to keep the exposed endpoints clean.
User Controller Creation
$ lb4 controller
? Controller class name: User
Controller User will be created in src/controllers/user.controller.ts

? What kind of controller would you like to generate? REST Controller with CRUD functions
? What is the name of the model to use with this CRUD repository? User
? What is the name of your CRUD repository? UserRepository
? What is the name of ID property? id
? What is the type of your ID? number
? Is the id omitted when creating a new instance? No
? What is the base HTTP path name of the CRUD operations? /users
   create src/controllers/user.controller.ts
   update src/controllers/index.ts

Controller User was created in src/controllers/
Project Controller Creation
$ lb4 controller
? Controller class name: Project
Controller Project will be created in src/controllers/project.controller.ts

? What kind of controller would you like to generate? REST Controller with CRUD functions
? What is the name of the model to use with this CRUD repository? Project
? What is the name of your CRUD repository? ProjectRepository
? What is the name of ID property? id
? What is the type of your ID? number
? Is the id omitted when creating a new instance? No
? What is the base HTTP path name of the CRUD operations? /projects
   create src/controllers/project.controller.ts
   update src/controllers/index.ts

Controller Project was created in src/controllers/
Usage of Casbin
The app has very basic usage of casbin:
- uses a model file to describe the shape of request, policy, role mapping, and
the decision rules.
- syntax doc for casbin models
- syntax doc for casbin role inheritance
- what is request definition: a set of info collected from the client request. In our case: subject, object, operation
- what is policy definition: who has permission for what. In our case the info are same as request: subject, object, operation
- when make a decision, the casbin enforcer compares the info from request to the policies
- uses policy files to store the policies.
- the casbin docs I post above also contain the policy examples
- divide policy files into multiple smaller ones based on roles