Differences between LoopBack 3 and LoopBack 4 request/response cycle
The request/response cycle infrastructure and pathway are very different in LoopBack 3 and LoopBack 4. Knowing the differences will help you migrate LoopBack 3 applications to LoopBack 4 and implement new request/response related features in LoopBack 4.
This document will guide you through the differences and show the LoopBack 4 equivalent, if there is any.
Request/response infrastructure
The difference begins with the LoopBack application object itself. In LoopBack 3, it is an instance of an Express application; in LoopBack 4, it is not. Although LoopBack 4 uses Express as the HTTP server, it is not directly exposed anymore.
In LoopBack 3, Express middleware and routers, models, components, boot scripts, and remote methods are the ways endpoints can be created on the application. Let’s take a look at how they have changed and how their functionality can be migrated in LoopBack 4.
Express middleware and routers
In LoopBack 3 you could add routes and load custom middleware using app.get(),
app.post(), app.use(), etc., just like how you do in Express. In LoopBack 4,
you cannot do it yet. However, you can
mount a LoopBack 4 application on an
Express application, which would allow you to still use the familiar routing
methods.
Tip: Follow our GitHub issues #1293 and #2035 to track the progress on supporting Express middleware in LoopBack 4.
If you want to mount an Express router in a LoopBack 4 application, you can use the RestApplication.mountExpressRouter() API.
Using Controllers is the recommended way for creating custom (and REST) endpoints on your application. Its support for dependency injection and Interceptors makes it a very powerful extension mechanism.
In LoopBack 4 middleware.json is not required anymore because of architectural changes.
Models
In LoopBack 3, models files automatically create the corresponding REST API endpoints and the database query machinery (using the configured datasource). In LoopBack 4, model files are limited only to describing the properties of the data. You will have to create a corresponding Repository for database connectivity, and controllers for creating the REST API endpoint.
The fact that you have to create two more artifacts along with the model to get a REST endpoint working might seem overly tedious at first. However, the separation of concerns and decoupling the functionality makes the codebase cleaner, easier to maintain, and much easier to customize functionality at various levels. This can be better appreciated as the complexity of your application grows.
For those who are uncomfortable with the concept of having to creating a
repository and a controller for a model, we have a component
@loopback/rest-crud ; with a little bit of
configuration, a model file is all you will need to create the REST endpoints.
Once your requirements outgrow what @loopback/rest-crud provides, you can
implement your REST endpoints the idiomatic way.
Components
Components are still supported in LoopBack 4, but the concept of component has completely changed.
In LoopBack 3, a
component is a simple
Node.js module which exports a function with the signature
function(app, options). In LoopBack 4, a component
is a TypeScript class which can add servers,
observers, providers,
and controllers to the application using dependency
injection.
LoopBack 3 components adding routes can be migrated to LoopBack 4 by moving the functionality to the controller of a LoopBack 4 component.
Here is an example of migrating a LoopBack 3 routing component to a LoopBack 4 component’s controller.
server/hi-component.js
module.exports = (app, options) => {
  app.get('/hi', (req, res) => {
    res.send('Hi!');
  });
};
src/components/hi.component.ts
import {get} from '@loopback/rest';
import {Component} from '@loopback/core';

export class HiController {
  @get('/hi', {
    responses: {
      '200': {
        content: {'application/json': {schema: {type: 'string'}}},
      },
    },
  })
  hello(): string {
    return 'Hi!';
  }
}

export class HiComponent implements Component {
  controllers = [HiController];
}
src/application.ts
import { HiComponent} from './components/hi.component';
...
export class Lb4AppApplication extends BootMixin(
  ServiceMixin(RepositoryMixin(RestApplication)),
) {
  constructor(options: ApplicationConfig = {}) {
    ...
    this.component(HiComponent);
    ...
  }
}
Because of the architectural changes, component-config.json is not required in
LoopBack 4 anymore.
Boot scripts
If you used LoopBack 3 boot scripts for adding routes to the application, it
should now be moved to a standalone controller, a component, or implemented
using app.mountExpressRouter().
Here is an example of migrating a route added by a boot script to a controller.
server/boot/hello.js
module.exports = function (server) {
  server.get('/hello', (req, res) => {
    res.send('Hello!');
  });
};
src/controllers/hello.ts
import {get} from '@loopback/rest';

export class HelloController {
  @get('/hello')
  hello(): string {
    return 'Hello!';
  }
}
Tip: For details about migrating LoopBack 3 boot scripts refer to Migrating boot scripts .
Remote methods
Remote methods add custom endpoints to a model’s REST interface.
server/models/person.js
module.exports = function (Person) {
  Person.greet = function (message, cb) {
    cb(null, 'Greetings: ' + message);
  };

  Person.remoteMethod('greet', {
    accepts: {arg: 'message', type: 'string'},
    returns: {arg: 'message', type: 'string'},
  });
};
The above remote method’s functionality can be migrated to a controller in LoopBack 4 in the following manner.
src/controllers/person.ts
import {post, requestBody} from '@loopback/rest';

export type Greeting = {
  message: string;
};

const spec = {
  content: {
    'application/json': {
      schema: {
        type: 'object',
        properties: {
          message: {
            type: 'string',
          },
        },
      },
    },
  },
};

export class PersonController {
  @post('/person/greet', {
    responses: {
      '200': spec,
    },
  })
  greet(@requestBody(spec) greeting: Greeting): string {
    return 'Greetings: ' + greeting.message;
  }
}
Request/response pathway
The request/response architecture has undergone a drastic change in LoopBack 4. LoopBack 3’s phase-based middleware routing system is now replaced by a sequence handler that sits infront of a routing table.
In LoopBack 3, middleware are added using Express APIs and via phases in
middleware.json or using
app.middleware().
Request to the app passes through the middleware chain in the following order.
initial:beforeinitialinitial:aftersession:beforesessionsession:afterauth:beforeauthauth:afterparse:beforeparseparse:afterroutes:before- Express middleware
- Components
- Boot scripts
routesroutes:afterfiles:beforefilesfiles:afterfinal:beforefinalfinal:after
Any middleware higher up in the chain may terminate the request by sending a response back to the client.
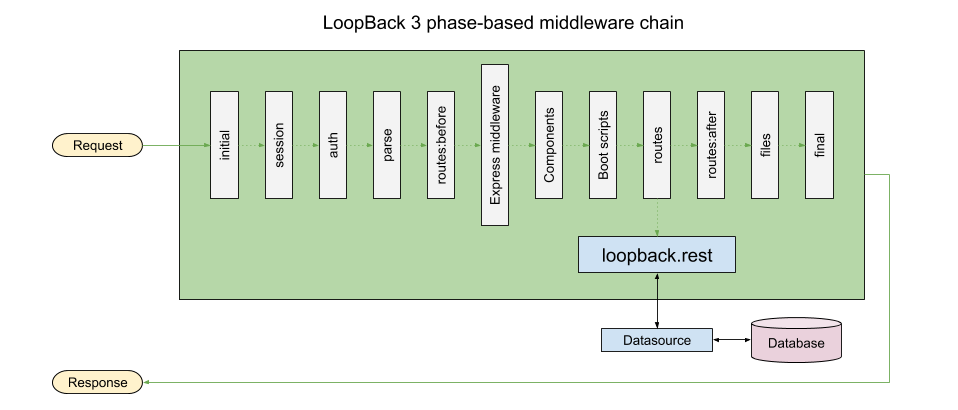
The REST API middleware is added in the routes phase and error handlers in the
final and final:after phases.
The REST API middleware is responsible for creating REST API endpoints out of the models in the application. It then uses the configured datasource for connecting and querying the undelying database for the corresponding REST requests.
In LoopBack 4, the sequence is the gatekeeper of all requests to the application. Every request to the application must pass through the sequence. It identifies the responsible handler for the requested endpoint and passes on the request to the handler.
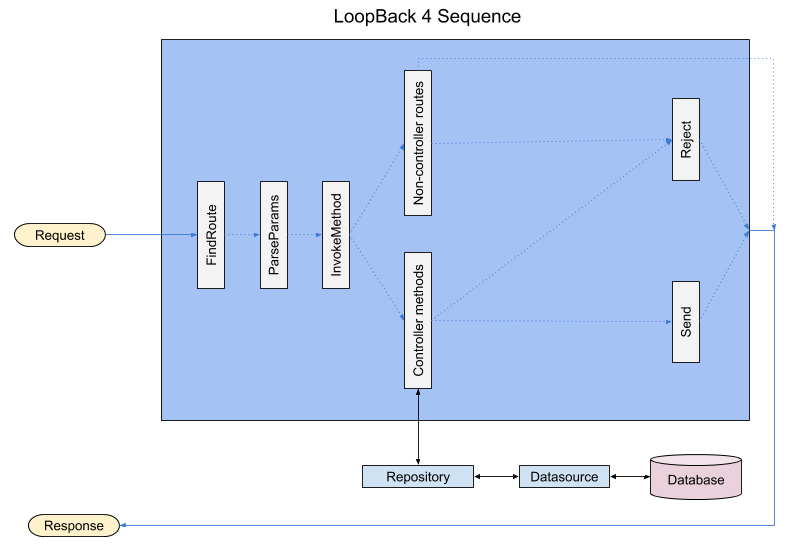
Unlike LoopBack 3, models in LoopBack 4 do not create REST endpoints. Use the
lb4 controller command to quickly generate the REST endpoints for a model.
For more details, refer to the LoopBack 4 request/response cycle doc.
Access to the request/response object
Since LoopBack 3 uses the Express middleware pattern, the request and response objects can always be accessed in all the middleware functions.
In LoopBack 4, the request and response objects can be accessed in routers loaded using the app.mountExpressRouter() method, using the familiar Express middleware signature.
Controllers, services, and repositories are LoopBack 4 artifacts that participate in the request/response cycle. The request and response objects can be made available to them via dependency injection.
Example of accesssing the request and response object in a Controller:
import {inject} from '@loopback/core';
import {Request, Response, RestBindings, get} from '@loopback/rest';

export class ExampleController {
  constructor(
    @inject(RestBindings.Http.REQUEST) private req: Request,
    @inject(RestBindings.Http.RESPONSE) private res: Response,
  ) {}

  @get('/headers')
  headers() {
    // Sends back the request headers
    this.res.send(this.req.headers);
  }
}
Similarly, the request and response objects can be injected into services and repositories along with other objects from the context.
It may be tempting to use an Express router (because of familiarity) instead of a controller to add custom endpoints to the application, but bear it in mind that controllers are way more powerful and capable than Express routers because of the following reasons:
- Support for dependency injection
- Access to the application context
- In-built support for parsing and validating submitted data based on the endpoint’s OpenAPI spec
- Controller routes are included in the auto-generated OpenAPI spec document
Interceptors can intercept execution of controller methods, thus have access to the request and response objects.
Data coercion and validation
Note: For a detailed explanation about validation in LoopBack 4, refer to the validation doc.
strong-remoting is the core of
data coercion and validation in LoopBack 3. Validation rules are defined using
the accepts metadata and data-access level validation are defined by model
validation methods like validatesPresenceOf().
strong-remoting’s supported data types can be found in its
type definitions,
each type comes with a validation and coercion methods. While the validations
are minimal (e.g. object properties are not validated), the coercions are very
comprehensive and applies different rules for values coming from JSON
(implemented by fromTypeValue) or from string sources like the url query and
HTTP headers.
LoopBack 4 does a full JSON Schema validation at the REST layer and property-based validation at the data-access layer.
OpenAPI is used to describe the type and constraints of request parameters in
LoopBack 4. In a typical controller, OpenAPI schemas describing the model data
are built from the metadata provided by LoopBack Models. Non-model parameters
(e.g. id in findById(id), filter in find(filter)) are described using
inline schema.
When a request arrives, a light weight coercion and validation is performed on the request body at OpenAPI parameters level. Then, the OpenAPI schema is converted to JSON schema on which AJV validation is run against the schema.
Currently, LoopBack 4 does not validate non-body parameters against schema. It will be supported in future, follow loopback-next#1573 to keep track of the progress.
In LoopBack 4, it is possible to apply additional validation of model data at
the REST layer via jsonSchema model setting, which can partially replace
advanced validations provided by LoopBack 3 at data-access level. However, it is
not a direct replacement for Model validation methods in LoopBack 3. The former
performs the validation at the REST API layer, while the later performs the
validation at the data access layer; that means, the data validation of
jsonSchema will not be applied if data is modified using repository methods.
Here is an example of enforcing the string length of a model property using
jsonSchema in LoopBack 4:
export class Book extends Entity {
  ...
  @property({
    type: 'string',
    jsonSchema: {
      'minLength': 5,
      'maxLength': 25
    }
  })
  title: string;
  ...
}
If the length of title is less than 5 characters, or is more than 25
characters a 422 error will be thrown by the server.
LoopBack 4 does not yet offer advanced validation rules at data-access layer like LoopBack 3 does, we are working on it.
Access to data before writing to the databases
In LoopBack 3, the before save
operation hook enable
users to access the model data before it is written to the database. A similar
functionality can be achieved in LoopBack 4 by overriding the create() method
of the
default CRUD repository
in the repository of the model.
Example of accessing model data before saving in LoopBack 3, using the
before save operation hook:
Book.observe('before save', async ctx => {
  if (!ctx.instance.author) {
    ctx.instance.author = 'Anonymous';
  }
});
Example of accessing model data before saving in LoopBack 4, by overriding the
create() method of the model’s repository.
async create(book: Book, options?: Options): Promise<Book> {
  if (!book.author) {
    book.author = 'Anonymous';
  }
  return super.create(book, options);
}
Similarly, various other repository methods in LoopBack 4 can be overridden to access the model data in the context of their operation.
Tip: Interceptors may also be used to access the user submitted data in some cases.
Summary
The phase-based middleware chain of LoopBack 3 is replaced by the sequence class in LoopBack 4. Controllers, services, and repositories are part of the request/response cycle in LoopBack 4; they provide interfaces and points of access to the request object, the response object, and the model data.