Overview
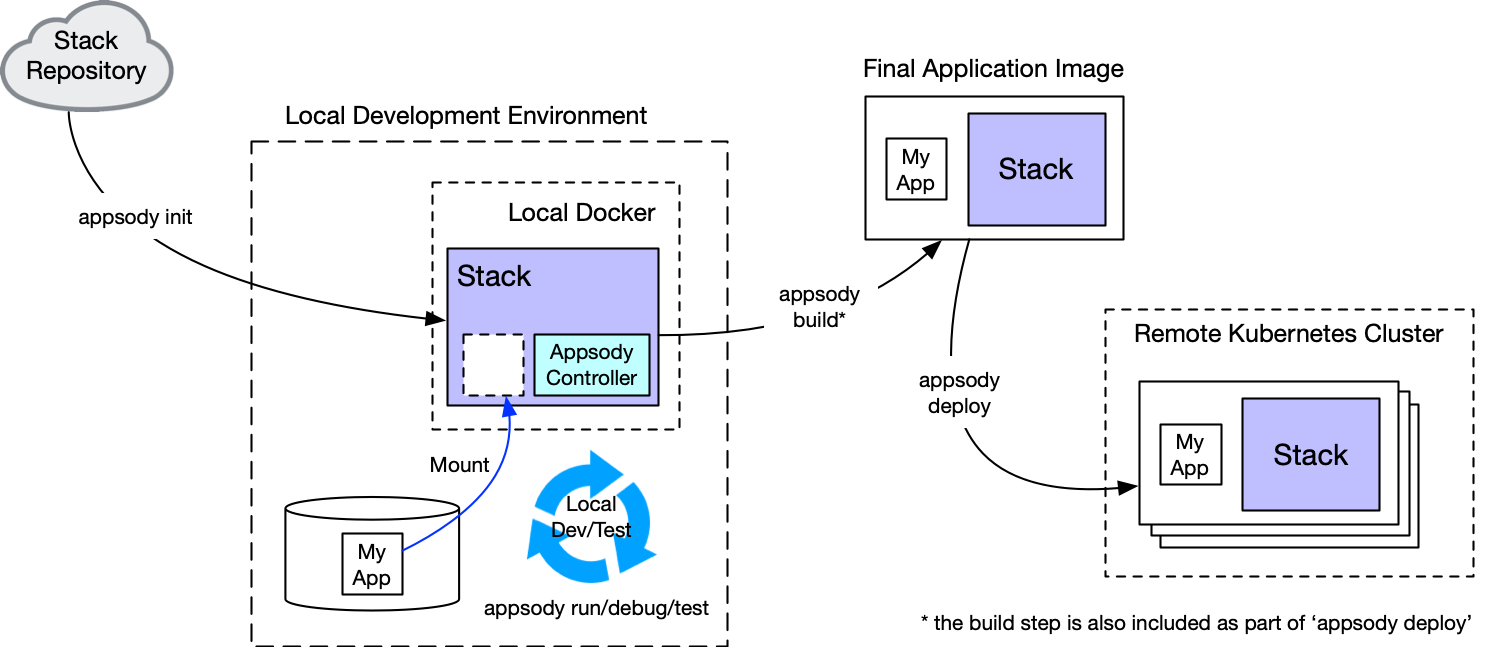
Appsody helps developers build containerized applications for the cloud that are ready to be deployed to Kubernetes without being an expert on the underlying container technology.
It is part of a broader offering named Kabanero where it is used for developing and deploying cloud native applications. But it can also be used on its own.
It consists of 3 key components:
-
Appsody Stacks: Configurable technology stacks built with popular runtimes and frameworks which provide the foundation for building applications that can be deployed and managed effectively in Kubernetes.
-
Appsody Hub: The central point of control for Appsody Stacks where you can find available stacks, create new stacks, or modify existing ones.
-
Appsody CLI: Makes it extremely easy for a developer to: scaffold, run, stop, debug, test, build, and deploy an application.
The LoopBack team has recently contributed the Node.js LoopBack stack which extends the Node.js stack and provides a powerful solution to build open APIs and Microservices in TypeScript with LoopBack, an open source Node.js API framework. It is based on LoopBack 4.
We’re going to show you how to scaffold, run, stop, debug, and test a LoopBack 4 application locally. Then, you’ll learn how to build and deploy this application to the IBM Cloud.
Installing Appsody
To install the Appsody CLI, please follow these instructions.
Scaffolding a LoopBack 4 Application using Appsody
Using the Appsody CLI, you can quickly scaffold a LoopBack 4 application.
- Open a terminal window
-
Create a directory named appsodyLB4Todo:
mkdir appsodyLB4Todo -
Navigate to that directory
cd appsodyLB4Todo -
List the available Appsody stacks (templates) with:
appsody listYou should see the nodejs-loopback stack (template) listed
REPO ID VERSION TEMPLATES DESCRIPTION ... *incubator nodejs-loopback 0.1.7 *scaffold LoopBack 4 API Framework for Node.js ... -
Scaffold a LoopBack 4 application in the current directory with:
appsody init nodejs-loopbackYou should see output like this:
Checking stack requirements...
Skipping Buildah - No requirements set.
Skipping Docker - No requirements set.
Skipping Appsody - No requirements set.
Running appsody init...
Downloading nodejs-loopback template project from https://github.com/appsody/stacks/releases/download/nodejs-loopback-v0.1.7/incubator.nodejs-loopback.v0.1.7.templates.scaffold.ta
r.gz
Download complete. Extracting files from /appsodyLB4Todo/nodejs-loopback.tar.gz
Setting up the development environment
Your Appsody project name has been set to appsodylb4todo
Pulling docker image appsody/nodejs-loopback:0.1
Running command: docker pull appsody/nodejs-loopback:0.1
0.1: Pulling from appsody/nodejs-loopback
...
Status: Downloaded newer image for appsody/nodejs-loopback:0.1
docker.io/appsody/nodejs-loopback:0.1
[Warning] The stack image does not contain APPSODY_PROJECT_DIR. Using /project
Running command: docker run --rm --entrypoint /bin/bash appsody/nodejs-loopback:0.1 -c find /project -type f -name .appsody-init.sh
Successfully initialized Appsody project with the nodejs-loopback stack and the default template.
The most important lines to make note of are:
Your Appsody project name has been set to appsodylb4todo and Successfully initialized Appsody project with the nodejs-loopback stack and the default template. -
Install all the dependencies of this application with:
npm install -
Now that all the dependencies have been installed, open your favourite IDE editor on this project.
In my case, I use VS Code.
code . -
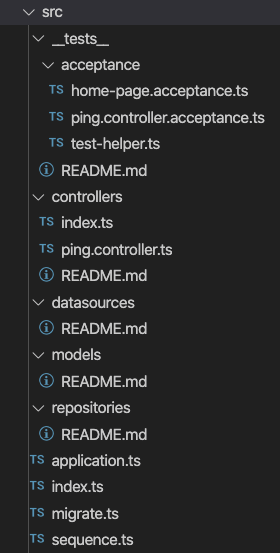
The basic structure of the application looks like this:

One important file is the Appsody configuration file for your project named .appsody-config.yaml .
It defines the name of your project, and the stack (template) on which it is based.
project-name: appsodylb4todo stack: appsody/nodejs-loopback:0.1 -
The source code of the LoopBack 4 application is located in the src directory.
-
This basic application only defines one API endpoint
'/ping'in the file src/controllers/ping.controller.tsThe initial application is very similar to the one generated by the
'lb4 app'command, but it’s going to be a loaded by a facade that sets up health/metrics for cloud native observability.
In the next section, we will add more API endpoints.
Building Your Application
The template application is only a starting point.
Let’s build a proper, basic LoopBack 4 application.
We’ll use the todo list application from the
Todo Tutorial as an
example.
Add the Todo model
Let’s create the Todo model using:
lb4 model
You will be prompted with different questions. Specify the same responses as below.
? Model class name: todo
? Please select the model base class: Entity (A persisted m
odel with an ID)
? Allow additional (free-form) properties? No
Model Todo will be created in src/models/todo.model.ts

Let's add a property to Todo
Enter an empty property name when done

? Enter the property name: id
? Property type: number
? Is id the ID property? Yes
? Is id generated automatically? Yes

Let's add another property to Todo
Enter an empty property name when done

? Enter the property name: title
? Property type: string
? Is it required?: Yes
? Default value [leave blank for none]:

Let's add another property to Todo
Enter an empty property name when done

? Enter the property name: desc
? Property type: string
? Is it required?: No
? Default value [leave blank for none]:

Let's add another property to Todo
Enter an empty property name when done

? Enter the property name: isComplete
? Property type: boolean
? Is it required?: No
? Default value [leave blank for none]:

Let's add another property to Todo
Enter an empty property name when done
We are done adding properties, so just hit the ENTER key at this point.
? Enter the property name:
  create src/models/todo.model.ts
  update src/models/index.ts

Model Todo was created in src/models/
Add a Datasource
-
Let’s create a datasource for an in-memory database using:
lb4 datasourceYou will be prompted with different questions. Specify the same responses as below.
? Datasource name: db ? Select the connector for db: In-memory db (supported by StrongLoop) ? window.localStorage key to use for persistence (browser only): ? Full path to file for persistence (server only): ./data/db.json create src/datasources/db.datasource.ts update src/datasources/index.ts Datasource Db was created in src/datasources/ - Create a folder named
/appsodyLB4Todo/data - Create a file named
/appsodyLB4Todo/data/db.json - Place the following content inside
db.json:{ "ids": { "Todo": 5 }, "models": { "Todo": { "1": "{\"title\":\"Take over the galaxy\",\"desc\":\"MWAHAHAHAHAHAHAHAHAHAHAHAHAMWAHAHAHAHAHAHAHAHAHAHAHAHA\",\"id\":1}", "2": "{\"title\":\"destroy alderaan\",\"desc\":\"Make sure there are no survivors left!\",\"id\":2}", "3": "{\"title\":\"play space invaders\",\"desc\":\"Become the very best!\",\"id\":3}", "4": "{\"title\":\"crush rebel scum\",\"desc\":\"Every.Last.One.\",\"id\":4}" } } }
Add a Repository
Let’s a repository to handle the database CRUD functions of the Todo model
using:
lb4 repository
You will be prompted with different questions. Specify the same responses as below.
? Please select the datasource DbDatasource
? Select the model(s) you want to generate a repository Todo
? Please select the repository base class DefaultCrudRepository (Juggler bridge)
   create src/repositories/todo.repository.ts
   update src/repositories/index.ts

Repository TodoRepository was created in src/repositories/
Add a Controller
Let’s create a controller to define and handle the request-response lifecycle for our API endpoints using:
lb4 controller
You will be prompted with different questions. Specify the same responses as below.
? Controller class name: todo
Controller Todo will be created in src/controllers/todo.controller.ts

? What kind of controller would you like to generate? REST Controller with CRUD functions
? What is the name of the model to use with this CRUD repository? Todo
? What is the name of your CRUD repository? TodoRepository
? What is the name of ID property? id
? What is the type of your ID? number
? Is the id omitted when creating a new instance? Yes
? What is the base HTTP path name of the CRUD operations? /todos
   create src/controllers/todo.controller.ts
   update src/controllers/index.ts

Controller Todo was created in src/controllers/
Look inside src/controllers/todo.controller.ts, and you will notice we have
several more endpoints:
- GET / POST / PATCH
/todos - GET / PATCH / PUT / DEL
/todos/{id} - GET
/todos/count
So, in total, these are the available endpoints of this application:
- Application endpoint: http://localhost:3000/
- API explorer: http://localhost:3000/explorer
- Open API Spec: http://localhost:3000/openapi.json
- API endpoints:
- http://localhost:3000/ping
- http://localhost:3000/todos
- http://localhost:3000/todos/{id}
- http://localhost:3000/todos/count
- Health endpoint: http://localhost:3000/health
- Liveness endpoint: http://localhost:3000/live
- Readiness endpoint: http://localhost:3000/ready
- Metrics endpoint: http://localhost:3000/metrics
We will run, test, debug, and stop this application locally in the next section.
Running/Testing/Debugging/Stopping a LoopBack 4 Application Locally using Appsody
Using the Appsody CLI, you can quickly run, test, debug, and stop a LoopBack 4 application.
Running a LoopBack 4 Application Locally using Appsody
-
Run the application using:
appsody runAppsody takes your current application artifacts and builds/starts up a docker container for you.
The output of the command looks similar to this:
Running development environment... Pulling docker image appsody/nodejs-loopback:0.1 Running command: docker pull appsody/nodejs-loopback:0.10.1: Pulling from appsody/nodejs-loopback Digest: sha256:c810188750a998bbc84a3dba1a2bb04413851453da6874d224a129994b12c9c5 Status: Image is up to date for appsody/nodejs-loopback:0.1 docker.io/appsody/nodejs-loopback:0.1 Running command: docker run --rm -p 3000:3000 -p 9229:9229 --name appsodylb4todo-dev -v /Users/dremond/Documents/appsody_stuff/appsodyLB4Todo/:/project/user-app -v appsodylb4todo-deps:/pr oject/user-app/node_modules -v appsody-controller-0.3.1:/.appsody -t --entrypoint /.appsody/appsody-controller appsody/nodejs-loopback:0.1 --mode=run [Container] Running APPSODY_PREP command: npm install --prefix user-app && npm run build --prefix user-app npm WARN nodejs-loopback-scaffold@1.0.0 No license field. [Container] audited 4510 packages in 6.142s [Container] [Container] > nodejs-loopback-scaffold@1.0.0 build /project/user-app [Container] > lb-tsc [Container] [Container] Running command: npm start [Container] [Container] > nodejs-loopback@0.1.7 start /project [Container] > node -r source-map-support/register . [Container] [Container] Server is running at http://[::1]:3000 [Container] Try http://[::1]:3000/ping -
In your browser, navigate to :
http://[::1]:3000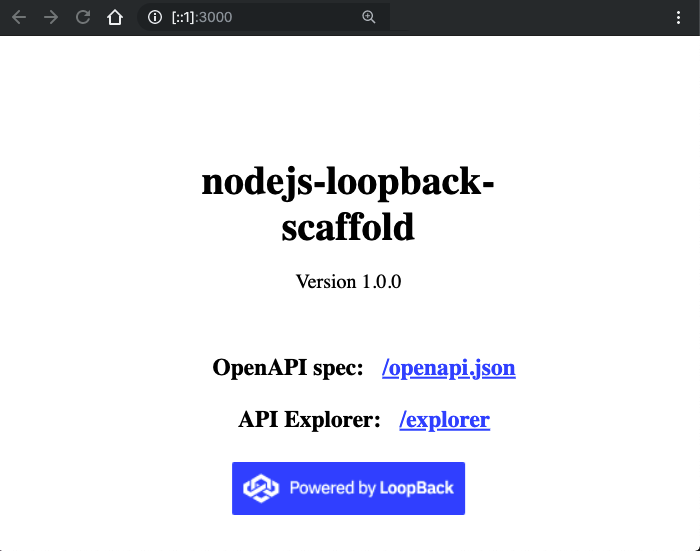
-
Click on the
'/explorer'link to open the'API Explorer'and interact with the REST API endpoints.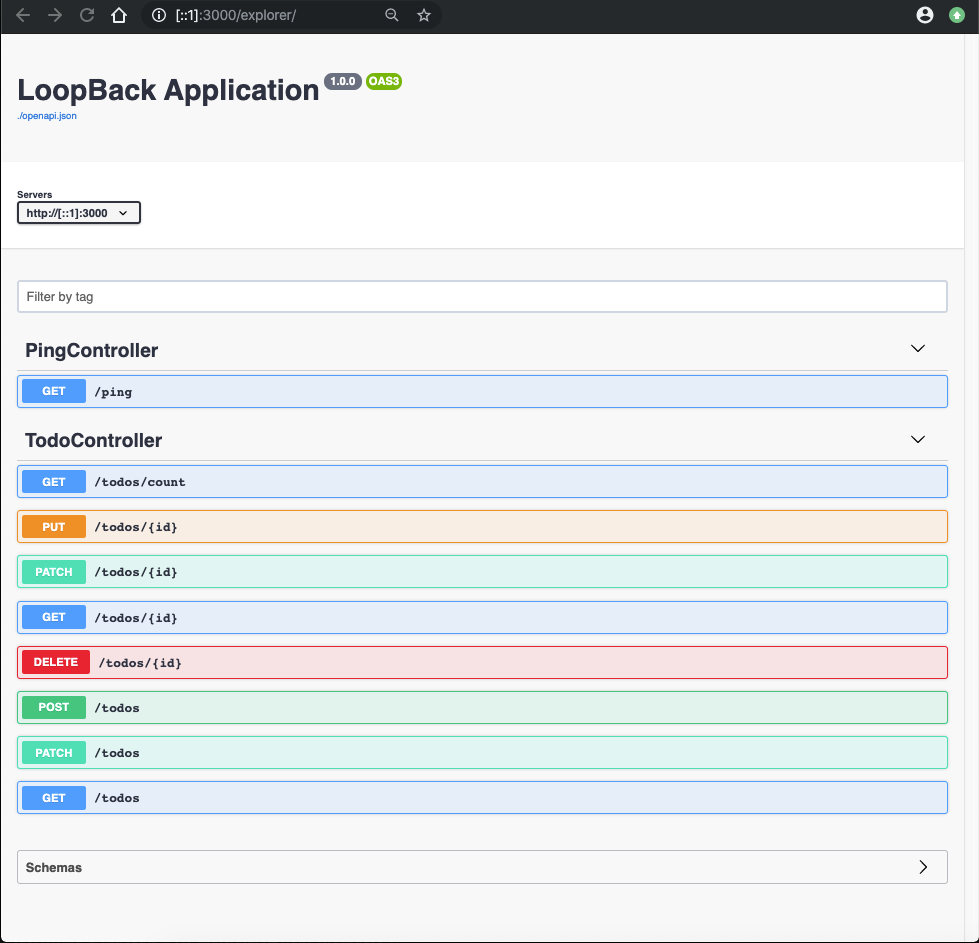
-
Expand PingController’s
'GET /ping'section, click on the'Try it Out'button, and then click on the'Execute'button.You should obtain a response code of
200and a message body of:{ "greeting": "Hello from LoopBack", "date": "2019-11-21T18:01:28.786Z", "url": "/ping", "headers": { "host": "[::1]:3000", "connection": "keep-alive", "accept": "application/json", "user-agent": "Mozilla/5.0 (Macintosh; Intel Mac OS X 10_15_1) AppleWebKit/537.36 (KHTML, like Gecko) Chrome/78.0.3904.97 Safari/537.36", "sec-fetch-site": "same-origin", "sec-fetch-mode": "cors", "referer": "http://[::1]:3000/explorer/", "accept-encoding": "gzip, deflate, br", "accept-language": "en-US,en;q=0.9" } } -
By default,
'File watching'is enabled when you run the command'appsody run'. This means you can change a file in your project, and then Appsody builds/runs a new Docker container for you automatically. -
Open src/controllers/ping.controller.ts, and change the greeting from
'Hello from LoopBack'to'Hello from LoopBack 4!'. Save the file. You will see some activity in console output:[Container] Running command: npm run pretest --prefix user-app && npm start [Container] Wait received error on APPSODY_RUN/DEBUG/TEST signal: interrupt [Container] [Container] > nodejs-loopback-scaffold@1.0.0 pretest /project/user-app [Container] > npm run clean && npm run build [Container] [Container] [Container] > nodejs-loopback-scaffold@1.0.0 clean /project/user-app [Container] > lb-clean dist *.tsbuildinfo [Container] [Container] [Container] > nodejs-loopback-scaffold@1.0.0 build /project/user-app [Container] > lb-tsc [Container] > nodejs-loopback@0.1.7 start /project [Container] > node -r source-map-support/register . [Container] [Container] Server is running at http://[::1]:3000 [Container] Try http://[::1]:3000/ping -
In the
'API Explorer', try the'GET /ping'endpoint again, and you will receive the new greeting response:{ "greeting": "Hello from LoopBack 4!", "date": "2019-11-21T18:22:22.975Z", "url": "/ping", "headers": { "host": "[::1]:3000", "connection": "keep-alive", "accept": "application/json", "user-agent": "Mozilla/5.0 (Macintosh; Intel Mac OS X 10_15_1) AppleWebKit/537.36 (KHTML, like Gecko) Chrome/78.0.3904.97 Safari/537.36", "sec-fetch-site": "same-origin", "sec-fetch-mode": "cors", "referer": "http://[::1]:3000/explorer/", "accept-encoding": "gzip, deflate, br", "accept-language": "en-US,en;q=0.9" } } -
In the
'API Explorer', try the'GET /todos'endpoint.Click on the
'Try it Out'button, clear the filter field, and then click on the'Execute'button.
The response will be:
[ { "id": 1, "title": "Take over the galaxy", "desc": "MWAHAHAHAHAHAHAHAHAHAHAHAHAMWAHAHAHAHAHAHAHAHAHAHAHAHA" }, { "id": 2, "title": "destroy alderaan", "desc": "Make sure there are no survivors left!" }, { "id": 3, "title": "play space invaders", "desc": "Become the very best!" }, { "id": 4, "title": "crush rebel scum", "desc": "Every.Last.One." } ] -
To see the docker container the Appsody started for you,
open a new terminaland use:appsody psIt will show something similar to this:
CONTAINER ID    NAME                    IMAGE                           STATUS
d39c90c5191d    appsodylb4todo-dev      appsody/nodejs-loopback:0.1     Up About a minute
'docker ps'will accomplish the same thing.
Stopping a LoopBack 4 Application Locally using Appsody
If your application is currently running under Appsody control, you can stop it
with Ctrl+C, or by running the command 'appsody stop' from another terminal.
The output will be the similar to this:
Stopping development environment
Running command: docker stop appsodylb4todo-dev -t 10
Testing a LoopBack 4 Application Locally using Appsody
- If your application is currently running under Appsody control, stop it.
- Open src/controllers/ping.controller.ts, and revert the greeting back
to
'Hello from LoopBack'. Save the file. (We don’t want our first test run to fail ;) ) - Let’s also make sure to fix up any ‘lint’ errors beforehand.
npm run lint:fix -
Test the application against the suite of test cases located in src/tests by using:
appsody testAppsody will build the project, and then run the mocha test suites. The output should be similar to this:
...
[Container] > nodejs-loopback-scaffold@1.0.0 test /project/user-app
[Container] > lb-mocha --allow-console-logs "dist/__tests__"
[Container]
[Container]
[Container]
[Container]   HomePage
[Container]     ✓ exposes a default home page (72ms)
[Container]     ✓ exposes self-hosted explorer
[Container]
[Container]   PingController
[Container]     ✓ invokes GET /ping
[Container]
[Container]
[Container]   3 passing (369ms)

...
Closing down development environment.
After the test suites have completed, Appsody stops the application’s docker container automatically.
Debugging a LoopBack 4 Application Locally using Appsody
- If your application is currently running under Appsody control, stop it.
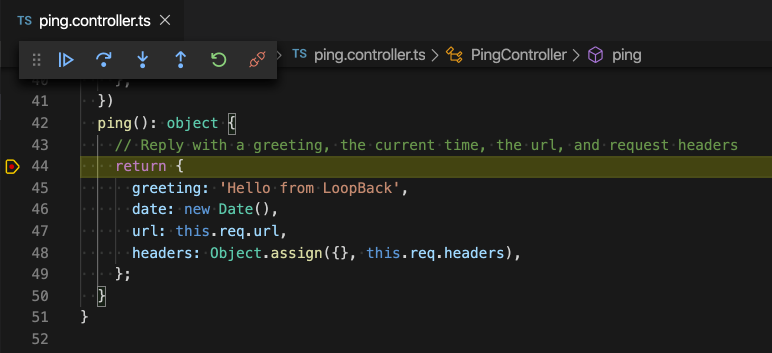
-
Open src/controllers/ping.controller.ts, and let’s set a breakpoint on the
'return'statement in the'ping(): object'function.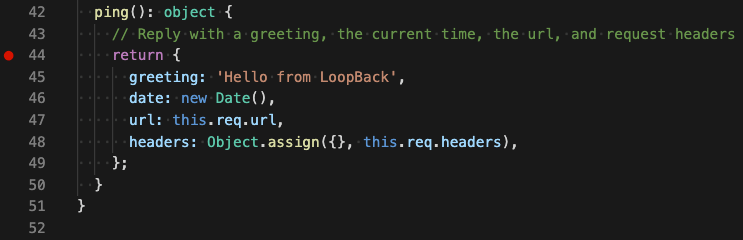
-
Start debugging the application by using:
appsody debugYou will see output similar to this:
Running debug environment ... [Container] > nodejs-loopback-scaffold@1.0.0 build /project/user-app [Container] > lb-tsc [Container] [Container] Running command: npm run debug [Container] [Container] > nodejs-loopback@0.1.7 debug /project [Container] > node -r source-map-support/register --inspect=0.0.0.0 . [Container] [Container] Debugger listening on ws://0.0.0.0:9229/dd6869ce-d940-4b8b-9867-cfde382f4856 [Container] For help, see: https://nodejs.org/en/docs/inspector [Container] Server is running at http://[::1]:3000 [Container] Try http://[::1]:3000/ping -
Switch to the debugging view in VS Code, and you will notice that there is a debugging configuration provided for Appsody.
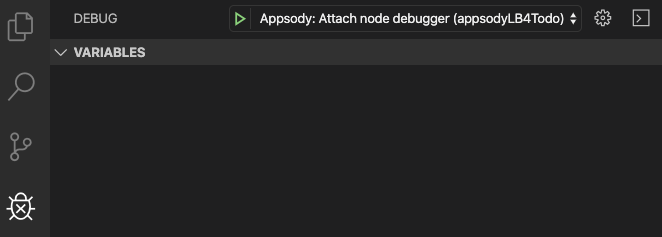
-
Press the green
'Start Debugging'button to attach to the debugger.The console view will show
[Container] Debugger attached. [Container] Server is running at http://[::1]:3000 [Container] Try http://[::1]:3000/ping -
In your browser, navigate to
http://[::1]:3000/explorer, and call the'GET /ping'endpoint.The debugger stops at the breakpoint.
-
Press the blue
'Continue (F5)'button in the debugger toolbar, and then return to the'API Explorer'.The response shows up.
{ "greeting": "Hello from LoopBack", "date": "2019-11-21T18:43:00.786Z", "url": "/ping", "headers": { "host": "[::1]:3000", "connection": "keep-alive", "accept": "application/json", "user-agent": "Mozilla/5.0 (Macintosh; Intel Mac OS X 10_15_1) AppleWebKit/537.36 (KHTML, like Gecko) Chrome/78.0.3904.97 Safari/537.36", "sec-fetch-site": "same-origin", "sec-fetch-mode": "cors", "referer": "http://[::1]:3000/explorer/", "accept-encoding": "gzip, deflate, br", "accept-language": "en-US,en;q=0.9" } } - Press
'Ctrl+C'to stop the debugger and the application.
Turning on DEBUG tracing
To turn on debug tracing in a LoopBack 4 application running under the control
of Appsody, you need to use the '--docker-options' parameter. You can specify
this parameter for the run, debug and test commands.
appsody [run | debug | test] --docker-options "--env DEBUG=loopback*"
You will see output similar to this:
[Container]   loopback:context:view Finding matching bindings +0ms
[Container]   loopback:context:view Reading bindings +0ms
[Container]   loopback:core:lifecycle Finished notification start of +26ms
[Container]   loopback:context [application] Resolving binding synchronously: servers.RestServer +89ms
[Container]   loopback:context:binding Get value for binding servers.RestServer +83ms
Deploying to a Kubernetes Cluster on IBM Cloud
Before deploying your application to the IBM Cloud, please ensure you have a
terminal window opened in your project directory. In our case, this is the
appsodyLB4Todo directory.
- Log into IBM Cloud :
ibmcloud login - Log into the IBM Cloud Container Registry :
ibmcloud cr login - List your container registry namespaces :
ibmcloud cr namespace-list - Create a namespace :
ibmcloud cr namespace-add <my_namespace>. In my case my namespace isdremond. - Create a Kubernetes cluster on IBM Cloud.
-
Go to the
'Access'tab of your cluster and follow the instructions to set upkubectlagainst your cluster configuration.In my case, my cluster is named
dremondOne.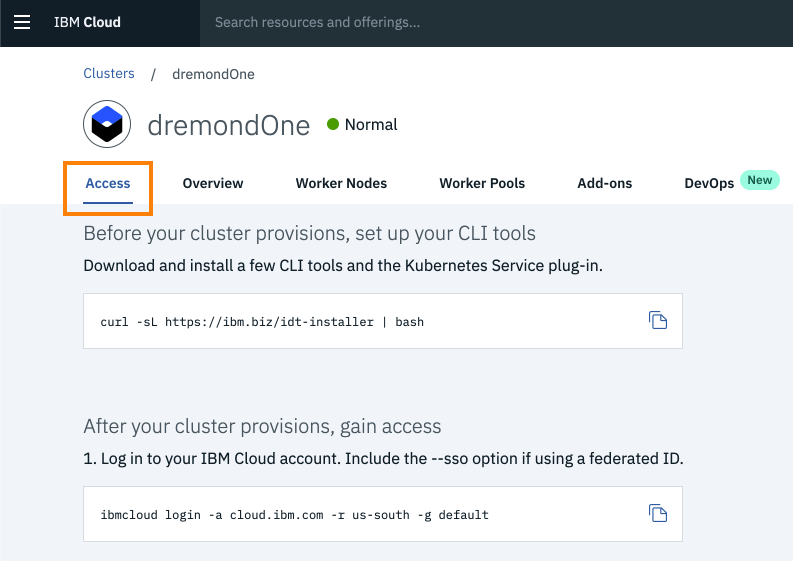
-
Confirm the region of your container registry:
ibmcloud cr regionYou will see something like:
You are targeting region 'us-south', the registry is 'us.icr.io'. -
List the secrets in Kubernetes:
kubectl get secretsIt will list many secrets. You are interested in the one that matches your region. In my case :
NAME                           TYPE
...                            ...
default-us-icr-io              kubernetes.io/dockerconfigjson
We will make use of
'default-us-icr-io'. -
Create the deployment manifest with:
appsody deploy --generate-onlyThe output will look similar to this:
Pulling docker image appsody/nodejs-loopback:0.1 Running command: docker pull appsody/nodejs-loopback:0.1 0.1: Pulling from appsody/nodejs-loopback Digest: sha256:c810188750a998bbc84a3dba1a2bb04413851453da6874d224a129994b12c9c5 Status: Image is up to date for appsody/nodejs-loopback:0.1 docker.io/appsody/nodejs-loopback:0.1 Running command: docker create --name appsodylb4todo-extract appsody/nodejs-loopback:0.1 Running command: docker cp appsodylb4todo-extract:/config/app-deploy.yaml /Users/dremond/Documents/appsody_stuff/appsodyLB4Todo/app-deploy.yaml Running command: docker rm appsodylb4todo-extract -f Running git command: git version Running git command: git status -sb Created deployment manifest: /Users/dremond/Documents/appsody_stuff/appsodyLB4Todo/app-deploy.yaml -
In
/appsodylb4todo/app-deploy.yaml, underapplicationImage, insert a line:pullSecret: default-us-icr-ioIt should look like this now:
spec:
  applicationImage: dev.local/appsodylb4todo
  pullSecret: default-us-icr-io
This pull secret is necessary for kubernetes to pull images from your private container registry.
-
Finally build and deploy your image to kubernetes using:
appsody deploy -t us.icr.io/dremond/appsodylb4todo:1 --pushYou will see output similar to this:
Extracting project from development environment
Pulling docker image appsody/nodejs-loopback:0.1
...
[Docker] Successfully built 7b7f1a04624b
[Docker] Successfully tagged us.icr.io/dremond/appsodylb4todo:1
Pushing image us.icr.io/dremond/appsodylb4todo:1
...
Updated existing deployment manifest /Users/dremond/Documents/appsody_stuff/appsodyLB4Todo/app-deploy.yaml
...
Attempting to get resource from Kubernetes ...
Running command: kubectl get svc appsodylb4todo -o jsonpath=http://{.status.loadBalancer.ingress[0].hostname}:{.spec.ports[0].nodePort} --namespace default
Deployed project running at http://:32556
It takes a bit of time, so please wait patiently.
Ensure it completes successfully.
It may fail the first time if the Apposody Operator installation fails. See Resolving the Appsody Operator Error .
If deployment was successful, the
applicationImagefield inapp-deploy.yamlwill have a value of:applicationImage: us.icr.io/dremond/appsodylb4todo:1which matches what you specified in the deploy command.
-
Confirm the deployment with:
kubectl get deploymentsYou should see the deployments named
'appsodylb4todo'and'appsody-operator':NAME DESIRED CURRENT UP-TO-DATE AVAILABLE AGE appsody-operator 1 1 1 1 11m appsodylb4todo 1 1 1 1 10m -
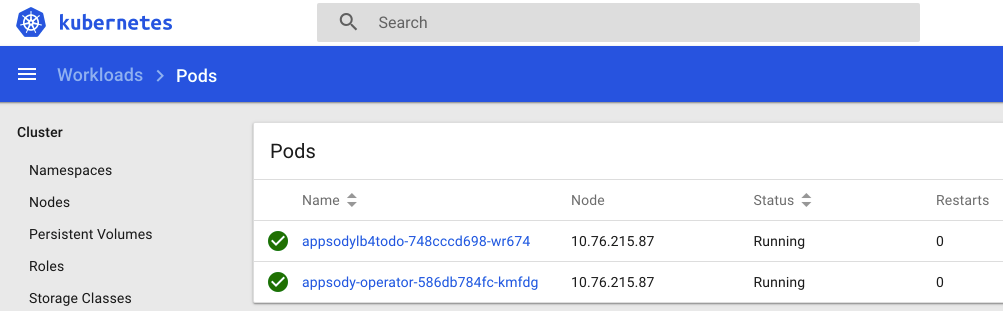
Confirm your pod is running with:
kubectl get podsYou should see a pod with a name beginning with
'appsodylb4todo'. Ensure its state is'Running'.NAME READY STATUS RESTARTS AGE appsody-operator-586db784fc-kmfdg 1/1 Running 0 13m appsodylb4todo-745cdc479d-k5hlp 1/1 Running 0 14mYou can also use the Kubernetes Dashboard to view the same information:
-
Determine the public IP address of your cluster with:
kubectl get node -o wideLook at the
EXTERNAL-IPvalue.NAME STATUS ROLES AGE VERSION EXTERNAL-IP OS-IMAGE KERNEL-VERSION CONTAINER-RUNTIME 10.76.215.87 Ready <none> 4d v1.14.8+IKS 184.172.214.253 Ubuntu 16.04.6 LTS 4.4.0-166-generic containerd://1.2.10 -
Determine the port of your application with:
kubectl get svc appsodylb4todoLooking at the
PORT(S)value.NAME TYPE CLUSTER-IP EXTERNAL-IP PORT(S) AGE appsodylb4todo NodePort 172.21.74.42 <none> 3000:32556/TCP 21mThe value you are interested in is the numeric value after the ‘:’ character.
In my case, this is the value
32556. -
In your browser, navigate to
http://{external IP}:{port}. In my case, this is: http://184.172.214.253:32556 .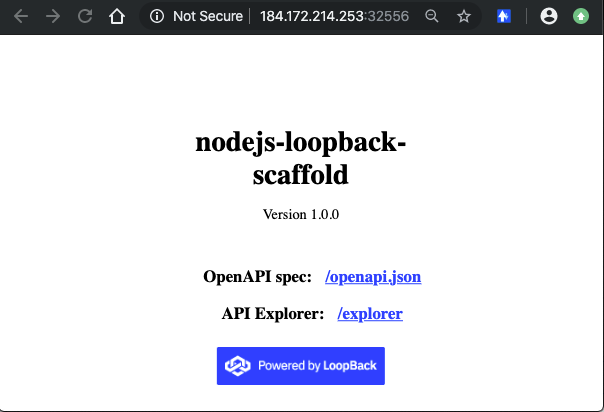
As mentioned earlier, all these endpoints are available:
- Application endpoint: /
- API explorer: /explorer
- Open API Spec: /openapi.json
- API endpoints:
- /ping
- /todos
- /todos/{id}
- /todos/count
- Health endpoint: /health
- Liveness endpoint: /live
- Readiness endpoint: /ready
- Metrics endpoint: /metrics
-
When you make additional code changes and you deploy again, it is necessary to
increase the tag numberin order for kubernetes to reload the pod with the new image.For example :
appsody deploy -t us.icr.io/dremond/appsodylb4todo:2 --pushThis is a workaround for a known bug at this time.
Resolving the Appsody Operator Error
If the 'appsody deploy' command fails with an error related to the
Appsody operator :
Running command: kubectl apply -f /Users/dremond/.appsody/deploy/appsody-app-crd.yaml --namespace default
Attempting to apply resource in Kubernetes ...
Running command: kubectl apply -f /Users/dremond/.appsody/deploy/appsody-app-operator.yaml --namespace default
[Error] Failed to install an Appsody operator in namespace default watching namespace default. Error was: kubectl apply failed: exit status 1: W1120 11:44:03.152352   12911 factory_object_mapping.go:423] Failed to download OpenAPI (the server could not find the requested resource), falling back to swagger
error: error validating "/Users/dremond/.appsody/deploy/appsody-app-operator.yaml": error validating data: the server could not find the requested resource; if you choose to ignore these errors, turn validation off with --validate=false
This is easy to fix. Simply take the command that failed, and add the suggested
parameter --validate=false
In my case, I had to enter the following command:
kubectl apply -f /Users/dremond/.appsody/deploy/appsody-app-crd.yaml --validate=false --namespace default
This command should succeed.
Confirm the deployment exists with:
kubectl get deployments
You should see an entry named 'appsody-operator'.
Confirm the pod is running with:
kubectl get pods
You should see a pod with a name beginning with 'appsody-operator'. Ensure its
state is 'Running'.
Deleting the Deployment from Kubernetes
Deleting the deployed application from Kubernetes is very simple.
Simply enter the command:
appsody deploy delete
The output should be:
Deleting deployment using deployment manifest app-deploy.yaml
Attempting to delete resource from Kubernetes...
Running command: kubectl delete -f app-deploy.yaml --namespace default
Deployment deleted
Confirm the deployment no longer exists with:
kubectl get deployments
You should not see a deployment named 'appsodylb4todo'.
Confirm your pod no longer exists with:
kubectl get pods
You should not see a pod with a name beginning with 'appsodylb4todo'.
Summary
Congratulations!
Using the Appsody CLI, you’ve learnt how to:
- scaffold, run, stop, debug, and test a LoopBack 4 application locally.
- build and deploy the application to the IBM Cloud.