Overview
A LoopBack application has its own life cycles at runtime. There are a few
methods to control the transition of states of Application.
- boot(): Boot the application
- init(): Initialize the application (it happens at most once per application)
- start(): Start the application. It will automatically call
init()if the application is not initialized - stop(): Stop the application
Application states
The initial state of application is created. There are two types of states
expected:
- Stable, such as
created,booted,started, andstopped - In process, such as
booting,starting, andstopping
Operations can only be called at a stable state. The logic of each operation
should immediately set the state to a new one indicating work in process, for
example, start() sets starting and stop() sets stopping. Calling a
different operation in an in-process state will throw an error. If the same
operation is in process, it awaits the operation to finish without performing
any logic.
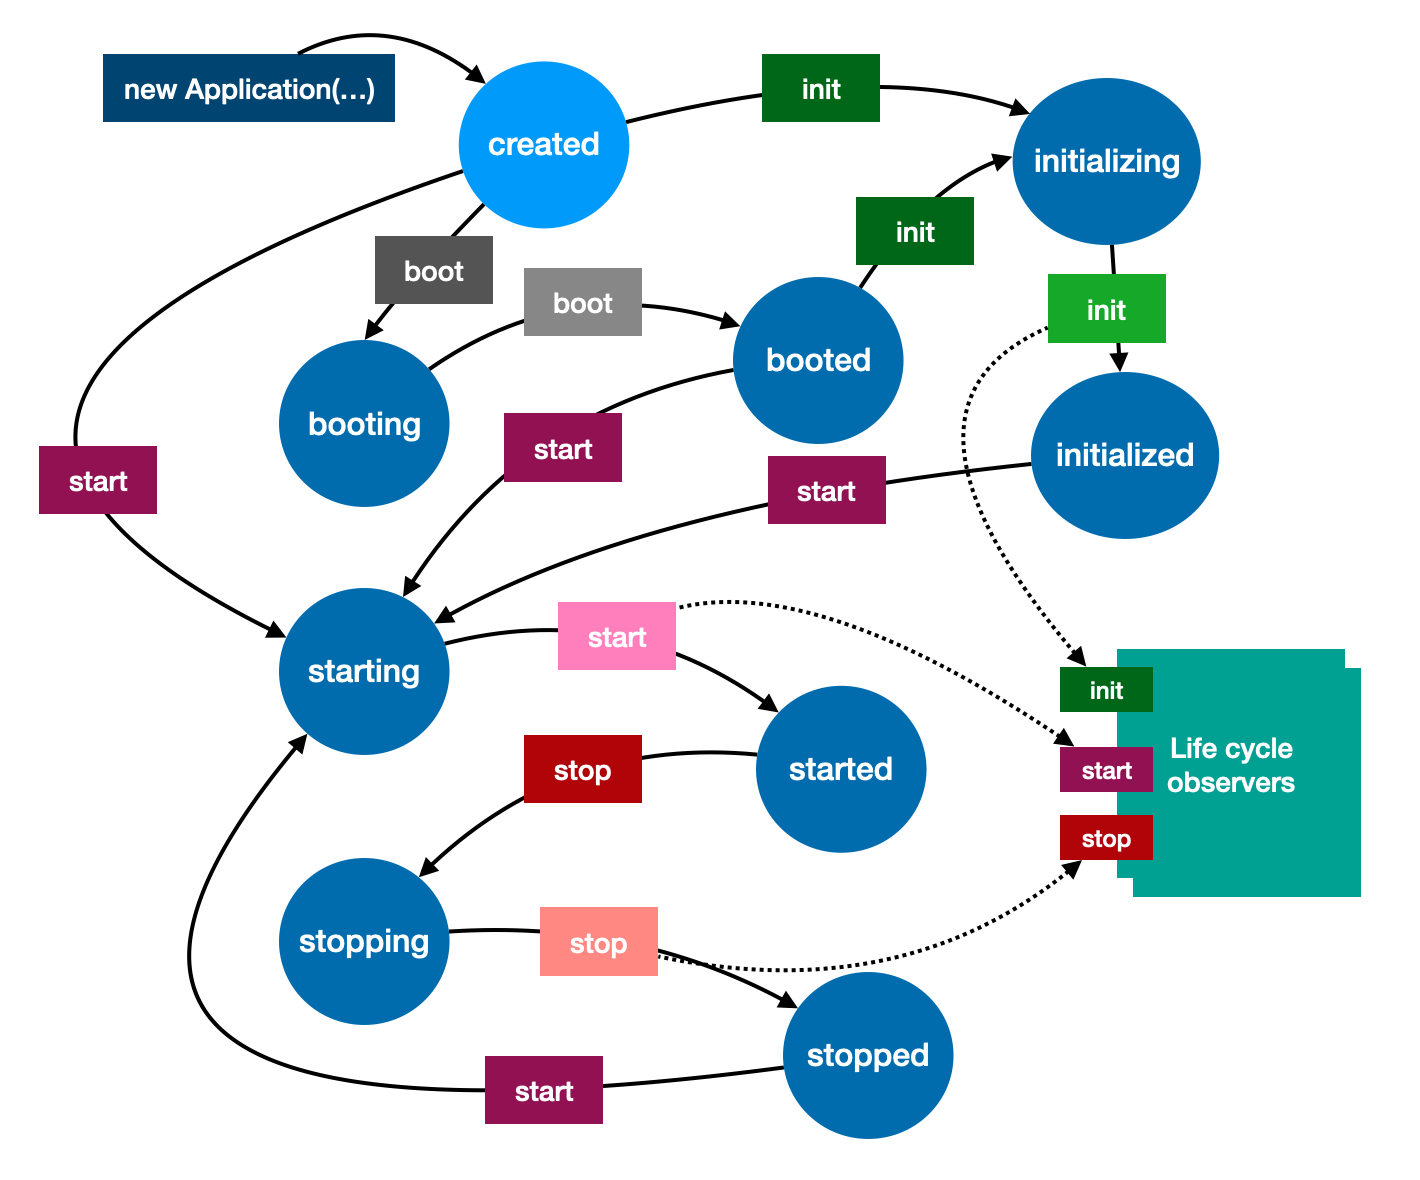
The state can transition as follows by operations including boot, start, and
stop:
- boot()
- !booted -> booting -> booted
-
booting booted -> booted (no-op)
- init()
- !initialized -> initializing -> initialized
-
initializing initialized -> initialized (no-op)
- start()
- !started -> starting -> started
-
starting started -> started (no-op)
- stop()
- started -> stopping -> stopped
-
stopping !started -> stopped (no-op)
State transitions are illustrated in the diagram below:
Each state transition emits a stateChanged event with data for the from and
to states. For example:
app.on('stateChanged', data => {
  console.log(data);
});
The data is an object such as {from: 'starting', to: 'started'}.
Graceful shutdown
Node.js will normally exit with a 0 status code when no more async operations
are pending. But it’s typical that a LoopBack 4 application creates connections
to backend resources and listens on network interfaces for incoming requests. In
such cases, the process keeps alive unless it receives a signal to shutdown. For
example, pressing Ctrl+C or using a kill command.
When the LoopBack 4 application is running inside a managed container, such as a
Kubernetes Pod, there is a protocol between the container and the application
process. The use case is supported by configuring the application with the
shutdown option:
/**
 * Options to set up application shutdown
 */
export type ShutdownOptions = {
  /**
   * An array of signals to be trapped for graceful shutdown
   */
  signals?: NodeJS.Signals[];
  /**
   * Period in milliseconds to wait for the grace shutdown to finish before
   * exiting the process
   */
  gracePeriod?: number;
};

/**
 * Configuration for application
 */
export interface ApplicationConfig {
  /**
   * Configuration for signals that shut down the application
   */
  shutdown?: ShutdownOptions;
}
For example, the following application captures SIGINT to gracefully shutdown:
const app = new Application({
  shutdown: {
    signals: ['SIGINT'],
  },
});
// Schedule some work such as a timer or database connection
await app.start();
When the application is running inside a terminal, it can respond to Ctrl+C,
which sends SIGINT to the process. The application calls stop first before
it exits with the captured signal.
Participate in the application start/stop
It’s often desirable for various types of artifacts to participate in the life
cycles and perform related processing upon start and stop. Good examples of
such artifacts are:
- Servers
- start: Starts the HTTP server listening for connections.
- stop: Stops the server from accepting new connections.
- Components
- A component itself can be a life cycle observer and it can also contribute life cycle observers
- DataSources
- connect: Connect to the underlying database or service
- disconnect: Disconnect from the underlying database or service
- Custom scripts
- start: Custom logic to be invoked when the application starts
- stop: Custom logic to be invoked when the application stops
The LifeCycleObserver interface
To react on life cycle events, a life cycle observer implements the
LifeCycleObserver interface.
import {ValueOrPromise} from '@loopback/core';

/**
 * Observers to handle life cycle start/stop events
 */
export interface LifeCycleObserver {
  /**
   * The method to be invoked during `init`. It will only be called at most once
   * for a given application instance.
   */
  init?(...injectedArgs: unknown[]): ValueOrPromise<void>;
  /**
   * The method to be invoked during `start`
   */
  start?(...injectedArgs: unknown[]): ValueOrPromise<void>;
  /**
   * The method to be invoked during `stop`
   */
  stop?(...injectedArgs: unknown[]): ValueOrPromise<void>;
}
init, start and stop methods are optional so that an observer can opt in
certain events.
Method injection is allowed for the lifecycle methods. For example,
class MyObserverWithMethodInjection implements LifeCycleObserver {
  status = 'not-initialized';

  init(@inject('prefix') prefix: string) {
    this.status = `${prefix}:initialized`;
  }

  start(@inject('prefix') prefix: string) {
    this.status = `${prefix}:started`;
  }

  stop(@inject('prefix') prefix: string) {
    this.status = `${prefix}:stopped`;
  }
}
Register a life cycle observer
A life cycle observer can be registered by calling lifeCycleObserver() of the
application. It binds the observer to the application context with a special
tag - CoreTags.LIFE_CYCLE_OBSERVER.
app.lifeCycleObserver(MyObserver);
Please note that app.server() automatically registers servers as life cycle
observers.
Life cycle observers can be registered via a component too:
export class MyComponentWithObservers implements Component {
  /**
   * Populate `lifeCycleObservers` per `Component` interface to register life
   * cycle observers
   */
  lifeCycleObservers = [XObserver, YObserver];
}
Shorthand methods
In some cases, it’s desirable to register a single function to be called at start or stop time.
For example, when writing integration-level tests, we can use app.onStop() to
register a cleanup routine to be invoked whenever the application is shut down.
import {Application} from '@loopback/core';

describe('my test suite', () => {
  let app: Application;
  before(setupApp);
  after(() => app.stop());

  // the tests come here

  async setupApp() {
    app = new Application();
    app.onStop(async cleanup() {
      // do some cleanup
    });

    await app.boot();
    await app.start();
  }
});
Discover life cycle observers
The Application finds all bindings tagged with CoreTags.LIFE_CYCLE_OBSERVER
within the context chain and resolve them as observers to be notified.
Notify life cycle observers of start/stop related events by order
There may be dependencies between life cycle observers and their order of
processing for start and stop need to be coordinated. For example, we
usually start a server to listen on incoming requests only after other parts of
the application are ready to handle requests. The stop sequence is typically
processed in the reverse order. To support such cases, we introduce
two-dimension steps to control the order of life cycle actions.
Observer groups
First of all, we allow each of the life cycle observers to be tagged with a group. For example:
- datasource (connect/disconnect)
- mongodb
- mysql
- server
- rest
- gRPC
We can then configure the application to trigger observers group by group as
configured by an array of groups in order such as ['datasource', 'server'].
For example,
app
  .bind('observers.MyObserver')
  .toClass(MyObserver)
  .tag({
    [CoreTags.LIFE_CYCLE_OBSERVER_GROUP]: 'g1',
  })
  .apply(asLifeCycleObserver);
The observer class can also be decorated with @injectable to provide binding
metadata.
import {injectable, createBindingFromClass} from '@loopback/core';
import {CoreTags, asLifeCycleObserver} from '@loopback/core';

@injectable(
  {
    tags: {
      [CoreTags.LIFE_CYCLE_OBSERVER_GROUP]: 'g1',
    },
  },
  asLifeCycleObserver,
)
export class MyObserver {
  // ...
}

app.add(createBindingFromClass(MyObserver));
Or even simpler with @lifeCycleObserver:
import {createBindingFromClass} from '@loopback/core';
import {lifeCycleObserver} from '@loopback/core';

@lifeCycleObserver('g1')
export class MyObserver {
  // ...
}

app.add(createBindingFromClass(MyObserver));
The order of observers is controlled by a orderedGroups property of
LifeCycleObserverRegistry, which receives its options including the
orderedGroups from CoreBindings.LIFE_CYCLE_OBSERVER_OPTIONS.
export type LifeCycleObserverOptions = {
  /**
   * Control the order of observer groups for notifications. For example,
   * with `['datasource', 'server']`, the observers in `datasource` group are
   * notified before those in `server` group during `start`. Please note that
   * observers are notified in the reverse order during `stop`.
   */
  orderedGroups: string[];
  /**
   * Notify observers of the same group in parallel, default to `true`
   */
  parallel?: boolean;
};
Thus the initial orderedGroups can be set as follows:
app
  .bind(CoreBindings.LIFE_CYCLE_OBSERVER_OPTIONS)
  .to({orderedGroups: ['g1', 'g2', 'server']});
Or:
const registry = await app.get(CoreBindings.LIFE_CYCLE_OBSERVER_REGISTRY);
registry.setOrderedGroups(['g1', 'g2', 'server']);
Observers are sorted using orderedGroups as the relative order. If an observer
is tagged with a group that is not defined in orderedGroups, it will come
before any groups included in orderedGroups. Such custom groups are also
sorted by their names alphabetically.
In the example below, orderedGroups is set to
['setup-servers', 'publish-services']. Given the following observers:
- ‘my-observer-1’ (‘setup-servers’)
- ‘my-observer-2’ (‘publish-services’)
- ‘my-observer-4’ (‘2-custom-group’)
- ‘my-observer-3’ (‘1-custom-group’)
The sorted observer groups will be:
{
  '1-custom-group': ['my-observer-3'], // by alphabetical order
  '2-custom-group': ['my-observer-4'], // by alphabetical order
  'setup-servers': ['my-observer-1'], // by orderedGroups
  'publish-services': ['my-observer-2'], // orderedGroups
}
The execution order of observers within the same group is controlled by
LifeCycleObserverOptions.parallel:
true(default): observers within the same group are notified in parallelfalse: observers within the same group are notified one by one. The order is not defined. If you want to have one to be invoked before the other, mark them with two distinct groups.
Add custom life cycle observers by convention
Each application can have custom life cycle observers to be dropped into
src/observers folder as classes implementing LifeCycleObserver.
During application.boot(), such artifacts are discovered, loaded, and bound to
the application context as life cycle observers. This is achieved by a built-in
LifeCycleObserverBooter extension.
CLI command to generate life cycle observers
To make it easy for application developers to add custom life cycle observers,
we introduce lb4 observer command as part the CLI.
$ lb4 observer
? Observer name: test
? Observer group: g1
   create src/observers/test.observer.ts
   update src/observers/index.ts

Observer test was created in src/observers/
See Life cycle observer generator for more details.