Page Contents
Overview
This article provides information on creating Android apps that can get push notifications from a LoopBack application. See Push notifications for information on creating the corresponding LoopBack server application.
To enable an Android app to receive LoopBack push notifications:
- Setup your app to use Google Play Services.
- On app startup, register with GCM servers to obtain a device registration ID (device token) and register the device with the LoopBack server application.
- Configure your LoopBack application to receive incoming messages from GCM.
- Process the notifications received.
Prerequisites
Before you start developing your application make sure you’ve performed all the prerequisite steps outlined in this section.
- Download the LoopBack Android SDK
- Install Eclipse development tools (ADT)
Configure Android Development Tools
Now configure Eclipse ADT as follows:
- Open Eclipse from the downloaded ADT bundle.
- In ADT, choose Window > Android SDK Manager.
-
Install the following if they are not already installed:
- Tools:
- Android SDK Platform-tools 18 or newer
- Android SDK Build-tools 18 or newer
- Android 4.3 (API 18):
- SDK Platform.
- Google APIs
- Extras:
- Google Play Services
- Intel x86 Emulator Accelerator (HAXM)
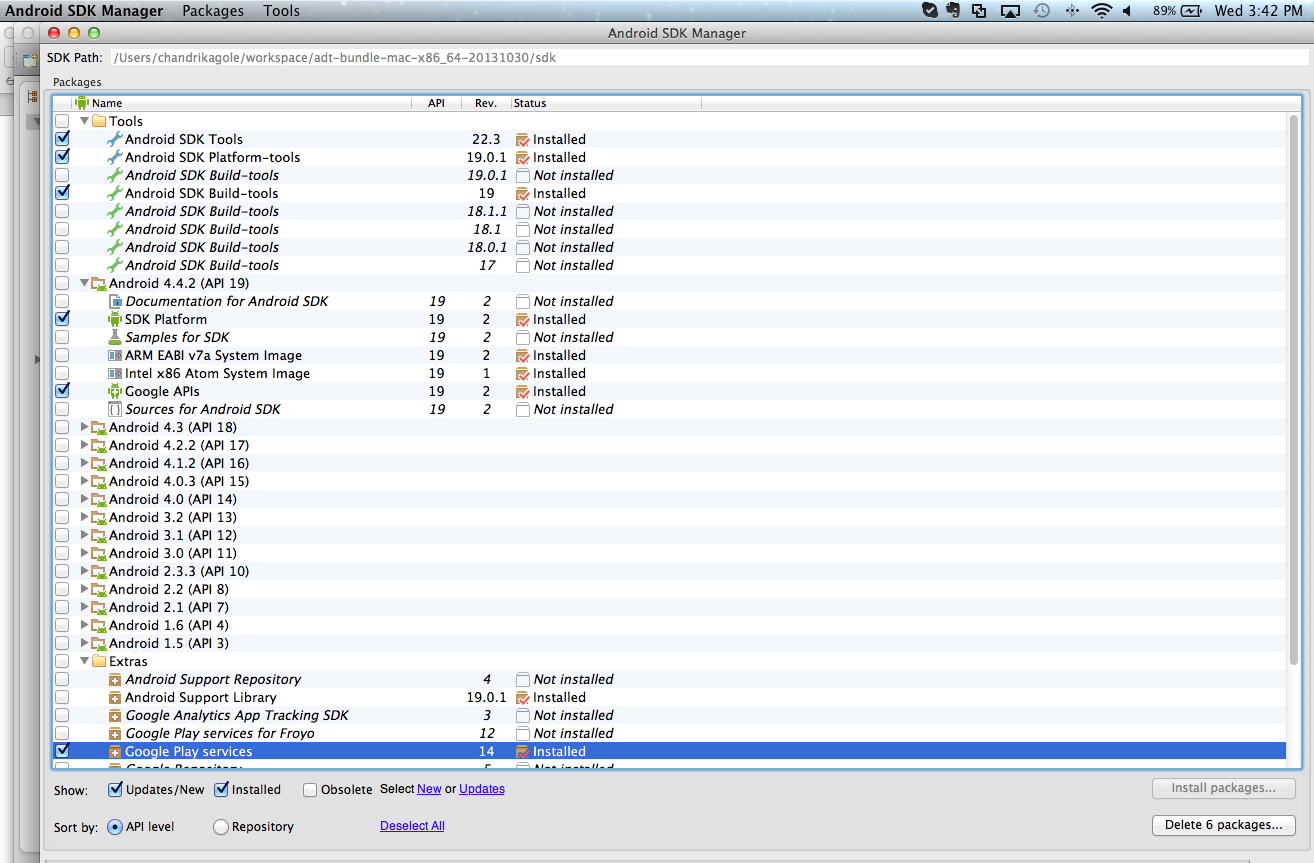
- Tools:
-
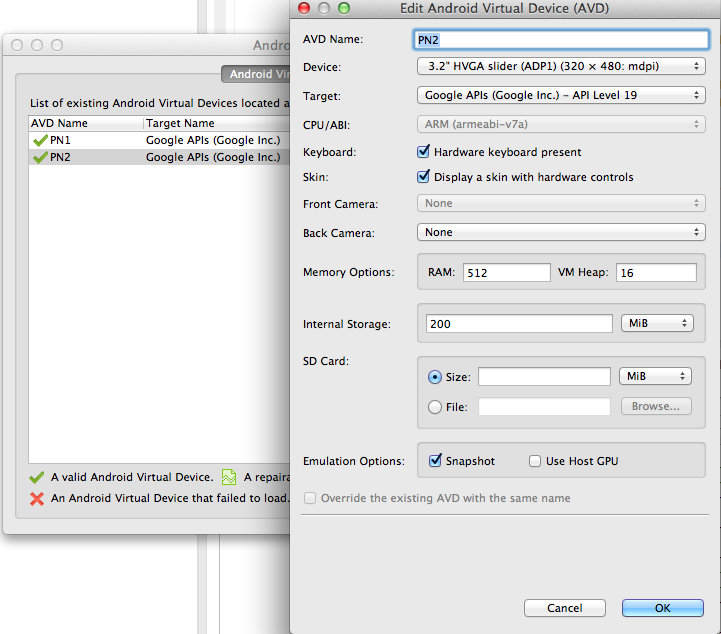
Before you start, make sure you have set up at least one Android virtual device: Choose Window > Android Virtual Device Manager.
- Configure the target virtual device as shown in the screenshot below.
See AVD Manager for more information.
 </figure>
Important:
If you are using the virtual device suggested above, you must also install the ARM EABI v7a System Image SDK.
Get your Google Cloud Messaging credentials
Open the Android Developer’s Guide To send push notifications to your Android app, you need to setup a Google API project and enable the Google Cloud Messaging (GCM) service.
Follow the instructions to get your GCM credentials:
-
Follow steps to create a Google API project and enable the GCM service.
-
Create an Android API key
- In the sidebar on the left, select APIs & auth > Credentials.
- Click Create new key.
- Select Android key.
-
Enter the SHA-1 fingerprint followed by the package name, for example
45:B5:E4:6F:36:AD:0A:98:94:B4:02:66:2B:12:17:F2:56:26:A0:E0;com.example NOTE: Leave the package name as “com.example” for the time being.
-
You also have to create a new server API key that will be used by the LoopBack server:
- Click Create new key.
- Select Server key.
- Leave the list of allowed IP addresses empty for now.
- Click Create.
- Copy down the API key. Later you will use this when you configure the LoopBack server application.
Install and run LoopBack Push Notification app
If you want to use the sample Android client app, download the Push Notification Example Android app. Then follow these steps to run the app:
-
Open ADT Eclipse.
-
Import the push notification application to your workspace:
- Choose File > Import.
- Choose Android > Existing Android Code into Workspace.
- Click Next.
- Browse to the example Android app you just downloaded.
-
Click Finish.
Important:
ADT does not take long to import the guide app. Don’t be misguided by the progress bar at the bottom of the IDE window: it indicates memory use, not loading status.
</div>
-
Import Google Play Services library project into your workspace. The project is located inside the directory where you have installed the Android SDK.
- Choose File > Import.
- Choose Android > Existing Android Code into Workspace.
- Click Next.
- Browse to the
<android-sdk>/extras/google/google_play_services/libproject/google-play-services_libdirectory. - Check Copy projects into workspace
- Click Finish.
See Google Play Services SDK for more details.
-
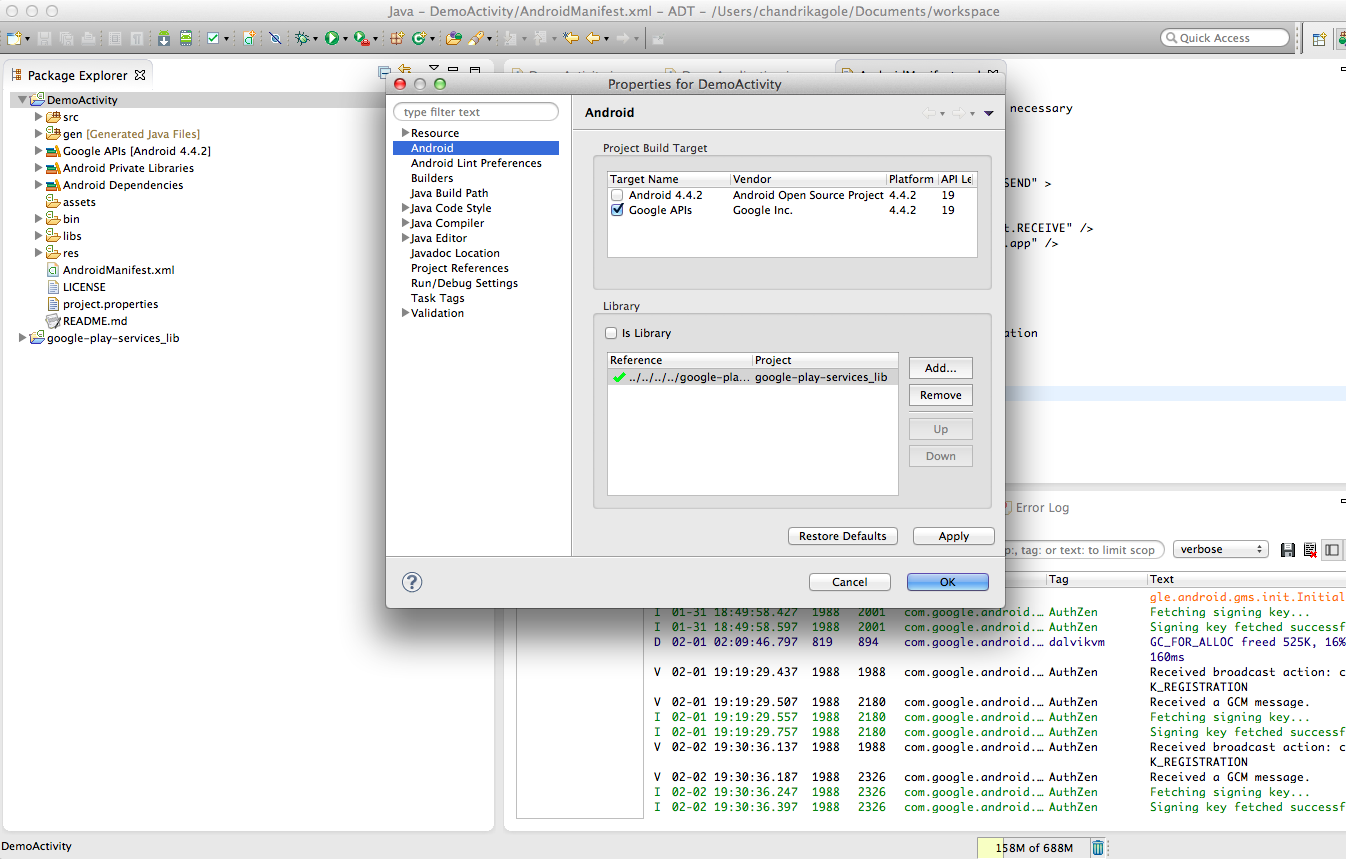
Add the imported google-play-services_lib as an Android build dependency of the push notification application.
- In the Package Explorer frame in Eclipse, select the push notification application.
- Choose File > Properties.
- Select Android.
- In the Library frame, click on Add… and select
google-play-services_lib. - Also under Project Build Target, set the target as Google APIs.
 </figure>
- Edit
src/com/google/android/gcm/demo/app/DemoActivity.java.- Set SENDER_ID to the project number from the Google Developers Console you created earlier in Get your Google Cloud Messaging credentials.
-
Go back to the https://cloud.google.com/console/project and edit the Android Key to reflect your unique application ID. Set the value of Android applications to something like this:
Android applications XX:XX:XX:XX:XX:XX:XX:XX:XX:XX:X
LOOPBACK_APP_ID
X:XX:XX:XX:XX:XX:XX:XX:XX:XX;com.google.android.gcm.demo.app.DemoApplication
-
Run the LoopBack server application you set up earlier. If you didn’t set the appName in the server application’s
config.jsearlier, do it now. Set it to “com.google.android.gcm.demo.app.DemoActivity”. - Click the green Run button in the toolbar to run the application. Run it as an Android application. You will be prompted to select the target on which to run the application. Select the AVD you created earlier.
Important:
It may take several minutes to launch your application and the Android virtual device the first time.
Warning:
Due to a known issue with Google Play Services, you must download and import an older version of Google Play services.
- Download https://dl-ssl.google.com/android/repository/google_play_services_3225130_r10.zip
- Extract the zip file.
- In Eclipse ADT, right-click on your project and choose Import…
- Choose Existing Android Code into Workspace then click Next.
- Click Browse…
- Browse to the
google-play-services/libproject/google-play-services_lib/directory created when you extracted the zip file and select it in the dialog box. - Click Finish.
You must also update AndroidManifest.xml as follows:
- In Eclipse ADT, browse to DemoActivity/AndroidManifest.xml.
- Change the line
<meta-data android:name="com.google.android.gms.version" android:value="@integer/google_play_services_version"/>to<meta-data android:name="com.google.android.gms.version" android:value="4030500"/> - Save the file.
Configure GCM push settings in your server application
Add the following key and value to the push settings of your application:
{
  gcm: {
    serverApiKey: "server-api-key"
  }
}
Replace server-api-key with the API key you obtained in Get your Google Cloud Messaging credentials.
Prepare your own Android project
Follow the instructions in Android SDK documentation to add LoopBack Android SDK to your Android project.
Follow the instructions in Google’s Implementing GCM Client guide for setting up Google Play Services in your project.
Important:
To use push notifications, you must install a compatible version of the Google APIs platform. To test your app on the emulator, expand the directory for Android 4.2.2 (API 17) or a higher version, select Google APIs, and install it. Then create a new AVD with Google APIs as the platform target. You must install the package from the SDK manager. For more information, see Set Up Google Play Services.
Check for Google Play Services APK
Applications that rely on the Google Play Services SDK should always check the device for a compatible Google Play services APK before using Google Cloud Messaging.
For example, the following code checks the device for Google Play Services APK by calling checkPlayServices() if this method returns true, it proceeds with GCM registration.
The checkPlayServices() method checks whether the device has the Google Play Services APK.
If it doesn’t, it displays a dialog that allows users to download the APK from the Google Play Store or enables it in the device’s system settings.
@Override
public void onCreate(final Bundle savedInstanceState) {
    super.onCreate(savedInstanceState);
    setContentView(R.layout.main);

    if (checkPlayServices()) {
        updateRegistration();
    } else {
        Log.i(TAG, "No valid Google Play Services APK found.");
    }
}
private boolean checkPlayServices() {
    int resultCode = GooglePlayServicesUtil.isGooglePlayServicesAvailable(this);
    if (resultCode != ConnectionResult.SUCCESS) {
        if (GooglePlayServicesUtil.isUserRecoverableError(resultCode)) {
            GooglePlayServicesUtil.getErrorDialog(resultCode, this,
                    PLAY_SERVICES_RESOLUTION_REQUEST).show();
        } else {
            Log.i(TAG, "This device is not supported.");
            finish();
        }
        return false;
    }
    return true;
}
Create LocalInstallation
Once you have ensured the device provides Google Play Services, the app can register with GCM and LoopBack (for example, by calling a method such as updateRegistration() as shown below).
Rather than register with GCM every time the app starts, simply store and retrieve the registration ID (device token).
The LocalInstallation class in the LoopBack SDK handles these details for you.
For more information on LocallInstallation, see Working with the LocalInstallation class.
The example updateRegistration() method does the following:
- Lines 3 - 4: get a reference to the shared
RestAdapterinstance. - Line 5: Create an instance of
LocalInstallation. - Line 13: Subscribe to topics.
- Lines 15-19: Check if there is a valid GCM registration ID. If so, then save the installation to the server; if not, get one from GCM and then save the installation.
private void updateRegistration() {

    final DemoApplication app = (DemoApplication) getApplication();
    final RestAdapter adapter = app.getLoopBackAdapter();
    final LocalInstallation installation = new LocalInstallation(context, adapter);

    // Substitute the real ID of the LoopBack application as created by the server
    installation.setAppId("loopback-app-id");

    // Substitute a real ID of the user logged in to the application
    installation.setUserId("loopback-android");

    installation.setSubscriptions(new String[] { "all" });

    if (installation.getDeviceToken() != null) {
        saveInstallation(installation);
    } else {
        registerInBackground(installation);
    }
}
Register with GCM if needed
In the following code, the application obtains a new registration ID from GCM.
Because the register() method is blocking, you must call it on a background thread.
private void registerInBackground(final LocalInstallation installation) {
    new AsyncTask<Void, Void, Exception>() {
        @Override
        protected Exception doInBackground(final Void... params) {
            try {
                GoogleCloudMessaging gcm = GoogleCloudMessaging.getInstance(this);
                // substitute 12345 with the real Google API Project number
				final String regid = gcm.register("12345");
                installation.setDeviceToken(regid);
                return null;
            } catch (final IOException ex) {
                return ex;
                // If there is an error, don't just keep trying to
                // register.
                // Require the user to click a button again, or perform
                // exponential back-off.
            }
        }
        @Override
        protected void onPostExecute(final Exception error) {
            if (err != null) {
                Log.e(TAG, "GCM Registration failed.", error);
            } else {
                saveInstallation(installation);
            }
        }
    }.execute(null, null, null);
}
Register with LoopBack server
Once you have all Installation properties set, you can register with the LoopBack server.
The first run of the application should create a new Installation record, subsequent runs should update this existing record.
The LoopBack Android SDK handles the details. Your code just needs to call save().
void saveInstallation(final LocalInstallation installation) {
    installation.save(new Model.Callback() {
        @Override
        public void onSuccess() {
            // Installation was saved.
            // You can access the id assigned by the server via
            //   installation.getId();
        }
        @Override
        public void onError(final Throwable t) {
            Log.e(TAG, "Cannot save Installation", t);
        }
    });
}
Handle received notifications
Android apps handle incoming notifications in the standard way; LoopBack does not require any special changes. For more information, see the section “Receive a message” of Google’s Implementing GCM Client guide.
Troubleshooting
When running your app in the Eclipse device emulator, you may encounter the following error:
Google Play services, which some of your applications rely on, is not supported by your device. Please contact the manufacturer for assistance.
To resolve this, install a compatible version of the Google APIs platform. See Prepare your Android project for more information.