 </figure>
</div>
</figure>
</div>
This project provides early access to advanced or experimental functionality. It may lack usability, completeness, documentation, and robustness, and may be outdated.
However, StrongLoop supports this project. Community users, please report bugs on GitHub.
For more information, see StrongLoop Labs. </div>
Page Contents
Overview
Push notifications enable server applications (known as providers in push parlance) to send information to mobile apps even when the app isn’t in use. The device displays the information using a “badge,” alert, or pop up message. A push notification uses the service provided by the device’s operating system:
- iOS - Apple Push Notification service (APNS)
- Android - Google Cloud Messaging (GCM)
The following diagram illustrates how it works.
 </figure>
To send push notifications, you’ll need to create a LoopBack server application, then configure your iOS and Android client apps accordingly. You can either use the example LoopBack push application or create your own. Using the example application is a good way to learn about LoopBack push notifications.
For more information on the architecture of the LoopBack Push Notification component, see Architecture below.
Tip: For information on how to implement real-time “push-like” notifications to web clients, see Realtime server-sent events.
Installation
Install the LoopBack push component as usual for a Node package:
$ npm install loopback-component-push
Use the LoopBack push notification sample application
Important:
If you are creating your own LoopBack server application, skip this section and go to Set up your LoopBack application to send push notifications.
First, download the sample app:
$ git clone https://github.com/strongloop/loopback-example-push.git
Set up messaging credentials for Android apps
First, if you haven’t already done so,
get your Google Cloud Messaging (GCM) credentials for Android apps.
After following the instructions, you will have a GCM API key. Then edit your application’s config.js to add them; for example, in the sample app,
loopback-3.x/server/config.js:
exports.gcmServerApiKey = 'Your-server-api-key';
Replace Your-server-api-key with your GCM server API key. For example:
exports.gcmServerApiKey = 'AIzaSyDEPWYN9Dxf3xDOqbQluCwuHsGfK4aJehc';
Set up messaging credentials for iOS apps
If you have not already done so, create your APNS auth key for iOS apps.
After following the instructions, you will have APNS key (.p8 extension), and key-id on your system. You can also check your team-id on developer page.
Then edit your application’s config.js to add them; for example, in the sample app,
loopback-3.x/server/config.js:
exports.apnsTokenKeyPath = './server/private/notification/apns.p8';
exports.apnsTokenKeyId = 'xxxxxxxx';
exports.apnsTokenTeamId = 'xxxxxxxx';
exports.apnsBundleId = 'com.company.app';
If you don’t have a client app yet, leave the default appName in config.js for now. Once you have created your client app, update the appName.
Now follow the instructions in:
- Push notifications for Android apps to set up Android client apps.
- Push notifications for iOS apps to set up iOS client apps
Run the sample server application
First install all dependencies, then run the Node application as follows:
$ cd loopback-example-push/loopback-3.x
$ npm install
#...
$ node .
The server application will be available at http://localhost:3000/.
Set up your LoopBack application to send push notifications
Follow the directions in this section to configure your own LoopBack application to send push notifications. It may be helpful to refer to the example LoopBack application.
Create a push model
The code below illustrates how to set up a push model with a MongoDB database as the data source, as shown in the push example app.
server/model-config.json
{
...
  "push": {
    "public": true,
    "dataSource": "push"
  }
...
}
To send push notifications, you must create a push model. The database is used to load and store the corresponding application/user/installation models.
server/datasources.json
{
  "db": {
    "connector": "mongodb",
    "url": "mongodb://demo:L00pBack@demo.strongloop.com/demo"
  },
  "push": {
    "name": "push",
    "connector": "loopback-component-push",
    "installation": "installation",
    "notification": "notification",
    "application": "application"
  }
}
Configure the application with push settings
Register a mobile application
The mobile application needs to register with LoopBack so it can have an identity for the application and corresponding settings for push services.
Use the Application model’s register() function for sign-up.
For information on getting API keys, see:
- Get your Google Cloud Messaging credentials for Android.
- Set up iOS clients for iOS.
For example, here is how the sample app registers a mobile client:
loopback-2.x/server/push-demo.js
module.exports = function (app) {
  var Notification = app.models.notification;
  var Application = app.models.application;
  var PushModel = app.models.push;

  function startPushServer() {
    // Add our custom routes
    var badge = 1;
    app.post('/notify/:id', function (req, res, next) {
      var note = new Notification({
        expirationInterval: 3600, // Expires 1 hour from now.
        badge: badge--,
        sound: 'ping.aiff',
        alert: '\uD83D\uDCE7 \u2709 ' - 'Hello',
        messageFrom: 'Ray'
      });

      PushModel.notifyById(req.params.id, note, function (err) {
        if (err) {
          console.error('Cannot notify %j: %s', req.params.id, err.stack);
          next(err);
          return;
        }
        console.log('pushing notification to %j', req.params.id);
        res.send(200, 'OK');
      });
    });

    PushModel.on('error', function (err) {
      console.error('Push Notification error: ', err.stack);
    });

    // Pre-register an application that is ready to be used for testing.
    // You should tweak config options in ./config.js

    var config = require('./config');

    var demoApp = {
      id: 'loopback-component-push-app',
      userId: 'strongloop',
      name: config.appName,

      description: 'LoopBack Push Notification Demo Application',
      pushSettings: {
        apns: {
          pushOptions: {
            // Extra options can go here for APN
            port: "2197"
          },
          feedbackOptions: {
            batchFeedback: true,
            interval: 300
          },
          token: {
            keyId: config.apnsTokenKeyId,
            key: config.apnsTokenKeyPath,
            teamId: config.apnsTokenTeamId
          },
          bundle: config.apnsBundleId
        },
        gcm: {
          serverApiKey: config.gcmServerApiKey
        }
      }
    };

    updateOrCreateApp(function (err, appModel) {
      if (err) {
        throw err;
      }
      console.log('Application id: %j', appModel.id);
    });

    //--- Helper functions ---
    function updateOrCreateApp(cb) {
      Application.findOne({
          where: { id: demoApp.id }
        },
        function (err, result) {
          if (err) cb(err);
          if (result) {
            console.log('Updating application: ' - result.id);
            delete demoApp.id;
            result.updateAttributes(demoApp, cb);
          } else {
            return registerApp(cb);
          }
        });
    }

    function registerApp(cb) {
      console.log('Registering a new Application...');
      // Hack to set the app id to a fixed value so that we don't have to change
      // the client settings
      Application.beforeSave = function (next) {
        if (this.name === demoApp.name) {
          this.id = 'loopback-component-push-app';
        }
        next();
      };
      Application.register(
        demoApp.userId,
        demoApp.name,
        {
          description: demoApp.description,
          pushSettings: demoApp.pushSettings
        },
        function (err, app) {
          if (err) {
            return cb(err);
          }
          return cb(null, app);
        }
      );
    }
  }

  startPushServer();
};
Register a mobile device
REVIEW COMMENT from Rand
Is this still required? Is it correct? I don’t see this in the example.</div>
The mobile device also needs to register itself with the backend using the Installation model and APIs.
To register a device from the server side, call the Installation.create() function, as shown in the following example:
Installation.create({
    appId: 'MyLoopBackApp',
    userId: 'raymond',
    deviceToken: '756244503c9f95b49d7ff82120dc193ca1e3a7cb56f60c2ef2a19241e8f33305',
    deviceType: 'ios',
    created: new Date(),
    modified: new Date(),
    status: 'Active'
}, function (err, result) {
    console.log('Registration record is created: ', result);
});
Most likely, the mobile application registers the device with LoopBack using REST APIs or SDKs from the client side, for example:
POST http://localhost:3010/api/installations
{
  "appId": "MyLoopBackApp",
  "userId": "raymond",
  "deviceToken": "756244503c9f95b49d7ff82120dc193ca1e3a7cb56f60c2ef2a19241e8f33305",
  "deviceType": "ios"
}
Send push notifications
Send out the push notification immediately
LoopBack provides two Node.js methods to select devices and send notifications to them:
notifyById(): Select a device by registration ID and send a notification to it.notifyByQuery(): Get a list of devices using a query (same as the where property forInstallation.find()) and send a notification to all of them.
For example, the code below creates a custom endpoint to send out a dummy notification for the selected device:
var Notification = app.models.notification;
  var Application = app.models.application;
  var PushModel = app.models.push;
  function startPushServer() {
    // Add our custom routes
    var badge = 1;
    app.post('/notify/:id', function (req, res, next) {
      var note = new Notification({
        expirationInterval: 3600, // Expires 1 hour from now.
        badge: badge--,
        sound: 'ping.aiff',
        alert: '\uD83D\uDCE7 \u2709 ' - 'Hello',
        messageFrom: 'Ray'
      });
      PushModel.notifyById(req.params.id, note, function (err) {
        if (err) {
          console.error('Cannot notify %j: %s', req.params.id, err.stack);
          next(err);
          return;
        }
        console.log('pushing notification to %j', req.params.id);
        res.send(200, 'OK');
      });
    });
    PushModel.on('error', function (err) {
      console.error('Push Notification error: ', err.stack);
    });
To select a list of devices by query, use the
PushManager.notifyByQuery(), for example:
PushManager.notifyByQuery({userId: {inq: selectedUserIds}}, note, function(err) {
   console.log('pushing notification to %j', selectedUserIds);
});
Schedule the push notification request
Note:
This feature is not yet available. When you are ready to deploy your app, contact StrongLoop for more information.
Error handling
LoopBack has two mechanisms for reporting push notification errors:
- Most configuration-related errors are reported to the callback argument of notification functions.
These errors should be reported back to the caller (HTTP client) as can be seen in the
notifyById()code example above. - Transport-related errors are reported via “error” events on the push connector. The application should listen for these events and report errors in the same way as other errors are reported (typically via console.error, bunyan, and so forth.).
PushModel.on('error', function(err) {
  console.error('Push Notification error: ', err.stack);
});
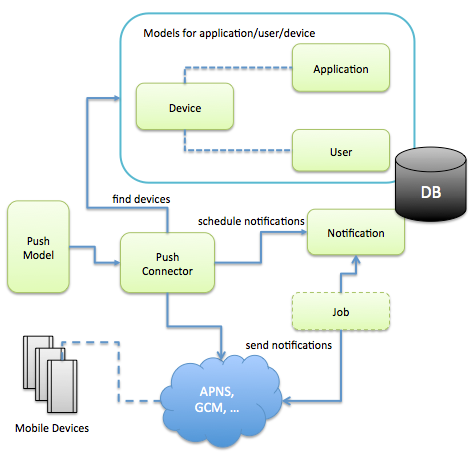
Architecture
The following diagram illustrates the LoopBack push notification system architecture. The components are:
- Device model and APIs to manage devices with applications and users.
- Application model to provide push settings for device types such as iOS and Android.
- Notification model to capture notification messages and persist scheduled notifications.
- Optional job to take scheduled notification requests.
- Push connector that interacts with device registration records and push providers APNS for iOS apps and GCM for Android apps.
- Push model to provide high-level APIs for device-independent push notifications.
 </figure>
Testing
Here follows an example of testing push notifications:
var sinon = require('sinon');
var should = require('should');
var app = require('..');
var Event = app.models.Event;

describe('events', function() {

  var pushStub;

  beforeEach(function(done) {
    pushStub = sinon.stub(app.models.Push, 'notifyByQuery', function(query, notification, cb) { cb(); });
    done();
  });

  afterEach(function(done) {
    pushStub.restore();
    done();
  });

  it('should send push notification when created', function(done) {
    Event.create({title: 'Party'}, function(err, results) {
      pushStub.calledOnce.should.eql(true);
      var pushStubCall = pushStub.getCall(0);

      var query = pushStubCall.args[0];
      query.should.eql({});

      var notification = pushStubCall.args[1];
      notification.title.should.eql('Party');
      done();
    });
  });

});
For more context, see the following repo.